FAQ: get started
For details on getting started with 8x8 Work for Desktop, refer to our following FAQ items.
The application is supported on computers that run Windows 10 or newer, or Mac OS 10.13 High Sierra or newer. For details, please refer to our system requirements for 8x8 Work for Desktop.
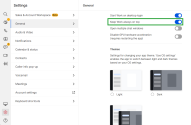
To grant yourself the quickest access to 8x8 Work for Desktop, Go to Settings  > General tab and enable the option to Start Work on desktop login. With this setting enabled, 8x8 Work for Desktop launches automatically whenever you start your computer.
Depending on when your version of 8x8 Work for Desktop reaches its end-of-life date, you receive a different message upon opening the app:
- If your version's end-of-life date is two weeks or fewer away, you see a banner notification that indicates the upcoming end-of-life date.
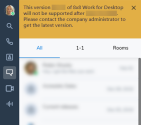
- If your version has just reached its end-of-life date, you see a notification that you have up to a week remaining to continue using your current version.

- If your version has reached end-of-life more than a week ago, you are no longer able to use your current version of the app, and must upgrade.
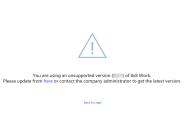
Note: If your organization opts out of an update to the app, you are not able to upload the app to the version blocked by your organization.
If you do not hear sound with your desktop notifications for 8x8 Work for Desktop on Windows 10 or Mac, you must enable an additional setting in your system preferences to enable sound for 8x8 Work notifications, and then set the volume of the notifications from your system audio preferences.
Note: Changing notification volume from your system preferences affects notifications from all your applications in addition to 8x8 Work for Desktop.
To enable notification sounds on Windows 10:
- On your PC, go to Settings > System > Notifications & Actions, and scroll down to the Notifications section.
- Under Notifications, enable the option to get notifications from apps.
- Under Get notifications from these senders, enable the option for 8x8 Work for Desktop, then click the app icon next to the option slider to view more settings.

- In the 8x8 Work settings that open, enable the option to play notification sounds.
- Go back to Settings > System, and go to Sound.
- In your sound settings, scroll down to the Other sound options section, and click App volume and device preferences.

- From the app volume settings, set the desired notification volume and speaker. The setting takes effect immediately.
To enable notification sounds on Mac:
- On your Mac, go to System Preferences > Notifications.
- In the list of applications, select 8x8 Work.
- In the notification settings for 8x8 Work, enable the option to play sound for notifications.
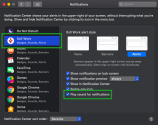
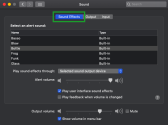
- Go back to System Preferences, and go to Sound.
- Under the Sound Effects tab of your system sound settings, set the desired notification sound, speaker, and volume. The setting takes effect immediately.
If you want to change the length of time for which 8x8 Work notifications (on Windows 10) or banners (on Mac) appear on your screen, you can configure the notification display duration in your computer's system preferences.
Note: Changing notification duration from your system preferences affects notifications from all your applications in addition to 8x8 Work for Desktop.
Note: On Mac, this setting only applies to banner-style notifications, as alert-style notifications display indefinitely until you close them.
To set notification display duration on Windows 10:
- On your PC, go to Settings > Ease of Access, and scroll down to Simplify and personalize Windows.
- Under Simplify and personalize Windows, click the drop-down next to Show notifications for to open a menu.

- From the drop-down, select the desired notification display duration. The setting takes effect immediately.
To set banner display duration on Mac:
- On your Mac, open Terminal.
-
When you are at the command prompt, use the following string to set your display duration:
defaults write com.apple.notificationcenterui bannerTime [time in seconds]
-
To set a custom duration, replace
[time in seconds]in the string with the desired number of seconds. For example, to set the banner display duration to 15 seconds, your string would appear as follows:defaults write com.apple.notificationcenterui bannerTime 15
-
To reset the duration to the system default, simply leave the string's
[time in seconds]value empty:defaults write com.apple.notificationcenterui bannerTime
-
- Press the Return key to execute the command.
- For the change to take effect across all applications, restart your Mac.
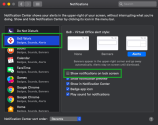
If you want to prevent 8x8 Work notifications from appearing on the lock screen of your computer on Windows 10 or Mac, you can disable lock screen notifications for the app in your computer's system preferences.
Note: On Windows, changing notification lock screen settings from your system preferences affects all your applications in addition to 8x8 Work for Desktop.
To disable lock screen notifications on Windows 10:
- On your PC, go to Settings > System > Notifications & Actions, and scroll down to the Notifications section.
- Under Notifications, disable the option to show notifications on your lock screen. The setting takes effect immediately.

To disable lock screen notifications on Mac:
Let’s say you prefer or need to use your keyboard rather than a mouse; 8x8 Work for Desktop supports keyboard navigation in the following areas:
- Cycle through and open tabs and sub-tabs: Press the Tab key to cycle through the tabs and sub-tabs visible in the app, and press Enter to open the highlighted tab or sub-tab.
- Search contacts and navigate search results:
- Press Ctrl+S to open your search screen, type the name of a contact, and press Enter.
- Press the Down and Up arrow keys to go through your search results.
- Once you reach the contact you want, press Right and Left to switch between the options to Call
 or Message
  the contact, or see More options
  (opened by pressing the Enter key), from which you can choose to Meet now or view Contact info.
 - Once you highlight the action you want, press Enter to confirm.
To make changes in your profile page, click the profile image icon in the header. This opens your profile, where you can:
Click your profile image icon in the header. In the profile page that opens up, you can view your 8x8 phone number and extension.
If some of the keyboard shortcuts available for 8x8 Work for Desktop overlap with shortcuts used for other applications on your computer, entering a shortcut intended for 8x8 Work may bring up a different application instead. In order to avoid such conflicts, be aware of any shortcut overlap between 8x8 Work for Desktop and your other applications.
If a keyboard shortcut you need to use for 8x8 Work conflicts with a duplicate shortcut in another application, edit the shortcut in the other app (if the app permits shortcut editing). This enables you to use the original shortcut with 8x8 Work for Desktop without conflicts.
In order to give your contacts more information on your presence status, you can write a custom status message from your profile page.
To set a custom status message:
- Click the profile image icon in the header to access your profile.
- In the page that opens, you can enter a status message that is visible to other users in the contact directory, your contact details, and chat history, as well as when you show up in a user's search results.
Your custom status message remains until you change it.
Depending on your selection of status from the profile page, or your actions in 8x8 Work, your presence status changes. Except for the Available status, a status you set manually remains the same until you change it again. However, system-set statuses show up automatically when triggered by an action in 8x8 Work (such as a phone call), and disappear once the action has ended.
Note: A system-set status (such as Busy or On Call) does not automatically display if you have manually set a status other than Available.
| Status | System-Set or Manual | Description |
|---|---|---|
|
|
Both | Show other users that you are available to reach out to. When you select this status, you automatically appear as On Call while on a call, as Busy while in a meeting, and as Away if you are inactive for a certain period of time. |
|
|
Manual | Show other users that you are very busy. Calls are routed to voicemail, and desktop notifications are disabled for all incoming 8x8 communications. This status remains active until you change it. |
|
|
Both | Show other users that you are busy. You can still receive communications from other users. This status remains active until you change it. |
|
|
System-set | Show other users that you are currently on a call by placing or receiving a phone call. You can still receive communications from other users. This status remains active until your call ends. |
|
|
Both |
Manually show other users that you are temporarily unavailable. If set manually, this status remains active until you change it. You can also set this status to display automatically after a period of time from your profile. If set automatically, this status remains active until you interact with the app. |
|
|
Manual | Hide your presence status. You appear to be offline to other users. This status remains active until you change it. |
|
|
System-set | Show other users that you are offline by logging out or quitting the app. You receive no communications from other users. This status remains active until you open the app and log in. |
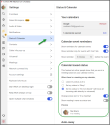
Let's say you frequently schedule events in your calendar, and you want those calendar events to reflect on your presence status in 8x8 Work so your colleagues know when you are available; once you sync your usual calendar with 8x8 Work, you can set up your presence status to automatically reflect scheduled events in that calendar!
Set up your calendar-based status when you have a calendar event
- Go to Settings
 Status & Calendar to open your status settings.
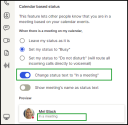
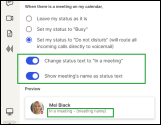
 - Under Calendar based status, select your presence status behaviour when you have a calendar event:
- Leave my status as it is: Ignore calendar events.
- Set my status to "Busy": Set your status to Busy when an event comes up in your calendar.
Set my status to "Do not disturb": Set your status to Do not disturb when an event comes up in your calendar; this routes all incoming calls directly to your voicemail, and disables desktop notifications for incoming 8x8 communications.
-
If you select the options for Busy or Do not disturb, you may also choose whether to display In a meeting as your custom status message, or additionally include the name of the meeting in your custom status message as well.
Note: 8x8 administrators can control user access to the Do not disturb (DND) status and calendar availability in the 8x8 Work for Desktop app globally, via the 8x8 Admin Console or by editing the 8x8workconfig.json file. If disabled, DND status and calendar options will be removed from the user interface. To learn how to manage settings for 8x8 Work applications, see Configure Work Apps Settings. To learn more about setting system requirements by 8x8 Work admins, see About system requirements.
If you want to show other users in the company that you are currently busy (for example, working on a deadline), you can change your presence status from your profile. If you want to include more details, you can also set a custom status message.
To let company contacts know you are busy:
- Click the profile image icon in the header to access your profile.
- In the panel that opens, select:
- Busy: You can still receive calls and messages from other users.
- Do not disturb: Calls are routed to voicemail, and desktop notifications are disabled for all incoming 8x8 communications.
Notes:
- If you set your status to Available, your status automatically changes to indicate when you are active, inactive for a certain time, or busy on a call or in a meeting
- 8x8 administrators can control user access to the Do not disturb (DND) status and calendar availability in the 8x8 Work for Desktop app globally, via the 8x8 Admin Console or by editing the 8x8workconfig.json file. If disabled, DND status and calendar options will be removed from the user interface. To learn how to manage settings for 8x8 Work applications, see Configure Work Apps Settings. To learn more about setting system requirements by 8x8 Work admins, see About system requirements.. - If you want to entirely stop your 8x8 Work communications, you must quit or log out of the app.
If other users incorrectly see you as unavailable (and/or you see everyone else as unavailable), this can indicate an issue with your status synchronizing. If the problem persists, log out and log back in.
To log out:
- Click the profile image icon in the header to access your profile.
- In the panel that opens, select Log out.
To enhance your 8x8 Work experience, sync your usual calendar app, such as Google Calendar or Office 365, with 8x8!
Once you sync your calendar, you can schedule meetings via 8x8 Meet and view upcoming calendar events directly from 8x8 Work. In addition, once you sync your calendar, you can configure your presence status to automatically show as Busy or Do not disturb when 8x8 Work detects an event in your calendar!
To sync your calendar with 8x8 Work:
- Open your list of Meetings
 , or open the Settings
  tab and go to Status or Meetings.
 - In the page that opens, click Sync Calendar to open a calendar permissions prompt.
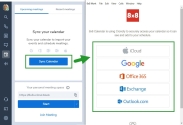
- At the prompt, select your usual calendar app, and continue through the prompts to sync your calendar.
Once your calendar is synced, you can view your upcoming calendar events and enhance them with 8x8 Meet!
Expanded Mode and Compact Mode are simply two different ways to view the application, based on the size of the application window. Compact Mode allows you to access all features of the app in a smaller window that takes up less space on your screen, while Expanded Mode shows more of the app at once. To switch to your preferred view of the application, you can:
- Click and drag the edge of the application window to make it wider or narrower; the content of the application window adapts in response.
- Go to View in the top menu bar of the app (accessible on Windows by selecting the app and pressing the Alt key), and selecting Expanded Mode or Compact Mode from the resulting drop-down menu; the application window switches between two preset sizes in response.
If your organization is a Virtual Office Classic customer, from your settings, you can view which services are included in your company's 8x8 Work subscription.
-
Open your 8x8 Account Settings app to access your account settings.
Note: If you do not have the 8x8 Account Settings app downloaded, go to Settings
 > Account settings and open the download page for the app.
 - Under My Services > Current Plan Includes, you can view the services offered in your 8x8 Work subscriptions.
Call forwarding settings are located under Settings  > Account settings. Depending on whether you are an X Series, Virtual Office Editions, or Virtual Office Classic user, you have access either to basic or advanced call forwarding rules.
Note: If you are a Virtual Office Classic user, download the 8x8 Account Settings app by going to Settings  > Account settings and opening the download page for the app.
You can send 8x8 your ideas, suggestions, and potential improvements for 8x8 Work in a feedback form in one or two clicks from anywhere in the app. If needed, you can click to contact 8x8 Support for assistance at the top of the feedback form.
To open the feedback form, simply click Send Feedback in the navigation bar.
Starting with version 5.0, 8x8 Work for Desktop moves towards a conversation-focused experience; as such, the first thing you see upon logging in is your list of recent messages.
The application is a 32-bit executable, and is compatible with 32-bit and 64-bit Windows.
Older versions of the application did not support Windows XP or Windows 2008 Server, but it would still run on those operating systems, unsupported.
Starting with version 5.0, however, the app does not install or run on Windows XP or Windows 2008 Server.
