Get started with 8x8 Contact Center for Zendesk
Once you have access to 8x8 Contact Center for Zendesk, follow the checklist below to get started:
- Before you begin
- Log in to the integration
- Tour the interface
- Check the integration connection
- Customize the integration settings
- Set up a phone to receive calls
- Check your queue assignments
Before you begin
To use the integration, you need:
- Login access to a Zendesk account.
- Login access to an 8x8 Contact Center extension.
Log in to the integration
Single Sign-On is supported for 8x8 Contact Center users with unified login.
To log in to 8x8 Contact Center for Zendesk:
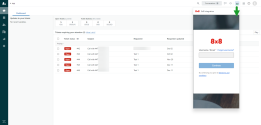
- Click the 8x8 Integration
 icon from the top-right corner of your home screen.
-
If you are not using Single Sign-On, you are prompted to enter your user ID and password to log in to the 8x8 Contact Center for Zendesk. Consult your supervisor for credentials.
Note: Multiple invalid login attempts may lock you out.
-
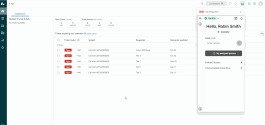
The 8x8 Contact Center app launches in a floating window and places you in the On Break status.
- Click Ready to work or Work Offline to change your status.
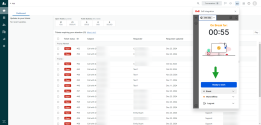
For more information on agent status and an overview of 8x8 Agent Workspace, refer to our User Guide. The integration app enables agents to use a graphical user interface (GUI) to manage customer interactions across all channels.
Tour the interface
The 8x8 Contact Center app for Zendesk consists of a control panel with the following menu items:
- Change status (status menu): Use to change your status, access My profile options, and log out of the application.
- Show dashboard: Use to access the agent dashboard and view a list of available agents and queues in a single panel.
- Show notifications: Use to view broadcast notifications, or send notifications to your agent group.
- My assigned queues: Use to view the queues that are assigned to you.
- Contacts: Use to access the list of all agents by group, the most recent contacts, and your favorite contacts. You can search for an agent, call, text, or mark them as favorite from the contacts directory.
- Add interaction: Use to start an interaction. Enter a phone number and call, or send an email or an outbound SMS.
- Show menu: Use to access the following action items:
- My recordings: Allows agents to record messages to be played to customers.
- My assigned queues: Lists the queues that are assigned to the agent, grouped by media such as inbound phone, outbound phone, chat, email, or voicemail.
- Knowledge base: Allows agents to access FAQs from a separate window. In this window, you can also create new support categories or FAQs.
- Monitoring (supervisors only): Allows agents to display the queue management, campaign management, and agent management tool in a separate browser window. Supervisors use the monitoring window to review and actively monitor agents, queues, groups, and campaigns.
- Campaign Reports (supervisors only): Allows agents to display the campaign report wizard.
- Customer experience: Allows access to the 8x8 Customer Experience app. Customer Experience provides contact center agents with a detailed view of recent calls with full filtering options, helping agents assess and improve their performance and quickly find the call detail information. The agents can launch the 8x8 Customer Experience from the 8x8 Contact Center app, eliminating the need for a separate login.
- CC Analytics: Allows access to the 8x8 Analytics for Contact Center platform. In 8x8 Analytics for Contact Center, agents can see their own performance metrics, while supervisors can track the performance of their agents and contact center.
- Video history: Opens the history list of video interactions.
- User guide: Opens the User guide in a new window.
- Support: Opens the 8x8 knowledge base support website in a new window.
- Send feedback: Allows agents to send product feedback and suggestions directly to our developers, and attach images or debug logs.
Check the integration connection with Zendesk
If your admin configured the integration, when you log in to the 8x8 Contact Center app, it automatically connects to Zendesk. The authentication window displays briefly in a separate tab. When connected to Zendesk, the window closes. If the integration disconnects, you can manually reconnect it.
To reconnect the integration:
- In the 8x8 Contact Center app, go to Change status
 > My profile.
 - In the window that displays, click the Integrations tab.
- Click Reconnect.
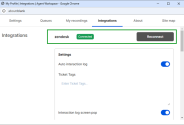
When connected, the system displays Connected in green in the Integrations section.
Customize the integration settings
You can enable automatic call logs and create ticket tags in your settings.
To view and change integration settings:
- In the 8x8 Contact Center app, go to Change status
 > My profile.
 - In the window that displays, click the Integrations tab.
- Under Settings, configure the following options:
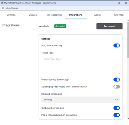
- Auto interaction log: Enable this option to automatically generate a log for all phone calls, chat interactions, and voicemails. A call log includes information about the time a call was initiated, terminated, duration, queue name, and more. A chat log includes the chat time and transcript. Just like a phone log, the voicemail log includes information about the time a call was initiated, terminated, duration, queue name, and more. This option is enabled by default.
- Ticket Tags: Ticket tags are additional information or call outcomes injected by agents during an interaction. Ticket tags display in the call log after this field is set up under the integration. In the Enter Ticket Tags field, enter the names of each ticket tag separated by semicolons. For example, you can define ticket tags for a call as <Voicemail; Wrong number; No answer>. For details, see our content on how to create ticket tags.
Once ticket tags have been created, a new agent-injected data (AID) field appears in the Wrap Up list during or after a call. This information feeds into the call ticket in the same way as the other AID fields. - Interaction log screen pop: This option automatically screen pops the newly created interaction log. Auto interaction log must be enabled for the screen pop to display. This option is enabled by default.
- screen pop first record in list in multi-match: This option controls the contact screen pop behavior for interactions with multiple matching records. When enabled, the browser pops the customer record details for the first match in the list. You can select to match the call to another record by clicking the avatar and manually selecting the record from the list. This option is disabled by default.
- Inbound screen pop: Allows you to set a screen pop when the phone is ringing, the call is connected, or never.
- Offered: A contact pops up for a single-match record during an inbound call, chat, or voicemail when the phone is ringing.
- Connected: A contact pops up for a single-match record when an inbound call, chat, or voicemail connects.
- Never: The contact does not pop up when there is a single-match record during an inbound call.
- Outbound screen pop: This option controls the contact screen pop for outbound calls. If enabled, when an agent makes an outbound call and a single-match record is found for that phone number, then a contact screen pop displays. This option is enabled by default.
- Pop a record during an interaction: This option controls the screen pop behavior while handling multiple concurrent inbound interactions. If enabled, then during a second interaction, a contact screen pop displays if the call has a single match record. If disabled, then during the second call, no contact screen pop displays. This option is enabled by default.
Set up a phone to receive calls
To handle interactions with your callers, you need to set up a phone. You can set up a softphone or a desk phone from the agent profile in 8x8 Contact Center for Zendesk to receive calls.
- In the 8x8 Contact Center app, click the status
 menu option and change your status to Work Offline. The app makes you unavailable for new interactions.
 - Click the status
 menu option and select My Profile. A new window opens.
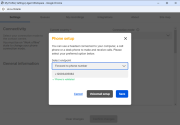
 - Click Change next to Phone setup.
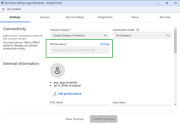
- From the dialog that displays, select the relevant endpoint from the drop-down list:
- Forward to phone number: Use to add your work phone number.
- Use a SIP URI: Use to add your SIP URI.
- Use Agent Workspace: Use the embedded 8x8 Agent Workspace softphone.
- Based on your selected endpoint, enter your phone number or SIP URI in the editable field. If required by your admin, you must validate your workplace setting to begin processing phone interactions. See how to validate your workplace number.
- Click Save.
Notes:
- If you do not have permission to change your phone number or the SIP URI, the phone number fields are disabled.
- Make sure the phone number is in the correct format. For example, you may need to add 1 before your area code. Check with your administrator for the correct format.
Validate your workplace number
In 8x8 Contact Center, when changing the Phone setup (workplace Phone and workplace SIP URI), agents must validate their changes to be able to handle the calls. When the agent clicks to validate the change, it triggers a phone call to the updated phone number. A PIN code is then communicated to the agent. The agent must enter the PIN code to validate the changes and continue. If they are unable to confirm the PIN, they must exit and revert to their last validated setting.
Notes:
- Validating the workplace phone is mandatory while Auto Answer is enabled.
- The workplace validation setting is offered as a stand-alone feature. Admins can remove or disable this feature in 8x8 Configuration Manager with no restrictions.
- It reverts to the agent's last validated setting if unable to validate the new workplace setting.
To validate the Phone setup, agents require a phone and audio access for the PIN code to be played to them. Moreover, the agents must be in Work Offline status to change their workplace Phone setup.
To validate your workplace setting:
- In the 8x8 Contact Center app, click the status
 menu option and change your status to Work Offline. The app makes you unavailable for new interactions.
 - Click the status
 menu option and select My profile. A new window opens.
 - Click Change next to Phone setup.
- From the dialog that displays, select the relevant endpoint from the drop-down list.
- Based on your selected endpoint, enter the phone number or the SIP URI in the editable field below.
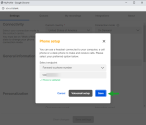
- Click Validate phone and follow the prompts to validate the workplace phone.
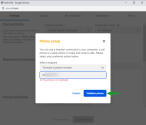
- After the validation session, depending on the result, the following messages may display:
 Phone is validated message appears under the phone/SIP URI field when the validation is successful.
 The phone is not validated message appears if you make any changes to the workplace setting and the phone/SIP URI used is not yet validated.
- The phone couldn't be validated message appears if the validation process failed or if there was a connection error during the validation process. Retry to validate the phone number to troubleshoot.
- Click Save.
Check queue assignments
To process phone, chat, and voicemail interactions from 8x8 Contact Center for Zendesk, you must be a member of phone, chat, and voicemail queues.
Note: Phone queues are separately defined for inbound and outbound communication.
To check queue assignments:
- From the 8x8 Contact Center app, click My assigned queues to view the status of the queues you are a member of.
-OR-
Select Show menu > My assigned queues.
 - Select the desired media queue such as chat queue or phone queue to assign them to yourself, or clear the queue assignment check box to opt out of a queue.
- Click Confirm selections and continue to work.
Notes:
- If no queues are listed, go to Change status ![]() > My Profile > Queues. Click the check-box to enable the desired media queue such as chat or phone queue and click Save queues.
> My Profile > Queues. Click the check-box to enable the desired media queue such as chat or phone queue and click Save queues.
- You can change the settings in My profile or in your assigned queues if permitted by your tenant administrator.
