The 8x8 Contact Center chat window is the interface between a customer and the agent during the chat. 8x8 Contact Center administrators can use the default chat window or create a custom window. To create a custom window, you can create a new form from scratch, or copy the default form and make the desired changes.
To create a custom chat window:
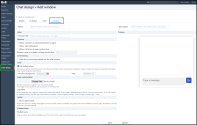
- From the Configuration Menu, open Chat Design.
- Go to the Window tab.
- Click
 or Add New Window.
- Enter Name and Description.
- Enter a value for Window title.
-
Enable the Allow customers to send attachments to agents option. If not, disable this option.
-
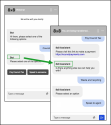
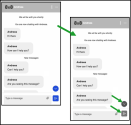
Enable the Allow chat notification option to allow customers to see when they have received a new message. If not, disable this option.
Customers will receive both a visual and audio notification when a new web chat message arrives, even if they close or minimize the web chat window:
-
A new message alert highlights unread messages in the 8x8 webchat window. This alert will disappear once the message is read.
-
When sound notifications are enabled, an alert tone plays, and a visual notification appears in the website tab as well as in the web chat widget if the chat window is minimized or closed.
-
- Select Offer the Co-browsing request into the Chat window.
Notice that Start Co-browsing session appears in the Chat window. For details regarding Co-browsing, see our content on Co-browsing via Chat. - Select the Use default colors checkbox. The default color theme complies with Web Content Accessibility Guidelines (WCAG) and is designed to help the visually challenged.
- Optional: Clear the Use default colors checkbox to customize your colour theme. When selecting the suitable background and text colours, keep relevant accessibility standards in mind while adjusting the color theme.
-
Select a file for Logo customization.
Note: The file must be an image and can not exceed 200 kb. The image will be displayed at a size of 100x30 pixels.
-
Enter a value for Logo label to describe the logo image for people with visual impairments. If the image is decorative (provides no important information, or its information is repeated nearby), this field may be left blank, such as with your company name logo (8x8).
-
Under Avatar, click the Show agent profile picture checkbox to enable the agent’s avatar to be displayed beneath the 8x8 logo section during web chat interactions.
Notes:
- When the Show agent profile picture checkbox is disabled, the default 8x8 company logo will display instead.
- This feature is compatible only with the webchat v2 version. -
Under Chatbot name, enter a custom name for your chatbot that will be displayed in all interactions with the chatbot.
Note: The chatbot window shows the new name you entered in the 8x8 Configuration Manager, while the chatbot’s name remains the same in other contexts, such as during customer interactions with an agent.
- Click Save.
You have defined all the Chat Visual Block (CVB) elements. The next step is to add them in a chat script to complete the workflow.
- From the Configuration Menu, open Chat Design.
- Go to the Window tab.
- Select the desired window and click Edit
 in the row.
 - Make the necessary changes.
- Save your changes.
From the Configuration Menu, open Chat Design.
Go to the Window tab.
Select the desired window, click Delete ![]() in the row, and confirm the deletion.
in the row, and confirm the deletion.
Personalize the web chat theme
After configuring your web flow, you may modify your chat window settings. Although you can do this within 8x8 Configuration Manager, it lacks the flexibility to theme all areas. You can adjust the theme related to the notification settings, including the size, colour, or position of the message badge or button. When changing the notification theme, remember to use a unified approach regarding the colour you use for all the chat window elements, such as buttons, wedges, etc.
See our API documentation to learn how to adjust the theming notification settings.


