What's new for admins in 8x8 Contact Center?
So far in 2025, we have introduced the following features and enhancements requiring admin configuration. Here's a summary:
Enhanced visibility for Transaction Code IDs
8x8 administrators can now view and manage Transaction Code IDs directly within the Transaction Codes section of the 8x8 Configuration Manager. These IDs are also included in the 8x8 Streaming API (SAPI) data for agent interactions, enhancing backend reporting and analysis.
By default, these IDs are hidden in the UI, but administrators can now manually expose them for better visibility.
Key definitions:
- Transaction Code List ID: A unique identifier for a group of transaction codes.
- Transaction Code ID: A unique identifier for an individual code that an agent selects.
These identifiers are visible both in the 8x8 Configuration Manager UI and in SAPI event data, offering improved traceability of agent activities.
Example: SAPI event format for Transaction Codes
When an agent selects multiple transaction codes during a call, the SAPI event reflects each selection like this:
json
{
"attachedDataKey": "tclSelectedItems",
"attachedDataValue": "241|461,241|441"
}
In this example:
- 241 = List ID (Transaction Code Group)
- 461 and 441 = Individual Transaction Code IDs selected by the agent
This structure allows teams to track each agent-selected disposition with greater precision in external systems using SAPI. For more details on the 8x8 Contact Center Streaming API, see the 8x8 Contact Center Streaming API KB article.
Limitations
- UI Limitation in Configuration Manager: The ID columns (for both list and individual transaction codes) are not persistently displayed. They must be manually re-enabled each time you revisit the Transaction Codes section.
- SAPI Limitation: Currently, the data sent to SAPI restricts the disposition code to a single value, corresponding to the first transaction code in the list. While agents can capture several transaction code IDs when making multiple selections, only the first chosen code is recognized as the official disposition code in SAPI.
Display the transaction code IDs and list IDs
You can manually display both the Transaction Code List ID and the Transaction Code ID in the 8x8 Configuration Manager.
To display the transaction code list IDs:
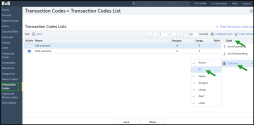
- From the Configuration Menu, go to Transaction Codes.
- Locate the list(s) you want to view.
- Click the dropdown arrow next to the Used column.
-
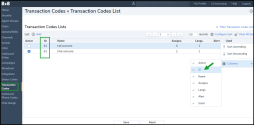
Select Columns > ID to show the transaction code list ID column.
-
The ID column now appears in the Transaction Code Lists table. You can see the unique ID for each transaction code list.
To display the transaction code IDs for a selected list:
- From the Configuration Menu, go to Transaction Codes.
- Select the preferred transaction code list and click Edit
 on the right side of the row.
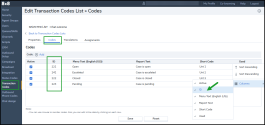
 - In the Codes tab, click the dropdown arrow next to the Used column.
-
Select Columns > ID to enable the ID column in the Codes table.
-
The ID column now appears in the Codes table. You can see the unique ID for each transaction code in the selected list.
- SAPI will send any selected transaction codes in applicable events with the label tclSelectedItems.
Note: These ID columns reset when you leave the page. You’ll need to re-enable them each time.
To learn more about transaction codes, see Transaction codes overview. You can find the same content under Transaction codes > Manage the visibility of the transaction codes IDs.
Ability to customize the chatbot name
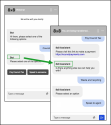
Administrators can now personalize their chat experience, including changing the chatbot name, to create a more customized and engaging user experience. This increased flexibility improves user satisfaction and engagement by accommodating individual preferences.
Features
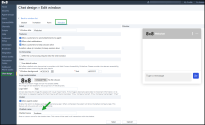
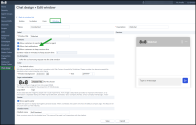
- Admins can change the chatbot name in the 8x8 Configuration Manager by navigating to the Webchat design > Window page.
-
Admins can create an identity for the chatbot, which adds a human touch to its presence in the interaction.
-
The chatbot updated name will be used in all customer interactions with the chatbot, including:
- ICA
- Quick replies
- Gateway
Limitations
Admins can define the chatbot name only in 8x8 Configuration Manager, not via API.
- The chatbot window displays the new name, while other areas, such as interactions retrieval, keep the chatbot name as BOT.
- The default chatnot name shows as BOT.
- To ensure optimal functionality and user experience of the webchat feature, you need the webchat v2 version. To learn more about the webchat v2 version, see Webchat v2.
To personalize a chatbot’s name:
- From the Configuration Menu, open Chat Design.
- Go to the Window tab.
- Select the desired window and click Edit
 in the row.
 - Under Chatbot name, enter your preferred name.
- Save your changes.
Note: The chatbot window shows the new name you entered in the 8x8 Configuration Manager, while the chatbot’s name remains the same in other contexts, such as during customer interactions with an agent.
To learn how to customize the window, see Design a chat window.
Ability to enable audio and visual notification in the web chat
Customers using 8x8 web chat can easily see when they have received a new message, enabling quicker responses and improving communication efficiency. Customers are still notified even if they close or minimize the web chat window.
This new feature is designed to improve user experience by reducing delays in conversation, ensuring that essential messages are not missed. This update lets users engage more effectively with their agents, making it a valuable tool for business interactions.
Features
- The alert notification can be both audio and visual.
- When a new message is sent to customers via web chat, notify the customer with an alert in the 8x8 web chat.
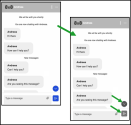
- While a customer is in the conversation panel, the new message alert appears before the unread message, making it easier to find the unread conversation. The alert notification disappears once customers read the unread conversation.
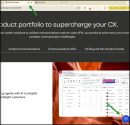
- If a customer minimizes or closes the web chat window or leaves the website, an alert notification is displayed on the site tab, and a notification sound also plays.
- Admins can enable the notification in the 8x8 Configuration Manager, by navigating to the Webchat design > Window page.
Limitation
-
Customers may not receive notifications on their mobile phones if they have closed their web chat.
- To ensure optimal functionality and user experience of the web chat feature, you need the webchat v2 version. To learn more about the webchat v2 version, see Webchat v2.
To allow alert notifications:
- From the Configuration Menu, open Chat Design.
- Go to the Window tab.
- Select the desired window and click Edit
 in the row.
 - Under Features, select Allow chat notifications.
- Save your changes.
Customers receive both a visual and audio notification when a new web chat message arrives:
-
A new message alert highlights unread messages in the 8x8 webchat window. This alert will disappear once the message is read.
-
When sound notifications are enabled, an alert tone plays, and a visual notification appears in the website tab as well as in the web chat widget if the chat window is minimized or closed.
Customers can personalize these alerts within the web chat window. They can enable sound alerts by clicking More ![]() > and enabling the Sounds option.
> and enabling the Sounds option.
To learn how to customize the window, see Design a chat window.
Ability to personalize the web chat theme
After configuring your web flow, admins may modify their chat window settings. Although this can be done within the 8x8 Configuration Manager, it lacks the flexibility to theme all areas. Admins can adjust the theme related to the notification settings, including the size, colour, or position of the message badge or button. When changing the notification theme, remember to maintain a unified approach regarding the colour used for all chat window elements, such as buttons, wedges, and more.
See our API documentation to learn how to adjust the theming notification settings.
