An 8x8 Contact Center chat script defines the path of a chat interaction from its initiation until it is accepted by an agent. Using chat scripts, 8x8 Contact Center administrators can define how to present a chat, when to present it, what information they need to collect before initiating the chat, and which queue to direct the chat interaction to. They can create a new script and assign it to any number of channels. Chat scripts are grouped under Scripts > Chat in 8x8 Configuration Manager. The enhanced chat script allows you to design and control the chat flow in a contact center. To see the chat workflow diagram, refer to Chat Overview.
Let's say Bob, a contact center administrator at AcmeJets, wants to define a chat workflow that allows website visitors to initiate a chat with friendly representatives from his company. To enable a smooth chat flow, Bob must create a chat script that enables the following workflow:
- Allow web page visitors during business hours to click the chat button and initiate a chat.
OR
Invite visitors to chat once they have spent some time on the page. - When they click the chat button, present a short pre-chat form that helps identify the customer's interests.
- Once the customer submits the pre-chat form, direct the chat interaction to an appropriate chat queue.
- If the wait is too long, allow the customer to skip waiting in the queue and send an offline message.
- Present the customer with a chat window they can use to interact with a representative.
- Allow the visitor to send an email message, if reached during closed hours.
To achieve the above goals, Bob must create a chat script like the one below. The objects can be entered in any order, as 8x8 Contact Center arranges them in the correct order.
To create a chat script:
- From the Configuration Menu, open Scripts.
- Go to the Chat tab.
- Click
 or Add new chat script.
 - Follow the steps below:
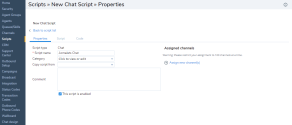
- Go to the Properties tab.

-
Enter the properties for the script.
The following table summarizes the options under Scripts > Chat > Properties:Phone/ Chat/Email Script Property Description Script Type - Phone: Select a script type: Inbound phone, Post Call Survey, or Outbound phone.
- Chat and Email: A read-only reminder of the script type. It displays if it is a phone, chat, or email script.
Script Name Enter a unique name for the script. Category A category helps you organize your scripts better. For example, if you have multiple scripts serving Support and Sales needs, you can group scripts under separate categories. You can select an existing category or create a new one. To create a new category:
- Select Edit Categories from the drop-down menu.
- In the Category dialog box, add a new category by clicking
 .
.
Copy script from Choose this option to place a copy of the default or an existing IVR script into this channel. This option appears when you are creating a new script. Comment Add comments or additional notes, if desired. This script is enabled Select to place this script definition into service. Assigned Channels /Assigned Queues - When you select Script Type > Outbound Phone, you must assign one or more new outbound phone queues.
- When you select Script Type > Post Call Survey or Script Type > Inbound phone, you must assign one or more channels to the script.
Note: It is not mandatory to assign a channel while creating a script.
To assign new channels:
- Click on the link to bring up the list of channels.
- Select the desired channels from the list.
- Click Assign.
Note: All channels in the list are associated with a script whether default or user-defined. If you assign and save a new script, the old script is permanently replaced by the new selected script.
Note: It is recommended to restrict your assignment to 100 channels at a time.
- Click Save.
- Go to the Script tab.
- Click Chat. The [add] option appears. For a complete list of objects and their descriptions, refer to Summary of Chat Script Objects.
- Click [add].
- Select Schedule from the chat objects.
This object performs a particular sequence of script operations when the contact center is open or closed.- Enter a name for the Object Tag.
- Select an existing schedule from the list of Select Schedule.
- Click OK.
- Click [add] next to Open and then:
- Select Forward to Queue, enter a name for the object tag, select a queue, and click OK.
This object forwards a chat interaction to a specific chat queue, such as the sales or main queue. - Select CVB Online, enter a name for the object tag, and click OK.
CVB Online refers to a chat design element, such as a chat button, chat invitation, chat form, or chat window, which can be used on your website during the business hours. - Select Greeting Message and click OK.
This object displays the greeting message to invite customers to the chat session. Append <@skipQueue@> to your message to offer the option to skip queue in the chat window. - Select Skip queue, enter the relevant parameters, and click OK.
This object gives customers the option to opt out of waiting in the chat queue and send an email offline. It can only be triggered in the greeting message object.
- Select Forward to Queue, enter a name for the object tag, select a queue, and click OK.
- For the CVB Online, click [add]:
- Select Online button, enter a name for the object tag, and click OK.
- Select Invitation, enter a name for the object tag, and click OK.
- Select Pre-chat form, enter a name for the object tag, and click OK.
- Select Chat Window, enter a name for the object tag, and click OK.
- Click Close, then click [add].
- Click CVB Offline, enter a name for the object tag, and click OK.
This object refers to a chat design element, such as a chat button or chat form, that activates on your website during closed hours. - Click add offline button next to CVB Offline, enter a name for the object tag, select a button, and click OK.
- Click CVB Offline, enter a name for the object tag, and click OK.
- Click Save to save your chat script.
- To edit the details, click any object and select edit. An edit window opens up. To view the details, double-click any object. The View details window appears. You can also click edit from inside the View details window.
- To undo the changes click Revert.
- Click the
 on the script page to generate a PDF image and save it locally. The PDF printout is generated containing the script name, date, and time of print. Supervisors and administrators can review and modify the script as needed.
For details, refer to Summary of Chat Script Objects.
Note: As long as you have all the objects in the script, the sequence does not matter. 8x8 Contact Center arranges the script in the correct order.
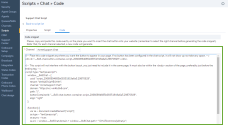
- Go to the Code tab.
- Select the chat channel from the list.

- Click Generate Code. The code appears in the window.
- Copy and paste the code to a page where you want to insert a chat button on your website.
Note: This script does not interfere with the button layout. It must be included in the same page and within the body section of the web page, preferably just before the ending tag.
- Click the Chat button you just created. The Chat window opens.

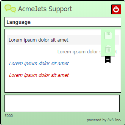
In the current version, admins can generate a coded chat script that displays either an agent's avatar and biography or the default company logo during a web chat interaction.
To generate a code chat script to embed an agent’s avatar in a web chat:
- From the Configure Manager menu, go to the Script > Chat tab.
- In the script list, select a script and click Edit
 in that row to edit it.
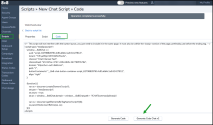
 - Go to the Code tab.
- Insert in the chat script a new code snippet for the chat button in the web chat.
- Click Generate Code Chat v2 to display the agent avatar and bio in the web chat interaction. To display the default company logo in a web chat interaction, click Generate.
See Chat Overview to learn about Embedded Chat Design.
