Customer 360 with Local CRM
The Customer 360 panel brings together customer details from voice and digital channels into a single, unified view. It displays automatically during active customer interactions, reducing the need to switch between tools or search for information.
To reduce distraction, the Customer 360 panel remains hidden during agent-to-agent calls, directory calls, and unrouted interactions.
Note: To configure Customer 360 as an administrator, see Configuration Manager.
Benefits
- Unified interface: Access all relevant customer information in one place.
- Context-aware access: The Customer 360 panel only displays during supported customer interactions. For agent-to-agent calls, unrouted interactions, or directory calls, the panel stays hidden to minimize distraction.
- Multiple channel support: Supports voice, chat, email, SMS, and social media interactions.
- Faster resolution: Agents get immediate context without searching.
- Increased agent control: View previous interactions to personalize support and speed up the resolution.
Use case example
Let’s say Pat, an agent, takes a call from a customer asking about a delayed order. With Customer 360, Pat immediately sees the customer’s earlier email about the same issue, along with order history. Instead of switching tools or pausing to dig for context, Pat resolves the issue right away, saving time and improving the experience.
Before Customer 360, Pat had to pause the conversation to manually search for records, slowing down service and frustrating customers.
Overview of the Customer 360 view with Local CRM
Customer 360 appears as a side panel during active customer interactions when using the expanded app view. If the app is resized to a narrow layout, it moves to the bottom of the workspace.
When you're handling an interaction with an existing customer, this tab provides quick access to:
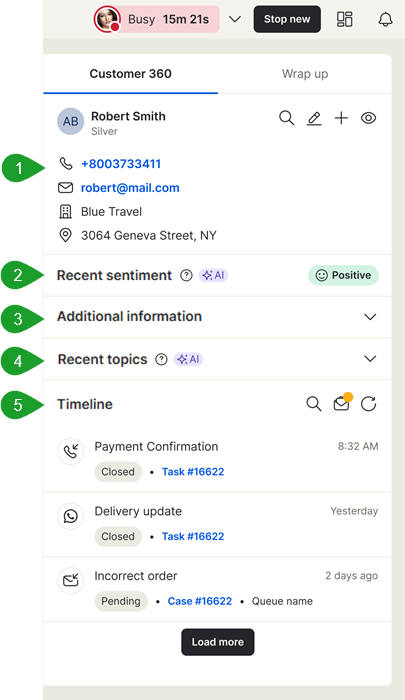
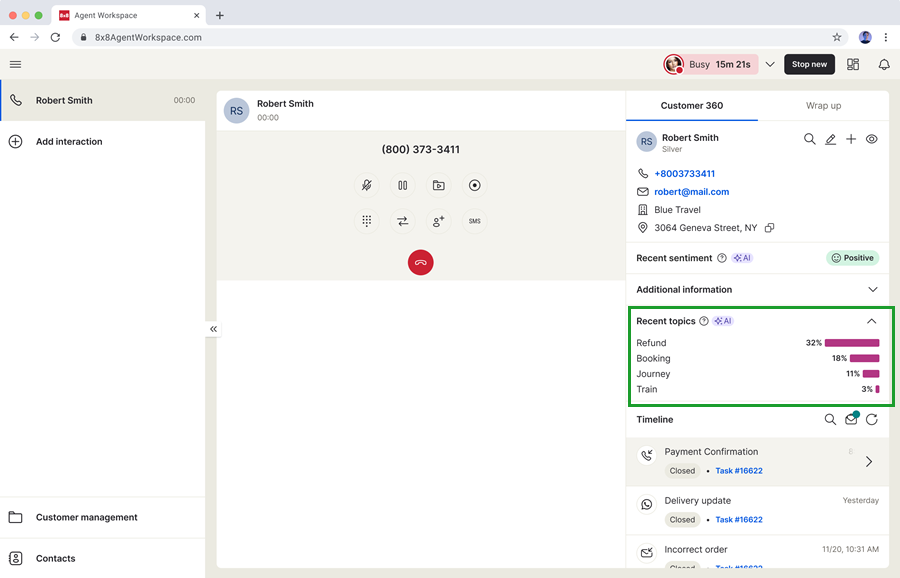
- Customer information: View the customer information, such as the customer's name, phone number, email address, and address.
- Recent sentiment*: See how the customer is feeling during an interaction.
- Additional information: Access additional information related to the customer, such as alternative phone numbers, the date when the record was created, the date the record was last updated, the address, etc.
- Recent topics*: Access topics related to the interaction.
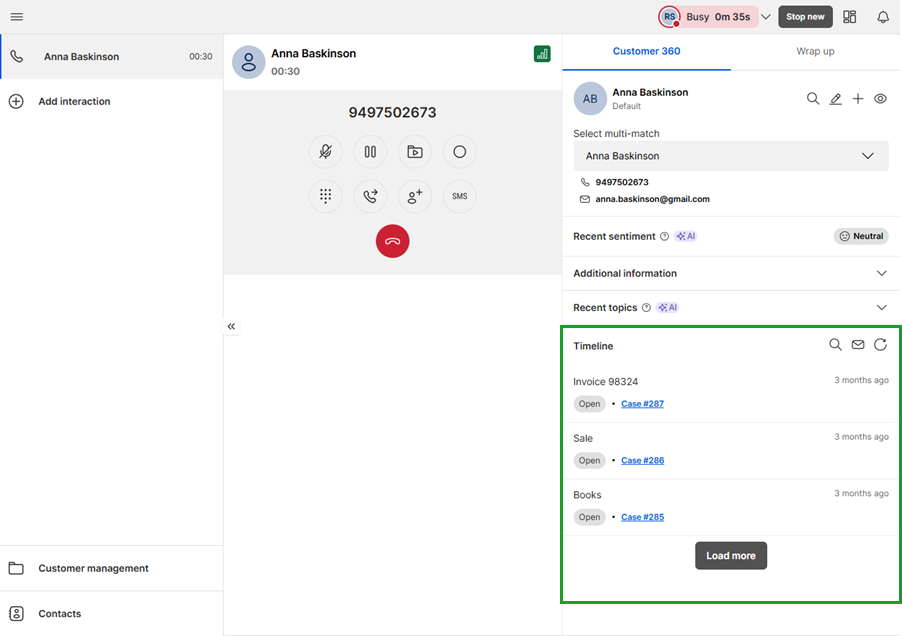
- Timeline: Access the cases or tasks linked to the customer’s record.
Note: Items marked with an asterisk (*) require a Speech Analytics license and setup, and at least two prior recorded interactions since the feature release.
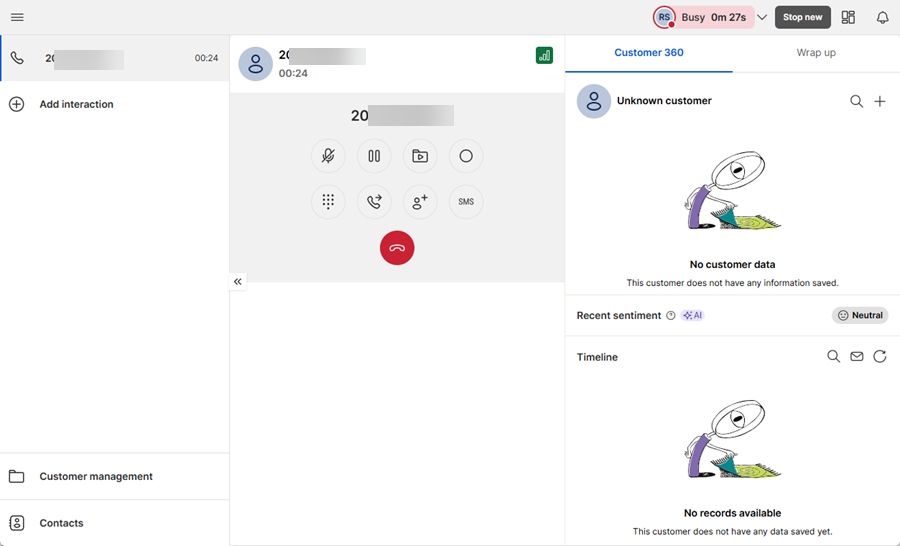
If no matching record is found, the Customer 360 panel will indicate that no customer data is available. For more information, see Customer 360 view for new customer records.
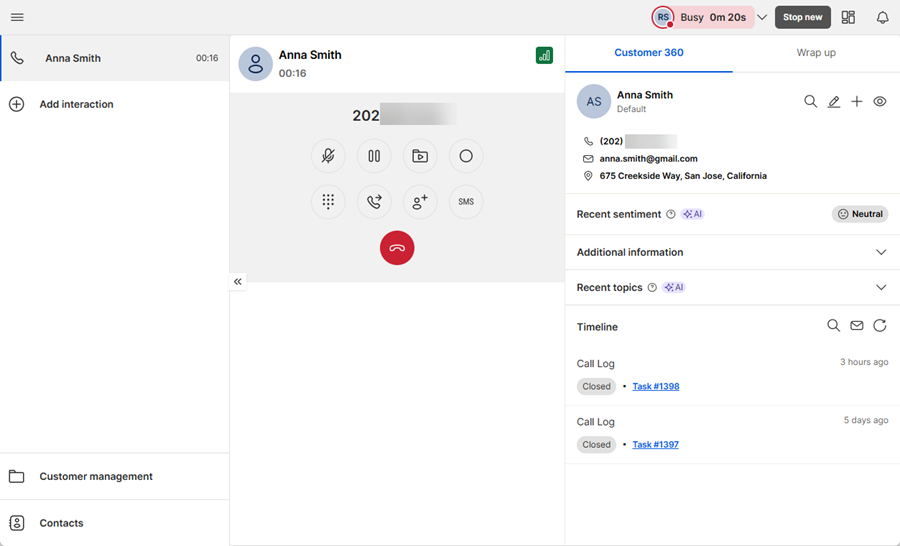
Customer 360 view for existing customer records (Local CRM)
When you accept an interaction from an existing customer, Customer 360 displays in a side panel. Click this tab to view the customer information and timeline (customer history).
If you have a Speech Analytics license, these additional sections show:
Customer 360 view for new customer records (Local CRM)
If the system can’t identify the customer during an interaction, a generic version of the Customer 360 panel appears. To link the interaction to a customer:
- Search for an existing customer: Use the search function to search for an existing customer to link the record to.
-OR- - Create a new record: Click the add
 icon in the top-right corner of the panel to create a new customer record.
To ensure future interactions are linked automatically, add unique identifiers such as an email address or phone number when creating the customer record.
Customer 360 view for multiple matching customer records (Local CRM)
If multiple customer records share the same name or identifier, the message Select multi-match shows above the customer name field in the Customer 360 panel. You can select a match from the list, search for a new customer, or create a new customer record.
To link an interaction to another customer in a multi-matching scenario:
- During a live interaction, go to the Customer 360 tab.
- Click the arrow
 next to the customer name field to view the records matched.
 - Select the correct customer record from the drop-down list. The selected record will be automatically linked to the current interaction.
- (Optional) If the correct record isn’t listed, search for the customer manually or create a new customer record.
- After the interaction ends, complete the post-processing from the Wrap up area.
- Click:
- Wrap up: To end the session and make yourself available for a new one.
- Wrap up and see logs: To end the session and open the interaction log in the Customer management workspace.
View timeline (Local CRM)
During an active interaction, you can view the Timeline (customer history) directly in the Customer 360 panel. This gives you quick access to essential details such as previous cases, tasks, and queued emails linked to the customer. You can search for a specific case, view its details, make edits within the workspace, and open customer queued emails.
If you need access to the full CRM, simply click Customer management from the sidebar.
During a live interaction, go to Customer 360 > Timeline.
Note: This option is only visible if enabled by your organization.
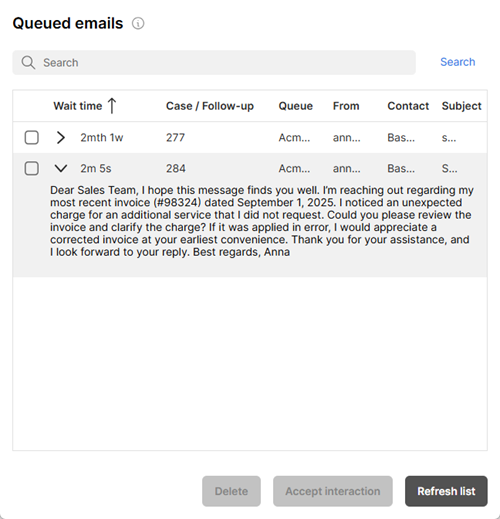
View customer queued emails
You can view a customer’s queued emails during an active interaction in the Timeline section of Customer 360 with local CRM. Queued emails are messages routed to your team’s email queue that have not yet been read or responded to. A yellow dot on the queued emails ![]() icon indicates pending messages. Click the
icon indicates pending messages. Click the ![]() icon to open the customer's queued emails in a separate window.
icon to open the customer's queued emails in a separate window.
To view queued emails:
- During a live interaction, go to Customer 360 > Timeline.
- Click the
 icon to open customer queued emails in a separate window.
- In the queued emails window:
- Click the arrow next to the check box to preview the email content.
- Use the search bar to find a specific email by subject or sender.
- Click the check box to select an email for deletion or to accept the interaction.
- Click the Refresh list button to update the email queue view.


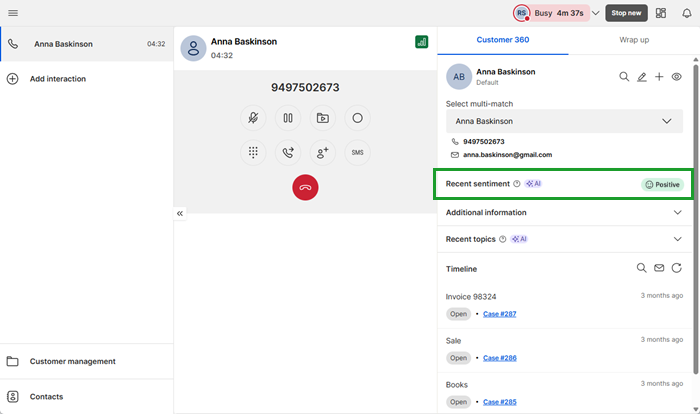
View the customer sentiment analysis in Customer 360 with Local CRM
Note: Sentiment analysis requires:
- A valid Speech Analytics license and setup.
- At least two recorded interactions with the customer after the Customer 360 feature was released.
The Customer 360 panel includes AI-powered sentiment analysis to help you understand how the customer is feeling based on recent interactions. The data is extracted from up to ten recent interactions, with greater emphasis on the most recent ones.
If the requirements for sentiment analysis are not met, no sentiment data will be shown.
During a live interaction, go to Customer 360 > Recent sentiment.
Note: This option is only visible if enabled by your organization.
View the customer topics in Customer 360 with Local CRM
Note: Topics matching requires:
- A Speech Analytics license and setup.
- At least two recorded interactions with the customer after the Customer 360 feature was released.
The Topics section in the Customer 360 panel shows key discussion themes automatically extracted from the customer's previous conversations. These topics are based on predefined phrases configured by your administrator in Quality Management and Speech Analytics (QM/SA).
This feature gives agents fast insight into the customer’s concerns, past inquiries, and likely reasons for contacting support. By understanding what’s already been discussed, you can respond more personally and avoid repeating questions.
Each topic includes a percentage value, which represents how frequently the topic appeared in the customer's recent interactions. For example, if the keyword “damaged” came up in three out of the last six conversations, the topic would display as 50%. The system calculates this percentage based on the last two to ten recorded interactions.
To view topics:
During a live interaction, go to Customer 360 > Recent topics.
Note: This option is only visible if enabled by your organization.
Wrap up an interaction in Customer 360 with Local CRM
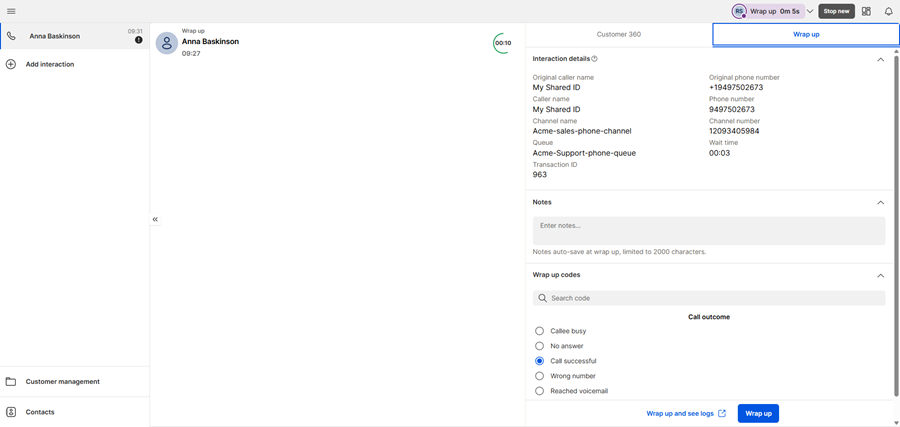
The Wrap up tab is available alongside the Customer 360 panel as soon as you accept an interaction. You can use it during the conversation to add notes or prepare the appropriate disposition codes.
The Wrap up button shows in the tab after the interaction ends. At that point, the system automatically switches to the Wrap up area so you can complete any final steps.
To wrap up an interaction in Customer 360:
- During a live interaction, Customer 360 displays as a side panel.
- Click the Wrap up tab.
- (Optional) Add any relevant notes.
- End the interaction.
- Select a disposition code.

- Click:
- Wrap up: Ends the session and makes you available for a new one.
- Wrap up and see logs: Ends the session and takes you directly to the interaction log in the Customer management workspace.
Where are Notes saved?
You can add notes during an interaction or during wrap-up. The system saves these notes based on your CRM setup:
- In a native CRM, notes are saved in the task or case description.
- In an external CRM, notes are saved through API integration.
Custom screen pop behavior
When a custom screen pop is configured by an admin and the Open new window for screen pop setting is disabled in Configuration Manager, the screen pop opens directly within the Customer management workspace instead of launching in a new window.
Agents can access the screen pop from this page at any time.