Set up user groups
User groups help admins limit the scope of access in specific role assignments. Admins can now create role assignments for accessing call recordings that are scoped to recordings from particular groups of users.
Note: Each user can belong to only one user group at a time.
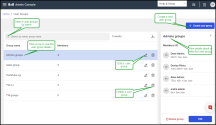
Through the new Work Groups > User Groups section, admins can:
- Create user groups
- Assign users to a group
- Remove users from a group
- Move users to another group
- Edit user groups
- Edit multiple members in bulk - move users to another group or remove users from this group
- Delete user groups
- Search user groups by group name
- Download the user groups report
- Assign members to a specific user group
- Create new permissions and role assignments based on user groups
- Create permissions and role assignments to access the Recordings app screen
- Limit users access to recordings
Through the new Work Groups > User Groups section, admins can:
As an admin, you can create role assignments for accessing call recordings that are scoped to recordings from specific groups of users.
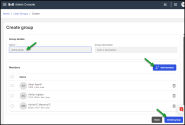
To create a user group:
- From the Menu
 , go to Work Groups > User Groups.
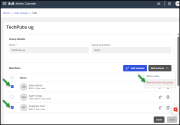
 - On the User Groups page, click Create User Group
 in the upper-right corner.
 -
Under Group details, enter the group name and a short description. The group name is mandatory to create your new user group.
- Click Add member
 to assign users to that group.
 - Click Create group.
Note: As an admin, you can assign a user to a specific group while creating or editing a user.
While creating or editing user groups, you can add user(s) to a group.
To add a user from a group:
- From the Menu
 , go to Work Groups > User Groups.
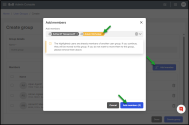
 - On the User groups > Create or Edit page, click Add member.
-
In the Add members window, add the desired member’s name, number or email.
Note: Users who are already members of another user group are highlighted. You can continue to move them to this group or remove them if you still want to belong to the current group.
- You can search and find users by their first name, last name, number or email. Press enter to add it to the list. Click Add members.
- Save your settings.
While creating or editing user groups, you can remove a user from a group whenever necessary.
To remove a user from a group:
- From the Menu
 , go to Work Groups > User Groups.
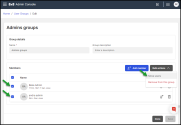
 - On the User groups > Edit page, click Remove user in the desired user row and conform. The user no longer belongs to any user groups.
- Save your changes.
Note: You can remove multiple members from a group by using the bulk editing capability.
While creating or editing user groups, you can move users from one group to another in one action.
To move a user to another group:
- From the Menu
 , go to Work Groups > User Groups.
 - On the User groups view page, click Edit
 in the desired group row from the list view .
 - While editing user a user group, click Move user
 in the desired user row.
 - Select another group to assign the user to and click Move user.
- Save your changes. The user no longer belongs to this user group and belongs now to the group you selected.
Note: Using the bulk editing capability, you can move multiple members to another group.
You can edit a user group whenever necessary. You can change the group name or description and manage members - add, remove or move members to another group.
To edit a user group:
- From the Menu
 , go to Work Groups > User Groups.
 - On the User groups view page, click Edit
 in the desired group row from the list view .
 - Make your changes and save.
While editing a user group, you can use the bulk editing capability to handle multiple members in one action by using:
- Move users - To move multiple members in another group in one action
- Remove users from this group - To remove multiple members from this group.
To move multiple users to another group:
- While editing a user group, select the members you want to move from this group.
-
Click Bulk actions > Move users.
- Select another group to assign the selected members to and click Move users. The selected users no longer belong to this user group, and they belong now to the new group.
To remove multiple users from a group:
- While editing a user group, select the members you want to move from this group.
-
Click Bulk actions > Remove from this group and confirm. The selected users will no longer belong to any user group.
Note: Deleting a group with assigned members requires you to reassign the group members to another group or to remove it from that group.
To delete a user group:
- From the Menu
 , go to Work Groups > User Groups.
 - On the User groups view page, in the desired group row from the list view, click Delete
 and confirm your action.
 - If the user group has members assigned, select a group to move all the members to that group and click Delete & move members. Optionally, select None to remove all the members from this group.
- Click Delete to confirm the deletion.
Note: Optionally, you can move users individually to different groups and then delete the user group.
If your 8x8 Contact Center has numerous user groups, tracking them in a single scrollable list may be challenging. You can narrow your search by group name, and press Enter.
Clear your search box and press Enter to display all the available user groups.
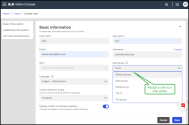
As an admin, you can assign a user to a particular group directly from the Users page while creating or editing a user.
To assign a user to a specific user group:
- From the Menu
 ,, go to Work Groups > Users.
 - Under Basic Information, in the User Groups list, select the group to which that user belongs.
- Save your changes.
Note:
- From the Account Settings (user profile) page, users can only view which user group they belong to but cannot modify it.
- From the Users page, administrators can select which user group a user (including themselves) belongs to only when creating/editing users.
- From the Users page, while editing users in bulk, the User Group selector is not visible, and the admins cannot assign those users to a user group.
Through Roles & permissions, you can create roles with limited permissions:
- View groups and their members - allows members only to view groups and their members.
- Manage membership only - allows users to view and edit groups and only to add members to groups.
- Manage groups and their members - allows users to view, edit or delete groups and to add or remove members from groups.
To create a new role with limited access based on user groups while creating or editing a role:
- From the Menu
 , go to Roles and Permissions > Roles.
 - On the Roles page, click +Create Role in the upper-right corner.
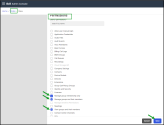
- Under Permissions, select one of the new permissions from the list on the new page to enable users to manage user groups.
- Save your settings.
Assign roles with limited access based on users group for the Storage application
As an admin with permissions granted for the Storage app, you can now provide limited data access control based on user groups for both the Storage Admin and Storage API roles
To assign a new role for the Storage Admin scope:
While assigning roles from the Role Assignments page, you can now assign user groups to the Storage Admin role.
- From the Menu
 , go to Roles and Permissions > Assignments.
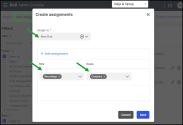
 - On the Role Assignments page, click +Create Assignment in the upper-right corner.
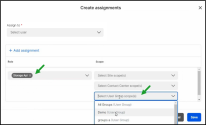
- On the Create assignments pop-up, select the user from the list to whom you want to assign the new role.
- Under Role, select the Storage Admin role from the list.
-
Under Scope, set the scope based on:
- Sites at a single or multiple site(s) - Users can see recordings only for the users from that site(s).
- Contact Center at a single or multiple Contact Center tenant(s) - Users can only see recordings for users from that contact center(s) at the tenant level.
- User Group at a single or multiple user group(s) - Users can see recordings only for users from that group(s).
- Save your settings.
Note: The Storage filter is visible on the Roles & Permissions page only if the user has the appropriate permissions for the Storage app.
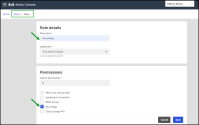
If users do not have access permissions to the Recordings page, admins can create permissions and role assignments for them.
To grant access to Recordings application in Admin Console:
-
Go to Admin Console-> Roles and Permissions-> Roles, click +Create Role on the upper right corner, then select Recordings under the Permission section to create the new Recordings role.
-
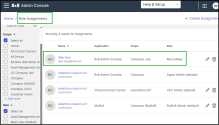
After you created the Recordings role, go to Admin Console-> Roles and Permissions-> Assignment and assign it to the desired users.
The selected user can now access the Recordings app screen. You can check the Recordings role assignment in the Role assignments list.
You can now assign users limited access to recordings related to specific user groups.
Limiting access to recordings is helpful for the supervisors to see only the recordings of members of the group they monitor.
Let's say a supervisor wants to see the recordings of members of groups the supervisor is responsible for. You can allow the supervisor access to the recordings of users belonging only to those groups.
Note:
- The supervisor will be able to see the user's recordings only once the user has been included in the group. Recordings made by the user before joining the group will not appear on the Recordings page.
- If a group member has left the group, the supervisor can see the recordings related to that user only for the time the user belonged to that group. After the user leaves that group, subsequent recordings will no longer be visible.
To give users limited access to recordings:
- From the Menu
 , go to Roles and Permissions > Assignments.
 - In the Role Assignments page, click +Create Assignment in the upper-right corner.
- In the Create assignments pop-up, select the user from the list and assign a new role for the Storage Admin scope.
- Save your settings.
-
From the Menu
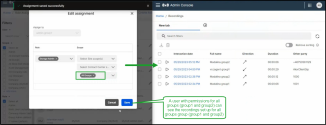
 , go to Recordings. Depending on the permissions and scope(s) granted, the user might see a different list of recordings:
-
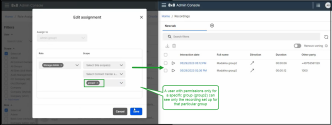
Users with permissions for a specific group can only view recordings for users belonging to that group.
-
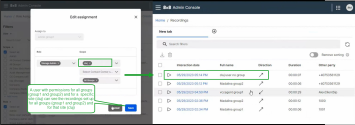
Users with permissions for all groups can view recordings for all users belonging to all groups.
-
Users who have permissions for all groups and a specific site (cluj) can view recordings for users in all groups and that specific site.
-
