Port Your Phone Numbers
Porting is transferring a phone number from one phone service provider to another. Upon initiating a transfer request, 8x8 assigns temporary numbers to your account, allowing you to continue your business without interruption until the porting process is complete. Enjoy the seamless swap of temporary numbers with the ported numbers once the porting is complete.
Features
Transferring an existing phone number eliminates the inconvenience of changing phone numbers.
- No new phone numbers to remember
- No need to notify friends, family, customers and business contacts of your new phone number
- No need to print new stationery or business cards
- Port your existing numbers from another service provider to 8x8 without interrupting your business.
- Initiate porting with required support documents, view porting status, and resolve porting errors.
- Get temporary numbers and begin using 8x8 services without having to wait for the porting process to complete. For inbound calls, ask your service provider to forward your calls to the temporary number. Keep your porting number for caller ID.
- Enjoy the seamless swap of temporary numbers with the ported numbers once the porting is complete.
- Generate a report that lists all phone numbers, assigned or available in your phone system. Find out the list of ported numbers, or numbers that are pending porting, or those that have failed porting by using the relevant filters.
Get Ready to Port
Before initiating the porting process, make sure you cancel any special services for your numbers, such as DSL. We strongly recommend you have the following information on hand:
- The billing owner information: first name, last name, company, and address.
- The name of the previous phone service provider, such as AT&T or Comcast.
- A telephone number for billing purposes that remains on the account.
For landlines or fax numbers, you can enter the primary telephone number on the account. For wireless, mobile, and toll-free accounts, enter one of the numbers you are porting. - The phone numbers you are about to port to 8x8.
- A completed Letter of Authorization (LOA).
Note: We recommend that you consult with your current carrier as to whether a fee applies when you change your preferred carrier.
Port Your Phone Numbers
To port your existing numbers:
- From the main menu in 8x8 Admin Console, go to Home > Phone Numbers.
- Click Port Phone Numbers.
-
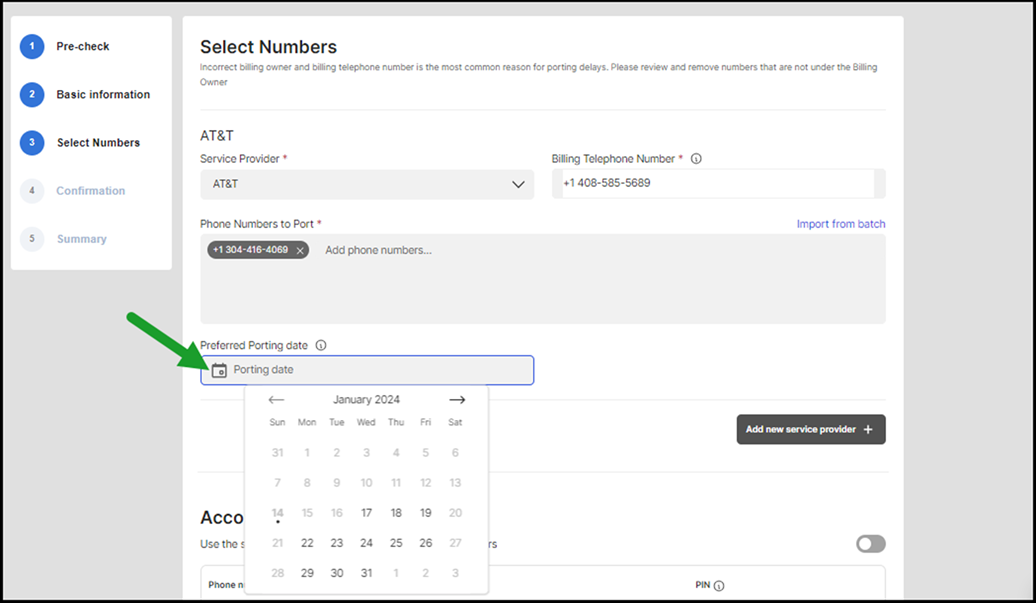
After reviewing the pre-check requirements, proceed to enter the authorized owner's Basic Information. Enter the owner's name, the name of the business, and the billing or service address. Only the account owner or an authorized person can request the transfer.
-
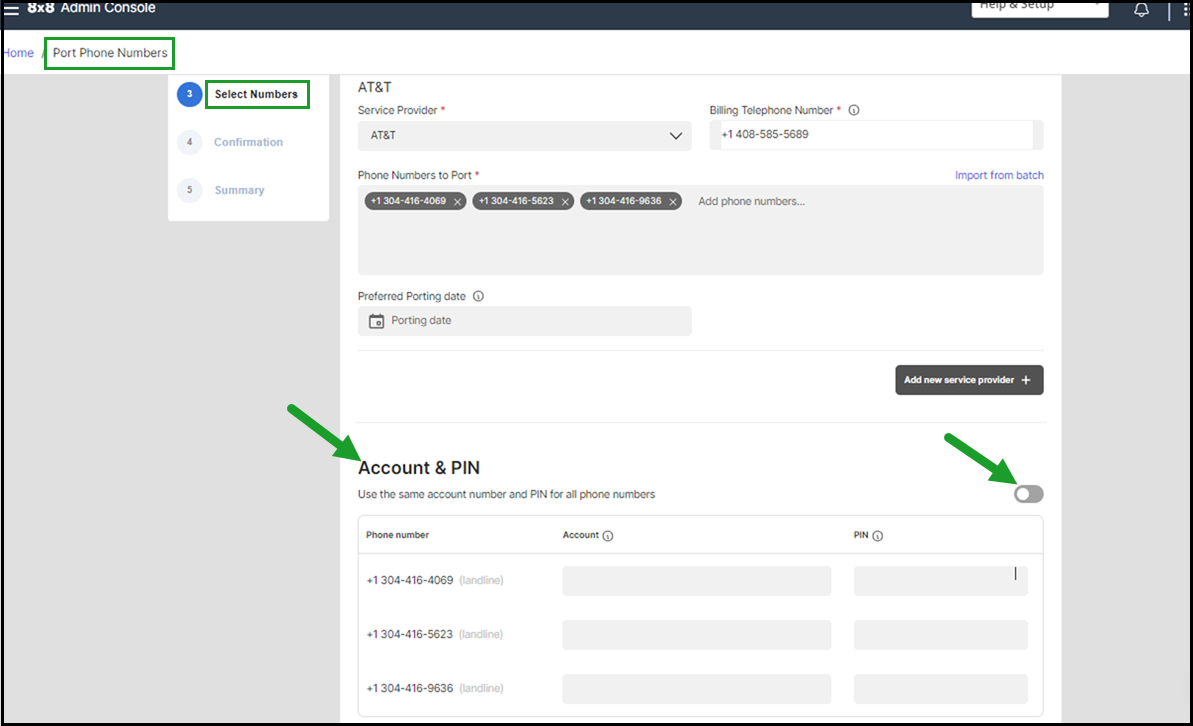
Under Select numbers:
- Identify the current Service Provider for the numbers to be ported.
- Enter the Billing Telephone Number
-
Enter the Phone Numbers to Port. Do not use spaces between the number digits:
- If you have entered a Toll free number, you must provide a copy of a bill (scanned copy or an electronic bill). Note that the phone bill is accepted if it has been more than 30 days from the billing or invoice date on the bill (not the pay-by date). Upload one bill for all toll free numbers.
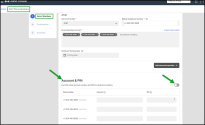
- If you have entered a Wireless Number, enter your enter your Account number and PIN in the Account & PIN section, for both landline and wireless type phone numbers. This information is only mandatory for wireless and optional for landline phone numbers
You can find your account number in the top corner of your bill or invoice. Your PIN is given to you by your former provider and is usually pre-selected. Contact your former provider for any questions. If you like to enter one account number and PIN for all mobile numbers to port, enable Use the same account number and PIN for all wireless phones.
-
Optional. click Porting date
 to avoid your number porting before a desired date. Select a preferred porting date to avoid early porting. Once the port request is accepted, our team will email you the confirmed date. Until then, avoid making any arrangements based on a specific date.
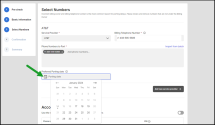
-
Enable Assign temporary numbers:
- Select System assigned to automatically assign the temporary numbers. The system-assigned temporary numbers are not from your inventory. They are usually offered with the same area code as porting numbers.
- Select a number of your choice from the list of available numbers in your inventory (whether claimed or ported) to manually assign to a porting number.
Note: For toll-free numbers, you must provide an electronic copy of the bill. Any phone bill that is over 30 days from the billing/invoice date (not the pay date) cannot be accepted.
-
Click Continue. A pop-up alerts you about the need to separate the porting request based on the underlying carrier.
When you submit a request to port a batch of phone numbers belonging to more than one service provider, the porting request will likely be rejected. To prevent porting failures, we detect upfront if the phone numbers belong to different service providers and split them into compatible groups. Further, with your input, we will split the porting request into multiple requests based on the service provider. This allows you to avoid porting rejections as well as track the requests easily.
Let’s say you submit phone numbers belonging to two different providers in the same porting request, you will be alerted that the porting request is not compatible and the phone numbers need to be split into compatible groups. With your permission and input, the phone numbers will then be split into compatible groups and submitted as two separate requests.

- Check the box to separate numbers into compatible groups and click Continue.
- Select the service provider and enter the billing contact number.
-
Review and accept the terms and conditions in the Letter of Authorization. Click I Agree.


You can print the letter of authorization, email the status to others, and see the list of temporary numbers that are assigned to the porting numbers. After submitting the porting request, the status of the transferred number appears as pending in the summary page. See Various Porting Statuses.
Soon after you submit your request, you receive a confirmation email including the numbers you requested to port. You can assign these numbers to the users while waiting for the porting process to complete. If you choose to send a welcome email to the user, it contains the temporary phone number and a link to set up password. The user can start making and receiving calls using the temporary numbers. To check your phone number inventory, go to
Home > Phone Numbers
from the main menu to view the list of numbers. Check the list of phone numbers to see the source of numbers (whether a number is claimed or ported), which numbers are assigned to users, and who the numbers are assigned to.

We may not be able to submit all your porting requests. For the orders that have not gone through, see the report in Porting order results. You can resolve the issue and click to Restart the porting process.
Notes: The current limitation for a porting order is 1000 per order. To port more numbers, create multiple porting orders.
Here are the various porting statuses. You can view and filter Porting Status by going to the Phone Numbers page.
| Porting Status | Definition |
|---|---|
| Pre-Porting | Pre-porting enables administrators to create users via bulk user upload giving them the numbers that are not yet in the inventory. It provides an easy way to capture the porting information with minimum data. The numbers to be ported are put into pre-porting status which means they are automatically assigned a temporary number and the user can start using their service immediately. In the CSV file, include the numbers to be ported and say Y in the User.Voice.PortNumber column. |
| Porting Pending | The porting is underway. Email updates are sent for every porting status change, such as porting date confirmed, porting date postponed, porting delayed, etc. The latest confirmed porting date is visible in the Number Status column and under due date. |
| Porting Complete | The porting is successfully completed. The porting number is then moved to Available or Assigned once the temporary number is swapped out. |
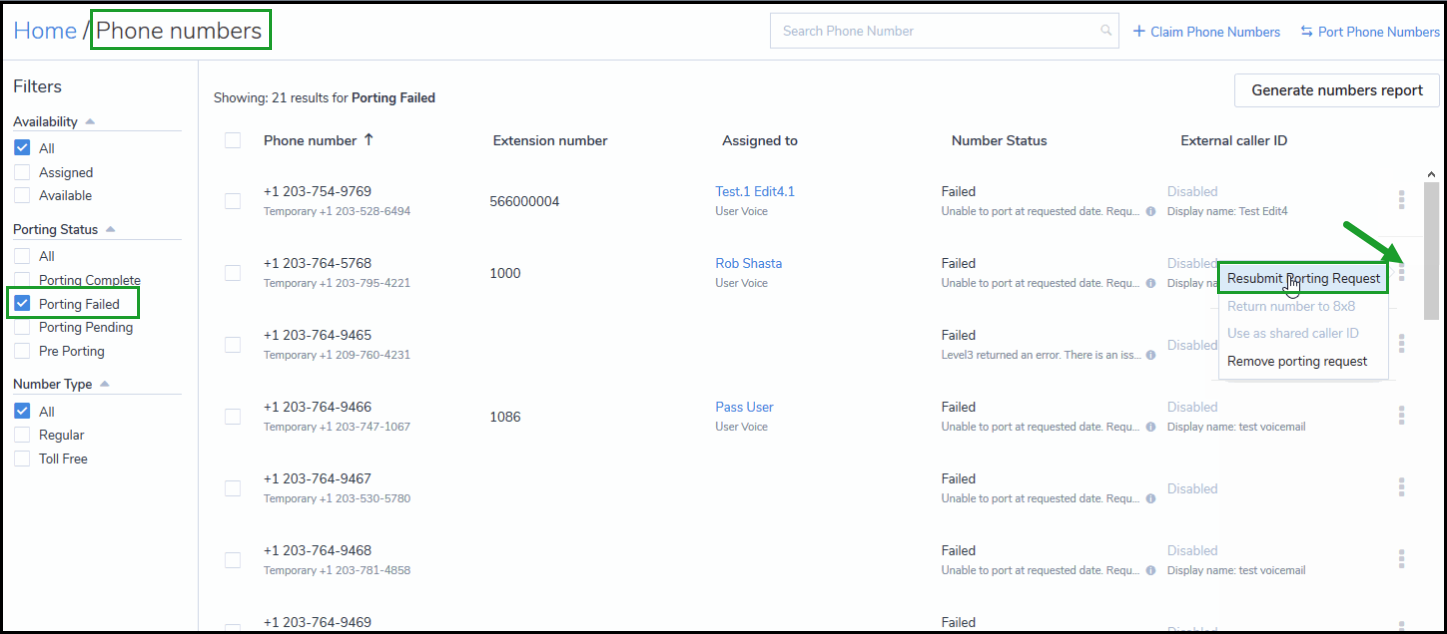
| Porting Failed | The porting failed. The porting fails for various reasons. In many cases porting failure is recoverable, such as an incorrect billing telephone number. You can review your answers and re-submit the porting request. |
Let's say your porting request has failed and you realized you have entered an incorrect number to port. You can easily remove your porting request for the number that has failed or is in pending porting state. When you remove the porting request, the number is removed from your system. The temporary numbers are either returned to 8x8, Inc.or remain in your inventory as a claimed number.
To remove a failed porting order:
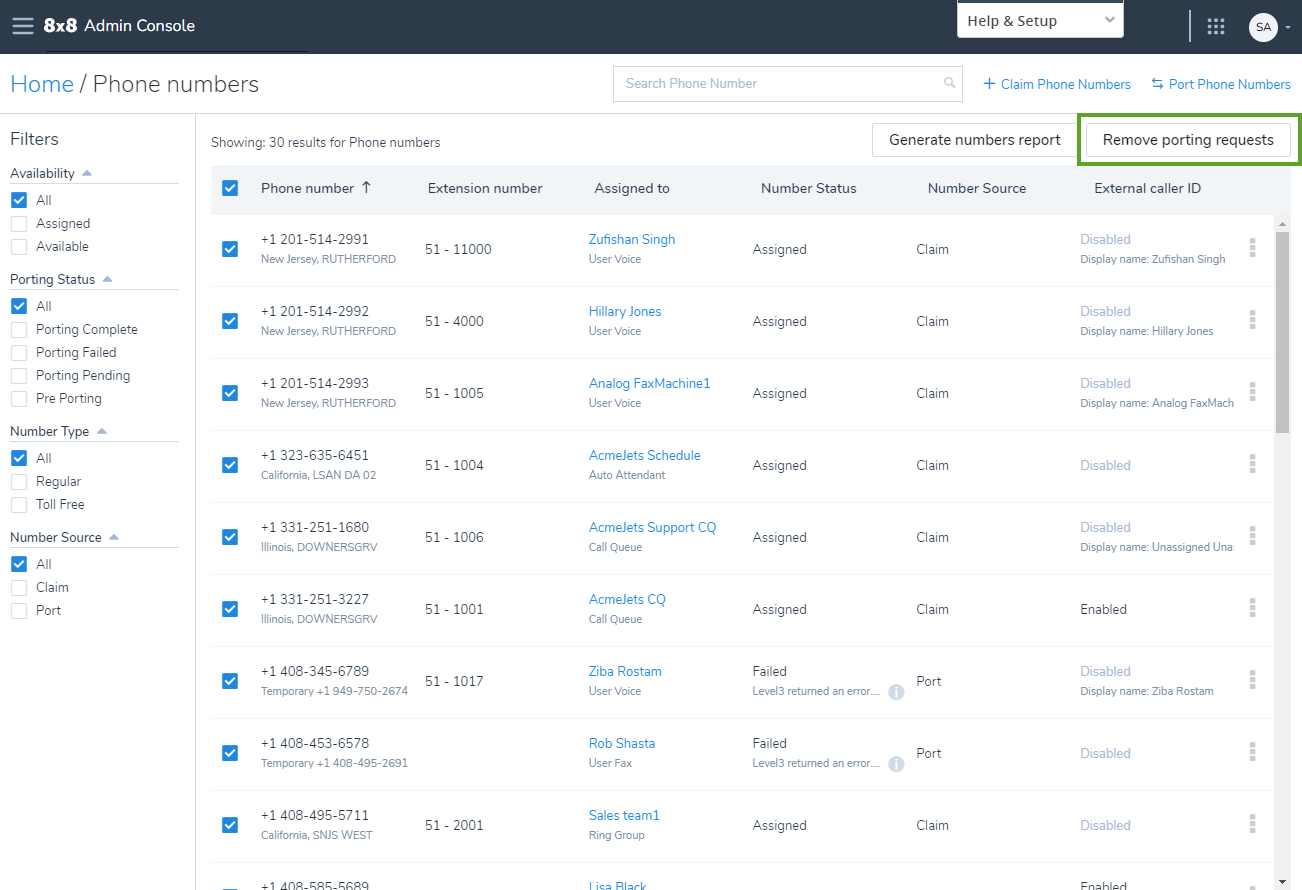
- Go to Home > Phone numbers.
- Filter the numbers by Porting Failed status.
- Find the number you wish to remove and click
 .
. Select Remove porting request from the menu. The failed porting number will be removed from your system following a confirmation message. The temporary numbers can be kept in your inventory as claimed numbers.
Note: To help with larger deployments, you can select multiple porting requests in pre-porting and porting failed status and remove them all at once.


If you are not happy with any number you have submitted, or if you need to change your order, you can simply make changes to your order and resubmit without going through the complete porting process.
To resubmit a request, you must:
- Be in a portable state such as pre-porting or failed stage.
- Keep at least one telephone number unchanged in an order with multiple porting numbers, or the order will be canceled.
- Enter the same type of numbers as the original order (for toll-free and wireless orders only).
- Do not change the service provider.
To resubmit a porting order:
- Go to Home > Phone numbers.
- Filter the numbers by Porting Failed.
- Find the order you would like to change and click .
- Select Resubmit porting request. Edit the order numbers and click Continue. See Port your existing phone numbers.
FAQs
Refer to the following frequently-asked questions for more information:
Porting is transferring a phone number from one phone service provider to another. The porting request is submitted by the administrator via 8x8 Admin Console. A few steps are involved in the porting process:
- Gather the authorized person's information.
- Find out the correct Billing Telephone Number (BTN).
- List all the telephone numbers you are porting, and provide the required documents (if needed).
- Sign the Letter of Authorization (LOA). Depending on the type of the number you are porting and its area, we may need additional documents. Our Number Porting team will contact you directly if needed. See Port Your Existing Phone Numbers.
Transferring an existing phone number eliminates the inconvenience of changing phone numbers.
- No new phone numbers to remember
- No need to notify friends, family, customers and business contacts of your new phone number
- No need to print new stationery or business cards
Yes; upon submitting a number transfer request, 8x8 automatically releases temporary numbers to your account. Temporary numbers are of the same country and type (regular or toll free) as the number to be ported. You can communicate these temporary numbers to your former phone service provider and ask them to forward your incoming calls to the temporary numbers. This prevents any disruption of inbound calls during the porting process. Once the porting is complete, the temporary numbers are automatically swapped with your real numbers.
No; the temporary numbers do not need a license as long as they are paired with a number to be ported. When you cancel a porting request, the number to be ported is removed from the system. The temporary number become a claimed number and uses a license.
You do not need to. The temporary numbers are for the transition only, and in order to make the transition process seamless, you do not need to expose them to your customers. For the inbound calls, if you asked your service provider to forward the calls to your temporary number, you can assign services to the porting numbers and your customers can continue to dial the old telephone numbers. The calls are then routed to your temporary numbers. You can answer your calls using your 8x8 system.
Do not cancel your old telephone service until your numbers have been completely transferred.
When the porting is complete, 8x8 automatically removes the temporary numbers and swaps them with the ported numbers. The temporary numbers are released back to 8x8.
Number status is shown in the Home > Phone Numbers list page. The porting process is not complete as long as you see the temporary numbers showing under your Phone Numbers. .
Updates on the status of your porting request are sent via email, and are visible in 8x8 Admin Console under Home > Phone Numbers.
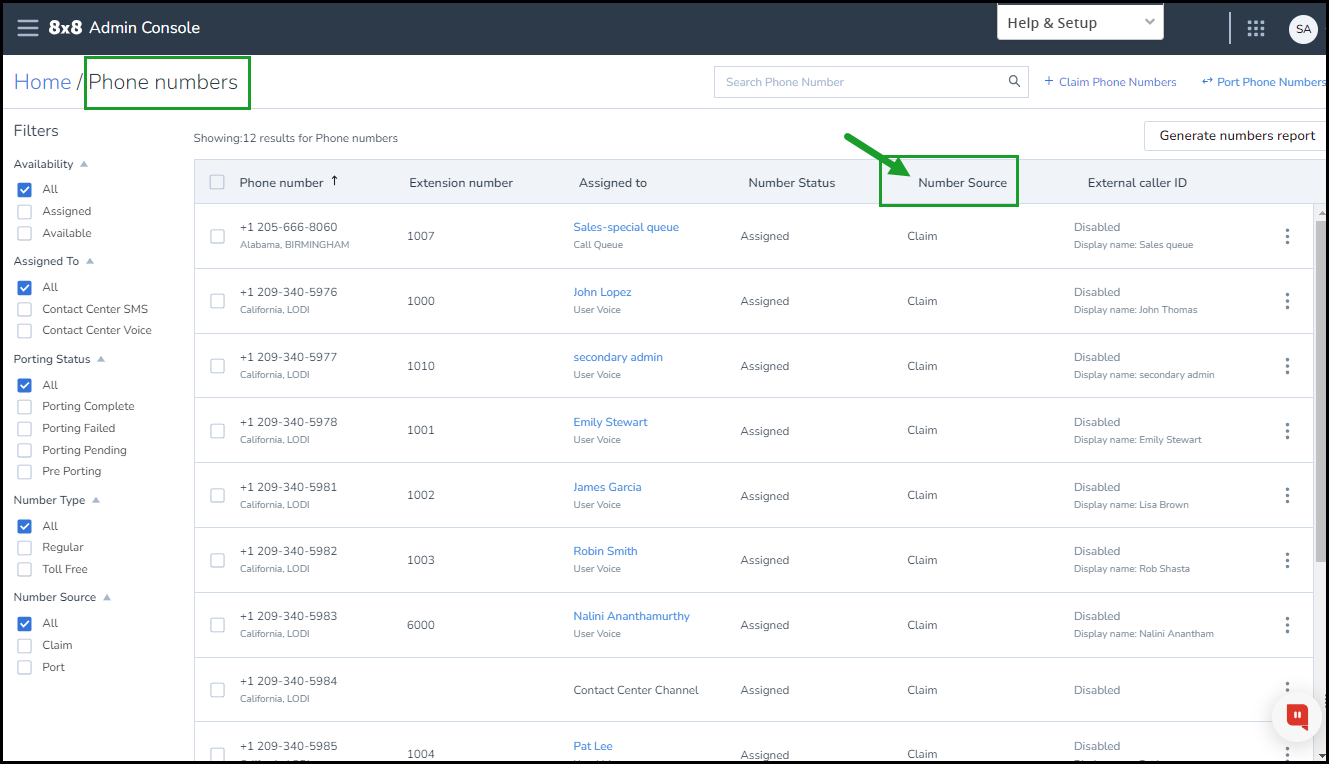
You can see the source of phone numbers in your tenant. To see whether a number is claimed or ported, go to Home > Phone numbers and check out the Number Source column.
If you have started a porting process and it fails, as long as you have a temporary number, you can assign the number to a user or workgroup. In fact, during porting, your temporary number is assigned not the porting number. You can try to port the failed number again until it successfully goes through.
Yes; as long as it has a temporary number associated with it, you can assign the porting number (which is failed) to the user and save. The numbers shown for the users are the porting numbers not the temporary numbers. Restart the porting process.
If you are not happy with any number you have submitted, or if you need to change your order, you can simply make changes to your order and resubmit without going through the complete porting process. Restarting the porting process for a failed number, gives you the possibility to correct any erroneous information. To resubmit a porting request, go to Home > Phone numbers. Filter the numbers by Porting Failed or Porting Pending, and click ![]() next to a number. Select Resubmit porting request. Edit the order number and click Continue.
next to a number. Select Resubmit porting request. Edit the order number and click Continue.
You can remove a porting request for a failed or pending porting numbers. This capability allows users to remove a failed order due to a mistake or incorrect number. When you remove the porting request, the number will be removed from your system and the temporary numbers will either return to 8x8, Inc.or remain it in your inventory as a claimed number. To remove a porting request, go to Home > Phone Numbers. Find the available number in the list, click ![]() , and select Remove porting request from the menu. See how to Remove a Porting Request for more information.
, and select Remove porting request from the menu. See how to Remove a Porting Request for more information.
Transferring a number is free of charge, as long as you have purchased a license from 8x8 for the number you want to transfer.
Having all the required information ready makes the process quick and painless. In most cases, we can transfer your number within 10 business days from when you submit the number transfer request, provided that all the correct information and documentation is submitted, including a correctly filled out Letter of Authorization (LOA) and the correct Billing Telephone Number (BTN). In some cases, however, number transfers can take up to 4 weeks depending on when your current provider releases your number(s).
Yes, but you are responsible for any early termination fees charged by your current service provider for exiting the contract, plus any balance owed on your account.
Yes; as opposed to traditional telephone service providers, our services are mobile. With all our accounts, you can keep your phone numbers from another city regardless of where you are located; a great advantage of the 8x8 VoIP phone service.
Yes; all domestic US-based toll free numbers are transferable to 8x8, unless there is a contract that prevents you from doing so.
It is possible you may experience a lapse in service during the actual transferring process. This normally lasts only a few minutes. We will do everything we can to make sure that if downtime does occur, it is brief.
No; you cannot transfer a number that has DSL associated with it. You must contact your current provider to remove the DSL service from the line you want to transfer, and request a new number for the DSL service before starting the number transfer process. Otherwise, you can sign up for another type of high-speed broadband service (such as cable) before you transfer the number to 8x8.
In most cases, your provider automatically disconnects your account when the number transfers. However, we encourage you to contact your provider to ensure they have disconnected the service and stopped the billing to your account.