Manage Your Devices
The Device inventory helps you allocate and manage your devices in the phone system. Add new device models to your phone system, get an inventory of the device types, check if you have any unassigned devices to assign to new users, view if the devices are activated or not, drill down for more details for each device type.
Features
- Access a single consolidated view of your device inventory, showing if the device is activated or assigned to a user. The inventory also shows the site location.
- Access MAC addresses and activation codes through device report, helping administrators activate a number of devices at the same time.
- Add devices that a re supported by 8x8. You can buy your own device (BYOD), or buy new from 8x8 or any other vendor.
- Add unlimited number of devices of a certain type to your inventory. We do not keep track of the number of devices you add.
- Get support for DECT and ATA devices.
- Optimize voice and fax quality by selecting Analog fax or Analog voice.
-
Generate device report to view device details such as: device type, status, activation code, MAC address, and more.
Limitations
- Devices are synchronized immediately after configuration. The synchronization time cannot be set in advance.
- A port is automatically assigned by the system when configuring DECT devices. The port or socket number cannot be determined by users.
- Each user can have one device assigned.
Users must have devices to communicate with other users or customers. In 8x8 Contact Center
8x8 Admin Console, your contact center agents may need desk phones dedicated to handling contact center calls. Assign these agents with dedicated extensions. The dedicated extensions require you to assign phone devices while creating users. In preparation, you must add the desired phone model to the device inventory.
Follow the following steps to view devices, add them to your inventory, and assign them to users before activating them:
You can view all devices you have added to your site inventory in one single page. The devices are grouped together by the model number, such as Polycom VVX 300. You can also see if a device is assigned to a user or has been activated.
To view the device status and check the inventory:
- Go to Home > Devices.
All devices in your inventory appears on the device page. You can see how many of any device model is assigned to a user and active. - Click View device report.
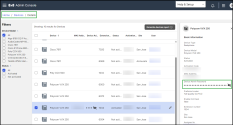
More information is presented such as MAC address, device admin password, extension number, status, activation code, site, and the user who is associated with the device. You can filter your view by Device Model or activation Status. Clicking the header row allows you to sort the results alphabetically. - In the Devices > Details page, click a device on the list to open the device's Info Panel. The device information such as device model appears on the right. The device model information specially helps when selecting a DECT base or an ATA terminal.
- In the Devices > Details page, for a quick and easy access to the Line Key configuration page, click
 next to the devices that are configured with Line Keys.
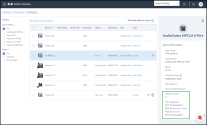
- To view port assignment for DECT bases and ATA terminals, and inspect what ports are assigned to users, click a DECT or ATA device in the list. The device's Info panel opens with the number of ports and the port assignments.
-
To see the device admin password, click Show
 next to it. Optionally, click Copy to clipboard
  to save it for future use, or click Hide
  to hide the password.
 - Click Generate devices report to download a report. The report allows administrators to print a list of information such as MAC address, MAC password, device model, extension, activation code, site, status, user, and number of users. You can activate a device remotely.
If you do not see the device you are planning to assign to your user in the inventory, you must add it. You can use any existing device or purchase one from a vendor, as long as it is supported by 8x8. Search and add the device of your choice before assigning it to users.
To add a device model:
Once you add a device to your inventory, you can assign it to any user. While editing a user, go to Voice Basic Settings > Device to select a device and save. You can activate the device at a later time. The devices you assign to the users must be activated before first use.
Note: You must select a license to be able to see the Voice Basic Settings.
To assign and activate a device:
- Go to Home > Users.
- While editing a user, go to Voice basic settings > Device model. The available devices in your inventory appear in the list. Select a device to add. You must select a base for DECT devices and a terminal for ATA devices. See how to add a DECT or ATA device.
- When you select a device, you need to activate the device. You can Activate Device by:
- Input MAC address: You can activate the device remotely. Select Input MAC address and enter the unique alphanumeric identifier assigned to the device for the user. The device is activated remotely once the user is saved. A MAC address is ideal when there is no email associated with the user, such as lobby or computer lab phones.
- Use an Activation Code: You can activate the device directly from the device. Select Use an Activation Code. Once the user is saved, an automatic code is generated by the system for the device, and associated with the user. The activation code is then sent to the user in their welcome email. The user can activate the device from their desk by calling the 8x8 registration service and entering the activation code.

- Click Save.
If you have selected the activation code, look for a welcome email and follow the instructions to activate your phone. For activating a number of devices, you can generate a report, print the list of devices and their access codes, and activate the devices remotely.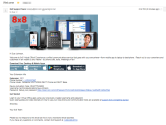
8x8 supports DECT (cordless) phones such as Yealink. A DECT phone includes a handset and a base. For a Yealink DECT phone, you can have up to four handsets. With four handsets, you can handle foursimultaneous calls.
To assign a DECT phone, check your device inventory first. If you do not have a DECT phone, you need to add a base first. A handset is included with the base and automatically added to your inventory.
To assign DECT phones to users:
- Go to Home > Devices.
- Check your device inventory to see if you have a DECT. If you do not have a DECT, you can click +Add device model to add a base such as Yealink W52p. See how to add a device to your inventory.
- Click Add device model again.
The system automatically adds the DECT Handset to the inventory.
You now need to assign the handset to a user. - Go to Home > Users.
- While editing a user, select a handset from the Device drop-down menu.
The Base device field appears as soon as you select a handset. A message in red next to the field indicates the device has not been activated. - From the Base device drop-down menu, select the corresponding base.
Note: For best practice, click Change Base Name and rename the base according to the department, group, or team, to easily locate it later.
Note: For DECT units, the system allocates the next available port. If all ports are used, the DECT base does not appear in the list. Yealink DECT phones come with four ports.
- Select an activation method. You can either activate the device remotely or send the user the activation code. See how you can activate a device.
- Click to Save the user.
Users must plug in their base and handset, and connect to Ethernet. They may need to activate their phones, if not activated remotely, and pair the handset with base. Follow the instructions on Yealink activation and pairing guides.
You may need to add an additional DECT base for the users who have recently joined your company. Let's say you have eight handsets with a Yealink DECT base that are already assigned to users. You've just hired a new employee and need a second base of the same type to add the new employee's handset to. Since you have added the device type for your first base already, you just need to rename the base to differentiate it from the first base.
To add an additional DECT base:
- Go to Home > Users.
- While creating or editing a user, go to Device and select a DECT handset, such as .
- Select Add new base from the list.
- In the Add new base unit window, select a base model, enter a name, and click Add device.
The new base appears in the Base device. - Follow the instructions to activate your device before the first use.
- Click Save.
Generating the report for available devices allows administrators to download and access the information they need to activate phones prior to going live, for example. The report includes: MAC address, MAC password, device model, extension number, activation code, site, activation status, user's name, and the number of users. You can activate a device remotely.
To generate devices report:
You can purchase additional devices directly from the Devices page or by clicking Shop from the Self Service section on the Home page.
To buy new devices:
FAQ
Refer to the following frequently-asked questions for more information:
You may need more handsets for your growing company. You can add up to efour handsets to your Yealink DECT base. Plug in the DECT handset. The Initial handset in the Kit box and the base are paired together at the factory. All other handsets need to be paired to the base and are activated individually.
- From the main menu in 8x8 Admin Console, go to Home > Users.
- Select a user to assign the handset to.
- Select a handset from the Device drop-down menu.
- Select a base from the Base device drop-down menu.
If you are selecting an existing base that is already activated, you do not need to activate it again. - Click Save.
The user is saved with a DECT handset.
You may have a broken or non-functioning handset that you like to replace. If the handset is for the same user, you do not need to do anything from 8x8 Admin Console. Use the new handset to cancel the old base and then pair it with the new base.
- From the DECT handset, select Menu > Settings > System Option > Cancel Base and choose the base you are canceling.
- Click Yes to delete the base.
- Turn on the new base you wish to pair the handset to.
- When it shows a solid green light, hold the locator button on the side of the base for about four seconds, until the status indicator flashes red.
- Press and hold the OK soft key on the handset until the display reads: "Please wait..."
It may take a couple of minutes. The phone display reads "Registered" and the light on the base goes solid green again. It also shows a Handset and a number. The handset is paired with the base unit. The handset may download some files.
You may have a broken or non-functioning base that you like to replace. For convenience, better choose the user that is allocated to port 1 in the current base.
- From the main menu in 8x8 Admin Console, go to Home > Users.
- While editing a user, select the handset from the Device list.
- Select Add new base from the Base Device list.
- Select the base type and give it a name.
- Follow the instructions to activate your device before the first use.
- Click Save to save the user.
You may have a user who has left the company and you need to assign her handset to a new team member. To re-assign a DECT handset, find another user and assign the device to.
- From the main menu in 8x8 Admin Console, go to Home > Users.
- Choose a new user you like to assign the handset to and click Edit.
- Select the DECT handset model from the Device drop-down menu.
- Select the existing Base device and click Save.
If you have activated the base already, you do not need to activate it for the new handset.
- From the main menu in 8x8 Admin Console, go to Home > Devices.
- Check your device inventory for an ATA, or click +Add device model to add a new ATA.
- Open the Users page.
- While editing a user, go to Device and select either an Analog fax device or Analog voice device.
Selecting a specific fax or voice device ensures the optimum voice and fax quality in the system.Note: You can assign one device per user. If you want to have both fax and voice devices, you need to create two users. Create a user for fax machine and assign the analog fax device to it.
- Click Select ATA terminal.
- Specify a Port number. Only the available ports are presented to you. You can determine what port you are connecting your terminal to.
- You must activate your device before the first use.
- Click Save to save the user.
To download the activation codes:
- Go to Home > Devices.
- Select a device model from the list, and click View device report.
- In the Devices > Details page, click Generate devices report. An excel sheet is downloaded with the device information such as: MAC address, MAC password, device model, extension number, activation code, site, activation status, user's name, and the number of users. You can activate a device remotely.

