Plan for a Disaster Event
To test your Disaster Recovery plan, choose an unassigned number in your list of available numbers. If you do not have one please reach out to 8x8 Sales. At a minimum, you should use this test number as well as other designated channel numbers monthly. 8x8 strongly recommends, and most industry guidelines require, conducting a full DR failover test at least once a year. As contact center managers , you must set up a disaster event contingency plan for the contact center, test the plan ahead of time so you can activate it instantly when you need it. The plan should identify the CC channel numbers to be rerouted to the companion tenant or to the alternate phone numbers, as needed. With the plan in place and with a few clicks in 8x8 Configuration Manager, your contact center traffic is automatically rerouted without the need to contact 8x8 Support.
Learn about features and limitations of Contact Center Disaster Recovery service.
Configure a Disaster Recovery Plan
Configuring a disaster plan involves:
- Setting up rerouting user logins (agent and admin logins): Allow agents to log in like before, but during a disaster event, the system diverts them to the DR companion tenant.
- Setting up rerouting voice channels (service and agent channels): Allows you to divert the contact center's inbound telephony traffic to the companion tenant or alternate phone numbers.
To configure a disaster plan:
- Log in to Configuration Manager by going to https://login.8x8.com from your preferred browser. The Application panel launches allowing you to access multiple 8x8 apps.
- Select to launch the Virtual Office Configuration Manager.
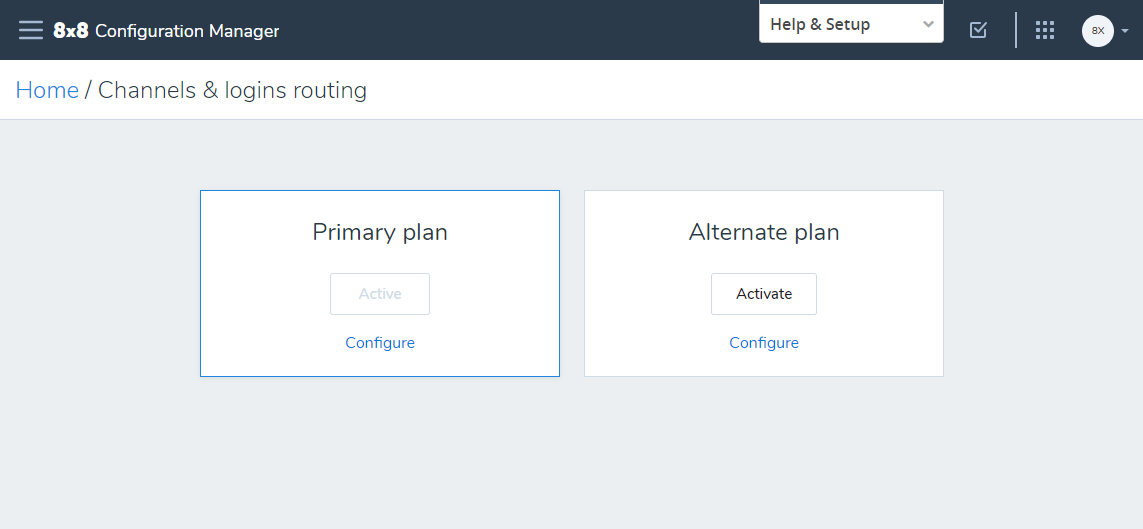
- From the menu, go to Channels and logins routing.
-
Note the plans available to your contact center.
- Primary Plan: Determine call routing during normal business operation.
- Disaster Plan: Determine call routing during a disaster event. (Available to DR customers only)
- Alternate Plan: Allows to test and validate selected routing options.
- Select to configure the Disaster Plan. This requires you to select a routing option for user logins and voice channels
- Under User Logins, select to edit each user individually or select all users and click Edit Routing Plans.
- At the prompt, select to redirect user logins to the disaster recovery companion tenant.
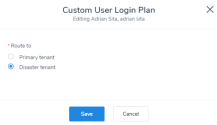
- Click Save to complete.
- Under Voice Channels, select to edit each channel individually or select all channels and click Edit Routing Plans.
- At the prompt, select to route all interactions directed to these voice channels to the disaster recovery companion tenant.
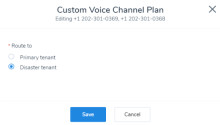
- Click Save to complete. Your Disaster plan is now ready to be activated any time.
- Prior to a disaster, activate the disaster plan to switch over to the companion tenant.


Test a plan
To ensure business continuity during a disaster, 8x8 recommends testing the disaster plan ahead of time. We recommend setting up the rerouting options in an alternate plan, test, and validate. Alternatively, you can select a couple of channels and agents in the Primary plan or the Disaster plan and point them to the DR tenant.
To test a plan:
- Log into VO-Configuration Manager.
-
From the menu, go to Channels and logins routing. Select a plan and edit it.
- Under User Logins, select a couple of users and redirect them to the DR tenant.
- Under Voice Channels, select a couple of test channels and point them to the DR tenant.
- Save your changes.
- If the plan is not already active, activate the plan and get ready to test the plan.
- To validate the effective change, have the two agents log out and log back in. Ensure the selected agents are directed to the DR tenant and have received interactions.
-
If you choose to test it on a non-active plan, set up the Alternate plan:
- Select a couple of test channels and point them to the DR tenant.
- Select a couple of agents and point them to the DR tenant. Save your changes.
- Activate and test the alternate plan.
- To validate the effective change, have agents log out and log back in. Ensure the selected agents are directed to the DR tenant and are receiving interactions.
NEXT STEPS
- Set up the Disaster plan according to your business requirements. Follow the steps described here.
- Activate the plan prior to or during a disaster.
- Switch back to the primary tenant after the disaster period passes. Learn more about switching back.
Note: All configuration changes done using the CC Configuration Manager in the companion tenant are not copied over to the primary tenant.
Reroute Chat and Email Channels
8x8 Contact Center Disaster Recovery Companion Service is intended to provide on-demand administration to manually redirect your contact center voice traffic to your companion tenant or other phone numbers. If your contact center is using email and chat channels, you must configure to redirect chat and email interactions to the companion tenant.
NOTE: The CRM record updates done while on the companion tenant do not transfer to the primary tenant upon switching back to the primary tenant. They must be copied manually. Updates to customer, case, follow-up, and task records need to be copied manually. With this limitation, we recommend redirecting chat and email channels to the DR tenant if you anticipate functioning on the DR tenant for a significant period of time.
Rerouting Email Channels
To redirect email interactions to the DR companion tenant, you must:
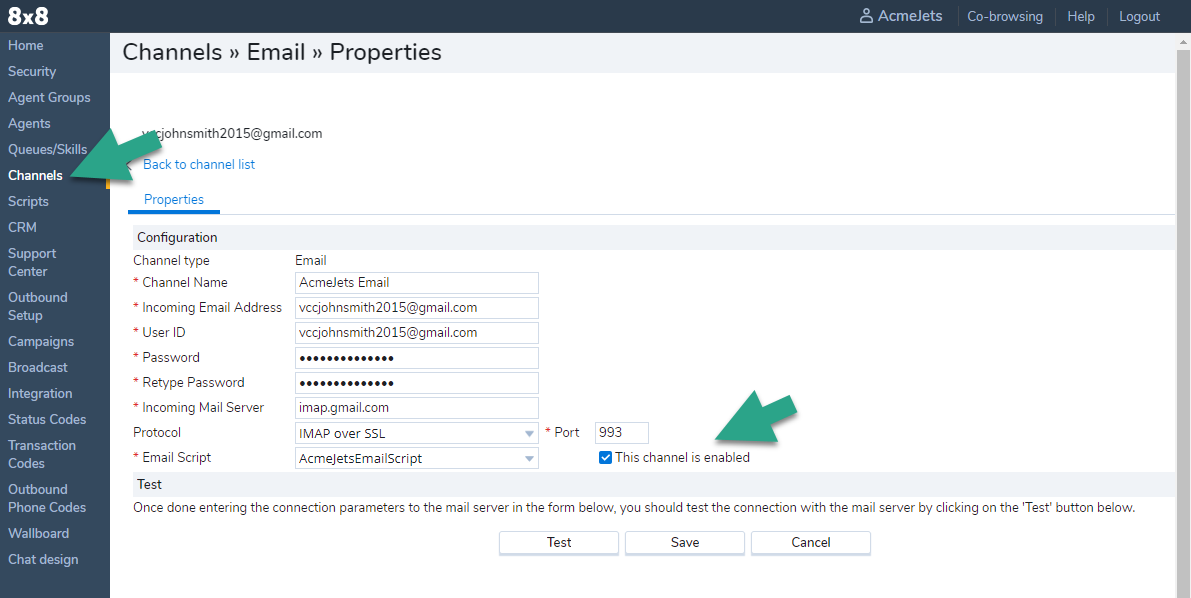
- Copy the mail server credentials in the email channel properties of the primary tenant and paste them in the email channel of the companion tenant.
- Activate the email channel on the DR tenant to retrieve emails from the email server.
- Disable the email channel in the primary tenant to temporarily stop retrieving emails.

Rerouting Chat Channels
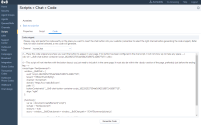
- Update the code snippet generated by the primary tenant which is being used on your web page offering chat servicewith snippet generated from the DR companion tenant.
- Update Co-browsing, email rerouting after hours offered in chat.

Switch Back to the Primary Tenant after the disaster
To switch back to the primary tenant after the disaster, you must log back in to Virtual Office Configuration Manager and activate the Primary plan in Channels and Rerouting. We recommend following the checklist below to be fully back on the primary tenant.
Voice Channels
- Log into the VO-Configuration Manager.
- Activate the Primary plan or the plan used during your normal business operation.
- Have your agents log out and log back in.
- Ensure the agents are redirected to the primary tenant and are receiving interactions via the channels in the primary tenant.
For chat channels
Update the web page offering chat services with the code snippet generated by the primary tenant.
For email channels
To redirect email interactions from the DR companion tenant to the primary tenant, you must:
- Copy the mail server credentials in the email channel properties of the DR tenant and paste them in the email channel of the primary tenant.
- Activate the email channel on the primary tenant to retrieve emails from the email server.
- Disable the email channel in the DR tenant to stop retrieving emails.
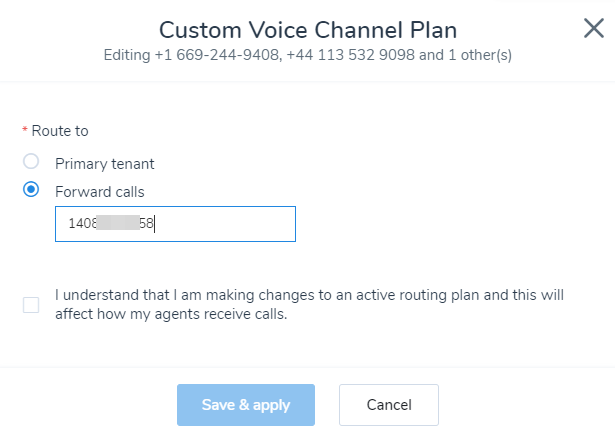
Configure Channel Rerouting (For users without the Disaster Recovery Service)
If your company does not subscribe to 8x8 Disaster Recovery Companion Services, you can still use our Channel Rerouting services and forward calls from channels to external phone numbers for call redirection.
- Log into VO-Configuration Manager and go to Channels and Rerouting from the menu.
-
Note that you have access to the following two plans:
- Primary Plan
- Alternate Plan

- Under Voice Channels, select the channels you want to reroute the traffic from and click Edit Routing Plans or select to edit channels individually.
- At the prompt, select to forward calls to the primary tenant or an external phone number.
- If you choose to forward calls to an external phone number, enter the phone number.

- If you are editing an active plan, acknowledge that you are making changes to an active plan.
- Click Save and Apply.
- To ensure that rerouting has taken effect, place a test call to the channel that has been redirected and confirm that you receive the call from the redirected number.