Assign roles and groups
8x8 Contact Center with 8x8 Work administrators must first create user profiles in 8x8 Account Manager and assign the agent or administrator privileges to them. They can then continue configuring those users in 8x8 Configuration Manager and define their roles and groups.
The new administrators are automatically assigned to the System Default role in 8x8 Configuration Manager. The System Default role has View permissions by default. However, you can modify it by allowing other permissions such as Write, Create, and Edit. The new administrator appears under the admins list indicated with a check mark. The Secondary administrator is indicated with (2). A default group, called ungroup, is assigned to all agents. You can create a new group later and use it instead of the default group.
To assign roles and groups to the users:
- From the Configuration Menu, open Users.
- Click
 to open and configure a user account.
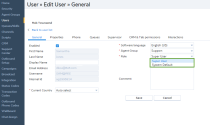
-
Enter the required information.
The following table summarizes the options under Users > General.
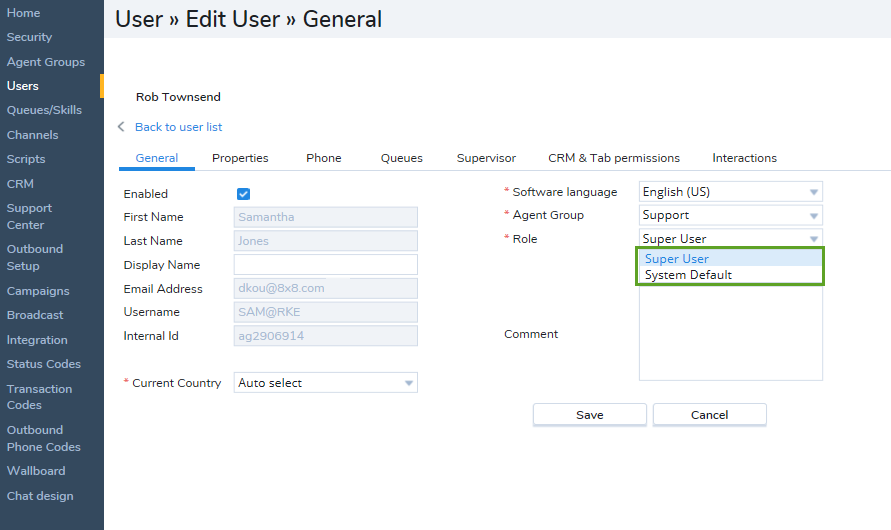
General Tab Option Description Enabled If selected, allows the user to log in to 8x8 Agent Console using their username and password. First Name This is a read-only field. The user's first name is entered by the administrator when creating the user profile in Account Manager. Last Name This is a read-only field. The user's last name is entered by the administrator when creating the user profile in Account Manager. Display Name Allows agents to present themselves with a customized display name. The display name can be modified by the 8x8 Contact Center administrator here, or if permitted, by the agents in 8x8 Agent Console. The changes immediately appear in the other application. To prevent agents from changing their display name at the tenant level, clear the Allow Agents to Change the Display Name checkbox under Home > Profile. Email Address This is a read-only field. The user's email address is entered by the administrator when creating the user profile in Account Manager. 8x8 Contact Center uses email to send users copies of their direct access voicemail messages. The email address is also used for the password reset emails. Outgoing Mail Server A user’s outgoing mail server is automatically populated with the tenant's default SMTP server. The default server can be either a VCC Internal server or a custom server. You can change the SMTP server. The changes are kept unless a new default server is set.
8x8 Contact Center administrators can configure users outgoing mail servers in three ways:
- Using the VCC Internal server
- Using a custom server
- Using a custom server but overriding with the specific account's user name and password (recommended)
If you use the VCC Internal server, you cannot override the server's default configuration, therefore, using the email address of the server. The emails sent by this user originate from the tenant’s default address which is not recommended.
Whereas a user that is configured to use a custom server configuration, such as [AcmeJets SMTP Server], overrides the default server configuration . The emails sent by this user originate from the address of the new server. By overriding the server’s default configuration you make it more specific to the agent.
Override Server Configuration This option gives you the ability to direct your emails via the user specific email address. If you do not choose to override, the emails are directed via the custom SMTP server address and not the default server configured for this specific user. To ensure the secure email delivery sent by the user, we recommend you to choose override. Username This is a read-only field. By default, a user’s email address is copied into the Username field when creating the user profile in Account Manager. The username must be globally unique. If the email address is not unique within 8x8, or if you wish to create a username of your own, you must choose one that has never been used before. Internal Id Read-only ID automatically assigned by the system once a user profile is created in Account Manager. Current Country By selecting the country of an agent, you can optimize the call quality and routing. It hints the system about the agent's location and offers improved call quality. Software Language Choose the language used for the 8x8 Agent Console interface. Agent Group Select the users group assignment such as Sales, Support, Marketing, etc. You can select the default ungroup if no other group is defined yet. The system automatically assigns the agents to the default ungroup group. You can create agent groups by going to Groups from the Configuration Menu. For details, refer to Create Agent Functional Groups. Role Role is only available for administrators, but not 8x8 Contact Center agents or supervisors. Select an administrator role, such as: - Super User: Has full administrative capabilities as the Primary administrator
- System Default: Is a default role in the tenant that grants List and Details permissions to the administrators
- Any user-defined roles: Any admin roles, such as campaign manager, created by the administrator. You can create a new role by going to Security > Roles.
Note: The Role option under the General tab is available only to Secondary administrators. When you add a Secondary administrator, they are automatically assigned to the System Default role. If you have created another role, you can select it from the drop-down list. You can create roles by going to Security > Roles. For details, refer to Create Roles and Assign Administrators.
Comment Enter a description for the user's account. Agent Experience Selection Allows you to configure this agent to use the refreshed ‘Agent Workspace’ agent experience platform.
- Agent Console
- Agent Workspace - activated for this agent
- Flexible - Allows this agent to switch between Agent Console and Agent Workspace
- Save the changes. If you navigate away from this tab without saving changes, the changes are lost.
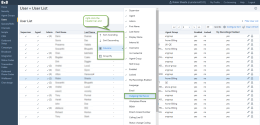
Note: You can view the outgoing email server for each user under the users > User list. To show this column, open Users, right-click the header bar of the Users list and select Columns > Outgoing Mail Server.

The next step is to configure user properties.