Manage contacts
The 8x8 for Microsoft Teams app (8x8 Teams app) includes integrated management of contacts, enabling users to create, modify, and remove personal contacts.
Note: This feature is disabled by default. Admins can activate contact management through the 8x8 Admin Console by enabling the Enable Contacts in MS Teams option under Work Apps Settings section. For further information, reach out your 8x8 for Microsoft Teams administrator, or see 8x8 Admin Console -Configure Work Apps Settings.
Contacts features
- Get to know the various contact types: Manage your contact directory effectively. Besides your colleagues, you can save frequently called external numbers as external contacts and designate any contact as a favorite for quick access!
- Navigate the Contacts directory to access contacts: Find your colleagues, personal contacts, and favorites effortlessly in the directory.
- Create and manage personal contacts: If you often call contacts at a partner company or make purchases for your organization, quickly turn a call recording or SMS chat into a personal contact for a smoother communication experience. Moreover, you can mark the colleagues you often communicate with as favorites for quick access, as well as create, update and delete personal contacts.
- Company contacts set up through the 8x8 Admin Console app nay be linked with the corresponding SMS conversation.
Limitations
- Only personal and 8x8 company contacts are available in 8x8 for Microsoft Teams.
- The corporate contacts are unavailable in 8x8 for Microsoft Teams.
- Users cannot import contacts from third parties.
About Contacts
8x8 for Microsoft Teams allows you to communicate and coordinate with your contacts quickly and efficiently, whether they are contacts from your company phone system or personal contacts from outside of your organization.
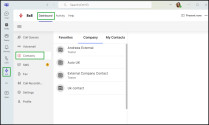
The Contacts tab displays specific types of contacts across different sections:
- Favorites: Lists the company and personal contacts you have marked as favorites on the app.
- Company: Shows contacts from your company phone system that have been created by your admin. You can view contact details, message your contacts and mark them as favorites.
- My Contacts: Shows the personal contacts you have created in the app. You can view contact details, message your contacts and mark them as favorites. Additionally, you can create, edit or delete personal contacts.
Note: When you start using 8x8 for Microsoft Teams, your contacts will be limited to those within your company's phone system. However, you can always create personal contacts using external phone numbers if necessary. Additionally, both company and personal contacts can be added to your favorites list for quick and easy access.
Contact Cards
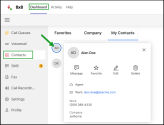
Contact cards display information about any of your contacts. You can access any of your company, personal, and favorite contacts in the 8x8 Teams app from different locations within the application:
- Contacts list and avatars
- SMS messages list and avatars
- Call Recordings list and avatars
Click the contact profile picture or avatar to view the contact details quickly. From the contact card, you can:
- Click SMS
 to initiate a chat communication with any of your contacts.
 - Click Favorite
 to move the contact to your Favorites list.
 - Click Edit
 to change the details of your contact card.
 -
Click Delete
 to delete the contact from your contacts list.
Access Contacts
You can quickly manage your contacts in the Contacts section.
To access a specific contact:
- In the 8x8 for Microsoft Teams's Dashboard, select Contacts
 from the side navigation menu.
 - The Contacts screen displays your contacts in the Favorites, Company and My Contacts tabs.
- Select the relevant contact list tab to access your company, personal, or favorite contacts. With just a click or two, you can chat with a contact, send or receive a fax, or view their contact details.
Note: You can also access your contacts from SMS ![]() or Calls Recording
or Calls Recording ![]() by clicking the desired contact from the list of recent chats or voicemails.
by clicking the desired contact from the list of recent chats or voicemails.
Create and manage personal contacts
If you often call numbers that are not in your company directory, you can create personal contacts for easy access. These contacts are private to you and can be edited as needed.
Personal contacts are visible only to you and can be edited as needed.
Note: This feature is disabled by default . Admins can activate contact management through the 8x8 Admin Console. For further information, reach out your 8x8 for Microsoft Teams administrator, or see 8x8 Admin Console -Configure Work Apps Settings.
- Go to Contacts
 > My Contacts.
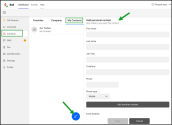
 - Click New Contact
 > Add new contact to begin creating a new contact.
 -
Enter the contact's details, including name, job title, company, phone number, email address, and other relevant information as needed.
- Click Save. The personal contact now shows up under Contacts
 > My Contacts.
- From the Dashboard, navigate to SMS
 or Call Recordings
  .
. - Hover over the desired contact and click More
 > Create new contact
  to begin creating a new contact. The number and Caller ID (if available) are automatically populated.
 - Enter the contact's details, including name, job title, company, phone number, email address, and other relevant information as needed.
- Click Save. The personal contact now shows up under Contacts
 > My Contacts.
Note: You can edit the information associated with your personal contacts but you cannot edit the information for company contacts created by your administrator.
- Go to Contacts
 > My Contacts.
 - Hover over the desired contact and click More
 > Edit
  .
. - Make the desired changes and save.
- Go to Contacts
 > My Contacts.
 - Hover over the desired contact and click More
 > .Delete
  . The contact is no longer listed under your contacts.
Favorite contacts
If you often communicate with a company or personal contact, consider adding them to your favorites list for easy access.
- Go to Contacts
 > Company or Contacts
  > My Contacts..
 - Hover over the desired contact and then click View contact details
 .
. - While in the contact details, click Favorite
 to mark them as a favorite contact.
 - The contact is now listed under Contacts
 > Favorites.
- Go to Contacts
 > Favorites.
 - Hover over the desired contact and then click View contact details
 .
. - While in the contact details, click Favorite
 to remove them from your favorites.
 - The contact is no longer listed under your favorites.


