Configure the 8x8 storage policy
Note: Purchased storage remains available only for as long as the customer remains a customer of 8x8. Otherwise, to protect your customer data, 8x8 shall delete your data in accordance with its data retention policies.
Through the 8x8 Admin Console, you can access and configure both default and custom storage policies.
You can easily manage the storage policies from the 8x8 Admin Console by accessing the Storage Policy dashboard.
To access storage policies:
- Go to https://login.8x8.com.
- Enter your user credentials and click Login.
- In the 8x8 Application Panel, select Admin Console.
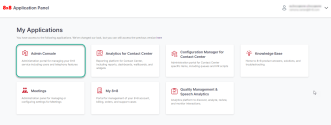
- The Home page, click Storage Policy.
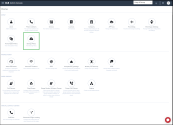
- The Storage Policy page displays, allowing you to manage any available license you need.
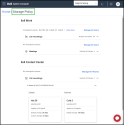
Note: The number of default policy cards that display depends on the licenses purchased. To learn more about default and custom storage policy, click here.
Once you access the Storage Policy feature from Admin Console, the Storage Policy page displays a dashboard containing all the available licenses purchased for your site, grouped in two main categories:
-
8x8 Work - displays the licenses used in a certain X-series license, grouped under the following extendable sub-categories:
- Call recordings
- Meetings
-
8x8 Contact Center - displays the licenses applied to all agents in a specific tenant and service (X-series), grouped under the following extendable sub-category:
- Call recordings
- Screen recordings
Each sub-category displays data about:
-
Unassigned Licenses - The number of unassigned licenses for both hot and cold storage displays above each sub-category.
Note:When you click View More, a new window that pops up displays the number of unassigned licenses for both hot and cold storage types.
- Number of Policies - The total number of policies for that product displays on the right side of each sub-category row.
Each license displays the available Default and Add-ons (custom) cards, and each of them contains details for both Hot and Cold storage, such as:
- Number of used licenses - The number of users assigned to a specific license.
-
The Hot and Cold storage license type:
-
Default storage - The default number of days assigned.
- Custom storage - The custom number of days assigned.
-
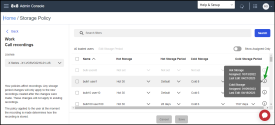
While you are editing storage policies, in the managing storage policies page, you can access information about the date when the user was first assigned to the license, as well as the date of the last edit of the hot and cold storage license, for each available user.
Note: The license will apply to users after the last editing. The recordings made before that remain valid for the previous license.
You can manage storage policies by editing their license type, hot storage limits, and cold storage limits. When a default policy does not suit your particular business situation, you can define a custom storage policy.
Notes:
- For 8x8 Work users, storage policies that are included by default in the X series licenses are also automatically assigned together with the licenses, but all storage add-ons (130 days hot and any type of cold) must be manually assigned to the users they were purchased for.
- For 8x8 Contact Center users, all storage policies are automatically assigned.
To edit individually storage policies:
-
In the Storage Policy page, in the right side of the selected storage policy row you want to edit, click Manage All Users (for 8x8 Work) or Manage All Tenants (for 8x8 Contact Center). A new page displays a list of all users.
Note: The users displayed in gray in the users list do not belong to the selected license. Optionally, you can switch on the Show Assigned Only toggle to filter the users list and to display only the users enabled to the selected license.
- In the left panel, from the License list, select the license you want to edit.
-
At this point you can choose edit users:
- Individually - Go to the next step and select the user you want to edit, then assign the user to a default/custom storage policy license.
- In bulk - Select more than one user and assign them with a single setting process to a default/custom storage policy license.
-
In the row of user you want to edit, click Hot storage and select one of the available hot storage licenses you want to assign to that user.
Notes:
- You can create a custom policy only for one 8x8 Work’s sub-category, either for Call recordings or for Meetings sub-category.
- For the same license, a user cannot be assigned simultaneously to more than one policy: you can choose either the default or the custom policy -
In the row or user you want to edit, click Hot Storage Period and in the Hot Storage Period window that displays, select one of the available options you want to assign to that user:
- Default to assign the default hot storage period to that user.
- Define custom to set up a new hot storage period.
-
Optionally, to define a custom hot storage period:
- In the Assign Storage window that displays, adjust the slider or type the number of days to set the hot storage period.
- Click Save. and continue to configure your storage policy.
-
In the row or user you want to edit, click Cold Storage and you can choose to:
- Select one of the available cold storage policies.
Or
- Click Remove License to unassign that license for this user.
Note: The Cold storage option is enabled only if purchased and cannot be added to the default storage policy. You have to previously purchase it as an add-on for only Contact Center and screen recordings.
-
In the row or user you want to edit, click Cold Storage Period and, in the window that displays, select one of the available options you want to assign to that user:
- Default - To assign the default cold storage period to that user.
- Define custom- To set up the cold storage period.
-
Optionally, to define a custom cold storage period:
- In the Assign Storage window that displays, adjust the slider or type the number of days to set the cold storage period.
- Click Saveand continue to configure your storage policy.
- Click Save. to save your new storage policy.
The new license settings are assigned to the user.
Important! While you are editing your storage policies and you click Cancel (1) or Back before saving your changes, you will lose all changes you made so far. To save your changes, you have to click Save:
- While you are editing your storage policies, and you click Back ![]() in the browser, you may lose the entire editing session, and your changes will be lost!
in the browser, you may lose the entire editing session, and your changes will be lost!
- While you are editing storage policies, and you click Back![]() (2) in the managing licenses page, a new window opens and you can choose to:
(2) in the managing licenses page, a new window opens and you can choose to:
(3) - Click Discard Changes and remove the unsaved changes.
(4) - Click Save and save all changes you made.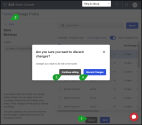
Important! You can edit storage policies in bulk only for 8x8 Work products. You cannot edit bulk storage policies for 8x8 Contact Center.
To edit a storage policy:
-
In the Storage Policy page, on the right side of the selected storage policy row you want to edit, click Manage All Users (for 8x8 Work) or Manage All Tenants (for 8x8 Contact Center). A new page displays.
NoteThe users displayed in gray in the users list do not belong to the selected license. Optionally, you can switch on the Show Assigned Only toggle to filter the users list and to display only the users enabled to the selected license.
- In the left panel, from the License list, select the license you want to edit.
-
At this point you can choose to:
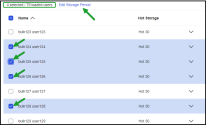
- Select certain users one-by-one - Select the checkboxes near the specific users you want to assign to a default/custom storage policy, with a single setting process.
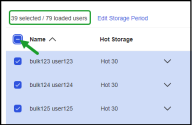
- Select loaded users - Select the checkbox next to Name, then assign them to a default/custom storage policy license with a single setting process .
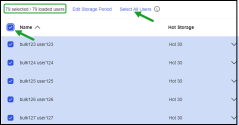
- Select all users belonging to the selected license - Select the checkbox next to Name and click Select All Users to assign them to a default/custom storage policy license with a single setting process.
-
Click Edit Storage Period above the user list.
-
In the Assign storage window that displays, configure the license assignment.
-
Click Hot Storage and select one of the available hot storage licenses you want to assign to that user.
-
Click Hot Storage Period and select one of the options:
- Click Default to assign the default hot storage period to that bulk of users.
Or
- Click Define custom to set up a new hot storage period for that bulk of users.
- Optionally, to define a custom hot storage period: adjust the slider or type the number of days to set the hot storage period. Click Save.
-
Click Cold Storage and you can choose one of the options:
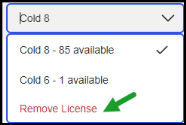
- Select one of the available cold storage policies for that bulk of users.
Or
- Click Remove License to unassign that license for that bulk of users.
Notes:
- The Cold Storage option is enabled only if purchased and cannot be added to the default storage policy.
- You have to previously purchase it as an add-on for only Contact Center and screen recordings. -
Click Cold Storage Period and in the window that displays:
- Click Default to assign the default cold storage period to that bulk of users.
Or
- Click Define custom to set up the cold storage period for that bulk of users.
- Optionally, to define a custom cold storage period: In the Assign Storage window that displays, adjust the slider or type the number of days to set the cold storage period. Click Save.
-
Click Save to save your changes.
The new license settings are applied to all the selected users.
Notes:
- You can only create a custom policy for call recordings or meetings. You cannot select both options at the same time in one custom policy.
- A user cannot be assigned simultaneously to more than one policy for the same service at a time. For example, an X2 user cannot be assigned simultaneously to both the default X2 policy for a custom X2 policy.
You can unassign a custom cold storage policy license to a user, whenever necessary.
Notes:
- The Cold Storage option is enabled only if purchased and cannot be added to the default storage policy.
- You have to previously purchase it as an add-on for only Contact Center and screen recordings.
To unassign a custom storage policy license to a user:
- In the Storage Policy page, in the right side of the selected storage policy row you want to edit, click Manage All Users. A new page displays.
- In the left panel, from the License list, select the license you want to edit.
-
In the users list, in the selected user row you want to edit, click Cold Storage, > Remove License to unassign that license to this user.
- Click Save, to save your changes.
The custom cold storage policy is now unassgined and users (based on their license) are automatically reassigned back to the call recordings default policy.
You have the ability to use the search filter of the 8x8 Work products in the main dashboard and in the detail pages.
Let’s say you have a long list of users and you need to search for certain users to assign a storage policy, you now have the ability to filter the data by:
- Department
- First Name
- Last Name
For each filter, you can further narrow the users list by choosing one of the following criteria:
- Is - finding an exact match to a complete word you entered
- Isn't - finding any information which is not an exact match
- Contains - finding an exact match of any consecutive characters within any text
-
In the Storage Policy page, on the right side of the selected storage policy row you want to edit, click Manage All Users (for 8x8 Work) or Manage All Tenants (for 8x8 Contact Center). A new page displays.
Note: The users displayed in gray in the users list do not belong to the selected license. Optionally, you can switch on the Show Assigned Only toggle to filter the users list and to display only the users enabled to the selected license.
- In the left panel, from the License list, select the license you want to edit.
-
Click the Search filters box, then select one of the available filters you want to use to filter the data:
- Department
- First name
- Last name
- Choose the appropriate criterion to filter the data.
-
You can choose to:
- Enter the search input to set the filter criterion.
Or
- Select the users you want to use from the list that displays.
- Click Finish.
- Click Search next to the Search filters box.
The users list now is refined based on your filtering criteria.
In the Storage Policy managing licenses page, users are displayed in alphabetical order, by name. You now have the ability to sort users in ascending or descending order, to better suit your needs. By default, users display alphabetically, in ascending order.
To sort users by name:
- In the Storage Policy managing storage page, click the arrow
 next to the header of the Name column to display users alphabetically, by name, in ascending or descending order.
 - To reverse the order users are displayed, click the arrow
 again.
