Set up 8x8 Frontdesk
Audience: Applicable to 8x8 admins only.
To enable 8x8 Frontdesk to a user, you must log in to 8x8 Admin Console. Whether your business requires a single receptionist or multiple receptionists, the following recommended settings may be used to set up 8x8 Frontdesk to meet your varying business needs. We have provided guidelines for the following scenarios:
In this basic use case where a business needs a receptionist to receive and route all incoming calls, enabling a user with 8x8 Frontdesk involves the following steps:
- User: Create a receptionist user, assign an X4 license, and enable Frontdesk.
- User: Assign a phone number for the receptionist.
- Site: Assign the receptionist number as the Site Main Line Number.
To enable 8x8 Frontdesk for a user:
- Log in to 8x8 Admin Console.
- Go to Users.
- Select to edit the desired user or create a new user.
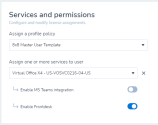
- In the user settings, under Services and permissions, if the user is assigned with an X4 license or higher, switch the Enable Frontdesk toggle on.
- Proceed to assign a phone number to the user.
To assign the receptionist phone number as the site main line number:
- Go to Sites.
- Select to edit the site to which the user belongs.
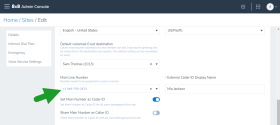
- Under Voice Service Settings, select the phone number of the user enabled with Frontdesk in the previous step as the site Main Line Number. Users calling the site main line number will reach the receptionist.
With this setup complete, the user enabled with 8x8 Frontdesk can now log in to 8x8 Work for Desktop and access the Frontdesk functionality.
In this use case, your business wishes to route all incoming calls via an auto attendant. During open hours, you want to offer callers an option to reach the receptionist along with other options.
Let’s say a single receptionist is required to manage calls for multiple businesses. The receptionist must then greet the callers with appropriate greetings based on the destination number called. The receptionist must be assigned with additional numbers to receive and route calls to multiple companies. Here are the recommended steps to set up.
- User: Create or edit a receptionist user, assign an X4 license, and enable Frontdesk.
- User: Assign a phone number to the receptionist.
- Site: Assign the receptionist number as the Site Main Line Number.
- User: Assign additional numbers to the receptionist, each of which receive calls for a specific company.
- Greetings: Assign dedicated greetings to phone numbers assigned to the receptionist user.
- Site: Create multiple sites based on your requirements.
- User: Create a receptionist and assign to a site.
- Ring Group: Create a ring group, assign to a second site, and add the receptionist as a member.
- Greetings: Create a ring group on the receptionist number, as well as the ring group assigned to the second site, to show different greetings and site filters.
Let’s say your company requires multiple receptionists to manage the massive call volume, follow the recommended steps below to create multiple receptionist users and assign them to a call queue or ring group.
- User: Create or edit receptionist users, assign X4 licenses, and enable Frontdesk.
- User: Assign numbers for the receptionists.
- CQ/RG: Create a call queue (CQ) or ring group (RG) for reception and assign a number.
- CQ/RG: Assign receptionist users as members of the work group.
- Site: Assign the CQ/RG number as the Site Main Line Number.
Let’s say the assigned receptionist leaves the company or goes on a vacation; we recommend following these steps:
- Site: Temporarily assign the Site Main Line Number to another user or auto attendant.
- CQ/RG: Remove the old receptionist user from their call queue (CQ) or ring group (RG), if set.
- User: Reset old receptionist user.
- User: Delete old receptionist user.
- User: Create receptionist user, assign an X4 license and enable Frontdesk.
- User: Assign the old number and extension for the new receptionist.
- Site: Assign back the receptionist number as the Site Main Line Number.
Greeting is a short message presented to callers by the 8x8 Frontdesk receptionist when a call comes in. The greeting serves as a reminder for the receptionist to greet the callers with a particular message that is intended for those callers.
To add greetings:
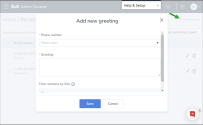
- Go to Home > Receptionist greetings.
- Click + Add greeting.
- Select a phone number from the list of available numbers. The greeting will be linked to this phone number. When a call comes into this number, the receptionist can view this message and greet the caller appropriately.
- Add the greeting text.
-
Select a site to auto-filter the phone numbers in the contact directory to entries from that site so that the receptionist can quickly navigate through the filtered list and direct an incoming call. This is optional.
-
Click Save.
When an incoming call is received by a receptionist on the 8x8 Frontdesk for this number, the greeting message pops allowing the receptionist to greet the caller appropriately before directing the call to the intended users or departments.
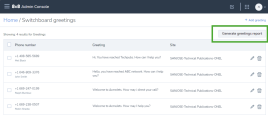
Click Generate greetings report to get a consolidated report of all greeting messages associated with phone numbers and corresponding users.
