Get started with 8x8 Work for NetSuite
Once you have access to , go through the following steps to get started: 8x8 Work for NetSuite
- Gather your credentials
- Log in to the integration
- Ensure the integration is activated
- Tour the interface
- Access records
Gather your credentials
In order to use 8x8 Work for NetSuite, you need:
- Login access to a NetSuite account
- Login access to an 8x8 Work extension
8x8 Work for NetSuite is dependent on your 8x8 Work extension also being logged in to either on your desktop or a mobile device.
Log in to the integration
Single Sign-On is not supported for NetSuite; log in to the integration using individual system sign-on.
To log in to the integration:
- Log in to your NetSuite account.
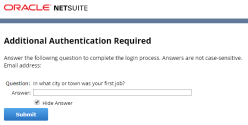
- In the NetSuite additional authentication screen, enter the answer (received from your supervisor) to the secret question in the Answer field.

- Click Submit. The NetSuite Home Dashboard screen displays.
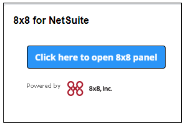
- Select the 8x8 for NetSuite section to expand it.

- Select Click here to open 8x8 panel to open the 8x8 floating browser.

- In the Setup screen in the 8x8 floating window browser:
- Select Virtual Office from the upper right-hand corner drop-down menu.
- Click Save. Single Sign-On is not supported.
The Advanced setup screen appears the first time you log in and after clearing your browser cache. You can access it under Settings > Advanced tab.

- At the prompt, enter your user ID and password to log in to 8x8 Work for NetSuite. Consult your supervisor for credentials.
- You are now logged in to the app.
Note: Multiple invalid login attempts may lock you out.
Ensure the integration is activated
In order for your integration to function, ensure that the integration is connected with NetSuite via your settings. The integration is enabled by default.
To activate the integration:
- Click the Settings
 icon in your integration panel.
 - Go to Integrations > Netsuite > Connect. If connected successfully, you see a message summary.
- Click X to return to the main screen of the integration. Your integration is now active.
Tour the interface
The 8x8 Work for NetSuite interface consists of a navigation menu with the following menu items.
- Work tab: Access the primary features of the integration.
- Phone
 : Access your dial pad and view your active calls.
 - Call Log
 : Access all historic inbound and outbound calls to the extension. From here, you can also access notes that you have created for each of your calls in NetSuite.
 - Records
 : Access records from NetSuite and contacts from the 8x8 Work contact directory.
 - More
 : Click to access the option to log out of the app.
- Phone
- Search tab: Assign records to active calls with unknown numbers or numbers that have multiple record matches. Enter a minimum of four characters in the search field and a matching list of search results is displayed.

- Settings
 : Customize your app settings.
- Integrations > Netsuite: Manage your NetSuite integration settings for call logging.

- Auto answer hard phone: Enable this option so that, if supported by the handset, calls can automatically be answered.
- Auto call log: Enable this option to automatically generate a log for all phone calls, chat interactions, and voicemails. A call log includes information about the time a call was initiated, terminated, duration, and more. This option is enabled by default.
- Call outcome: Define custom codes to collect information about the outcome of each call per user. Separate each option by a semicolon.
- Call history pop: Enable this option to allow the CRM to open the customer history page for outbound calls with a single matching record. The customer history page lists all activities associated with the customer.
- Screen pop on inbound call: Automatically pop a single match record for inbound call, when the call is in ringing state, in connected state, or select Never to prevent the screen pop for inbound calls.
- Pop a record during a call: Enable this option to allow screen pop during multiple concurrent interactions.
- Outbound pop: Enable this option to generate a screen pop for outbound calls.
- Pop behavior: Select the way a screen pop displays—in a new tab or a new window.
- Pop call in edit more: Enable this option so that the screen pop displays in edit mode.
Contact: Enable this option so that a call is searched for an existing contact record. This option is enabled by default.
- Customer: Enable this option so that a call is searched for an existing customer record. This option is disabled by default.
- Lead: Enable this option so that a call is searched for an existing lead record. This option is disabled by default.
- Prospect: Enable this option so that a call is searched for a prospect record. This option is disabled by default.
- Employee: Enable this option so that a call is searched for an existing employee record. This option is disabled by default.
- Vendor: Enable this option so that a call is searched for an existing vendor record. This option is disabled by default.
- Partner: Enable this option so that a call is searched for an existing partner record. This option is disabled by default.
- Case: Enable this option so that a call is searched for an existing case record. This option is disabled by default.
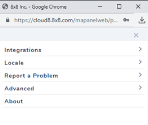
Under Settings:
Under Search Types:
- Locale: View the language or location of this integration. This integration is currently supported only in the US and UK.
- Report a Problem: Send feedback on an issue or suggest an improvement.
- Advanced: Reset the panel to clear history and end your 8x8 Work session.
- About: View details on your user extension and the app.
- Integrations > Netsuite: Manage your NetSuite integration settings for call logging.
Access records
From the Records ![]() tab, browse or search for records from your contact directory and/or NetSuite to make calls. Simply hover over the desired record, and click the Call
tab, browse or search for records from your contact directory and/or NetSuite to make calls. Simply hover over the desired record, and click the Call ![]() icon.
icon.
Note: Enter a minimum of four characters to search for a name or number.

