Configure the email integration for Salesforce
As a Salesforce administrator, you can enable communication via email channels for agents using 8x8 integration for Salesforce. This allows routing emails to agents, and to have these emails automatically stored as cases in Salesforce when an agent accepts and responds to the emails. The configuration involves:
Features
The support for email communication allows agents to:
-
Accept emails with contextual screen pops of customer records
-
Review the list of matching customer records before selecting the right one
-
Stay in busy status while processing the email to avoid any distractions
-
Create a case automatically for the accepted email and linked to the customer record
-
Reply, forward, close, and transfer emails quickly and efficiently
-
Send new and follow up emails
-
Keep track of the email thread through the case history
Limitations
-
The email channel support is currently limited to 8x8 integration with Salesforce only.
-
Ability to pull email is not yet available.
-
Individual customer queued email is not supported.
-
This functionality is not copied over to Local CRM yet.
-
The email channel communication is supported on the updated integration only.
Requirements
-
Access to the updated integration. Contact 8x8 Support to request.
-
Access to 8x8 Agent Workspace
Enable email integration in Configuration Manager
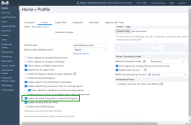
This step requires you to have administrator privileges to access 8x8 Configuration Manager. In this step, you need to enable full email integration in Agent Workspace, which is controlled by a setting in the 8x8 Configuration Manager.
-
Log into Configuration Manager.
-
From the menu, go to Home > Profile.
-
Select Enable full email integration in Agent Workspace.
-
Click Save.
Configure the email integration in Salesforce
As a next step, you must configure the email integration in Salesforce which requires you to have necessary admin privileges in Salesforce. This process requires you to perform the following tasks:
To enable email messages in Salesforce, you need to switch to Classic Mode.
- Log in into your Salesforce account.
-
Click on your profile image. From the options, select Switch to Classic Mode.
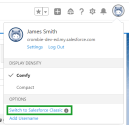
The Salesforce Classic mode launches. -
From the header menu, on the top right corner of the screen, click Setup.
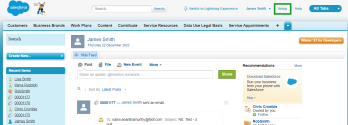
-
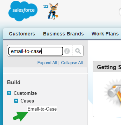
In the Quick Find / Search box, search for the keyword <Enhanced> and from the results shown, click Enhanced Email.
-
Refresh the page and search for <Email Message> in the Quick Find / Search box. You can see Email Message listed under Build > Customize > Email.
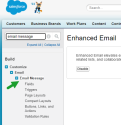
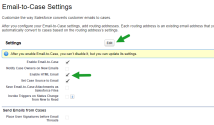
The next step is to enable the HTML body in emails.
In the next step, create the following custom fields to support the email integration. You must create these custom fields to allow 8x8 to add emails to cases. This ensures that follow up emails are attached to a case as a thread rather than each email creating a new case.
| Field Name | API Name | Data Type |
|---|---|---|
|
MainNumber |
MainNumber__c |
Text(255) (External ID) |
|
Lead |
Lead__c |
Lookup(Lead) |
Create MainNumber custom field in the Case object
-
In the Quick Find / Search box, search <case> and select Fields.

-
In the page list of existing case fields, under Case Custom Fields & Relationships, click New.

-
To specify the type of information that the custom field contains, select Text as the data type.
-
Click Next.
-
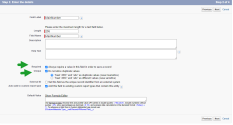
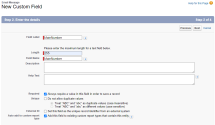
In the field details, enter the following values:
-
Field Label: MainNumber
-
Field Name: MainNumber
-
Field Length:255
-
-
Also select the checkboxes for:
-
Click Next to go to the Field Level Security page. Click Next.
-
In this last step, select the page layouts that should include this field. The field will be added as the last field in the first 2-column section of these page layouts.
-
Click Save & New to save this new custom field along with the page layouts that it should appear on. You will now move on to creating another custom field.
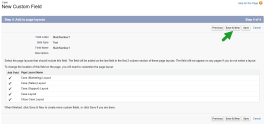
Create Lead custom field in the Case object
-
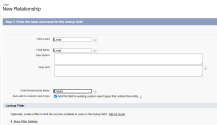
To specify the type of information that the custom field contains, select Lookup Relationship as the DataType and click Next.
-
From the Relate Todropdown list, select Lead as the other object to which this object is related.
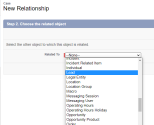
-
Click Next.
-
In the field details, enter the following values:
-
Click Next.
-
In the Establish field-level security for reference field page and Add reference field to Page Layouts page, save with default values. The field will be added as the last field in the first 2-column section of these page layouts.
-
Click Save to save this second custom field.
-
To view the custom fields you created, go to Cases > Fields from the Quick Search box.
-
Under Case Custom Fields and Relationships, locate the new fields.
As the final step in configuration, create the following custom fields in the Email Message object:
| Field Name | API Name | Data Type |
|---|---|---|
|
MainNumber |
MainNumber__c |
Text(255) (Required) |
|
ChildNumber |
ChildNumber__c |
Text(255) |
Create MainNumber custom field in Email Message
-
In the Quick Find / Search box, search <email message> and select Fields.

-
Under Email Message Custom Fields & Relationships, click New.

-
To specify the type of information that the custom field contains, select Text as the data type.
-
Click Next.
-
In the field details, enter the following values:
-
Field Label: MainNumber
-
Field Name: MainNumber
-
Field Length:255
-
-
Also select the checkbox for:
Required: Always require a value in this field in order to save a record
Note: Do not select the checkbox for Unique - Do not allow duplicate values
-
Click Next to go to the Field Level Security page. Click Next.
-
Click Save & New to save this new custom field and create another custom field.Keep the default selection ofthe page layouts that should include this field. The field will be added as the last field in the first 2-column section of these page layouts.
Create ChildNumber custom field in Email Message
-
Under Email Message Custom Fields & Relationships, click New.

-
To specify the type of information that the custom field contains, select Text as the data type.
-
Click Next.
-
In the field details, enter the following values:
-
Field Label: ChildNumber
-
Field Name: ChildNumber
-
Field Length:255
-
-
Also, do not select the checkboxes for:
Required - Always require a value in this field in order to save a record
Unique - Do not allow duplicate values -
Click Next to go to the Field Level Security page. Click Next.
-
Click Save to add this custom field to page layouts. Keep the default selection ofthe page layouts that should include this field. The field will be added as the last field in the first 2-column section of these page layouts.
-
To view the custom fields you created, go to Email Message > Fields from the Quick Search box.
-
Under the Email Message Custom Fields and Relationships, locate the new fields.
With this step complete, you have successfully configured the email communication in 8x8 integration for Salesforce.
Select the Salesforce objects in Agent Workspace
Note: The following procedure must be performed by agents.
Upon receiving an interaction, the 8x8 integration searches for matching customer records and presents them to agents helping them associate the interaction with the right customer. The search can be broadened to all the supported Salesforce objects or narrowed down to the specific objects desired. To select the Salesforce objects to search for in email integration, log into 8x8 Agent Workspace and select the Salesforce objects to search.
-
Log into Salesforce and launch the 8x8 integration app.
-
Once the app launches 8x8 Agent Workspace, choose to Work offline.
-
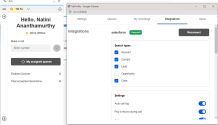
Go to My Profile from the menu. It launches in a new window.
-
In the Integrations tab, under Search Types, select:
-
Account
-
Lead
-
Contact
-
Case
-
-
Click Save.
Note: By default, Account and Contact objects are selected.
