FAQ
Check the following frequently-asked questions for more information:
Call Mode and Data Usage
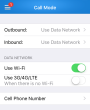
Call mode is the type of network you use to handle inbound and outbound calls from your L'application mobile Virtual Office.
You can use mobile data network or cellular network. 8x8 Virtual Office allows you to switch between the two networks based on your needs. For example, if you are roaming in areas with weak Wi-Fi signals or poor 3G/4G reception, you may experience poor call quality or dropped calls. By switching to cellular data network, you can gain better call quality and reliable call connection.
For call mode settings, from the main menu, select Settings > Call Mode.
If you wish to reduce the impact of the L'application mobile Virtual Office on your data plan, you can change your device or app settings in order to better control your network data usage.
Within the L'application mobile Virtual Office, you can reduce your network data usage via Call Mode.
To reduce data usage from Call Mode:
- Tap
 to open the main menu.
 - From the main menu, go to Call Mode.
- Under Data Network,
- Tap Outbound or Inbound to select the desired call mode.
- For outbound calling, select one of the following options:
- Always Ask (prompts you to choose between your selected data network and cellular data)
- Use Data Network
- For inbound calling, select Use Data Network.
The app automatically saves your selection. For details, refer to Set up Call Mode.
From your device settings, you can reduce your overall data usage, affecting the usage of the L'application mobile Virtual Office accordingly. To reduce your data usage from your device settings, you can:
- Enable Wi-Fi data.
- Disable 3G/4G/LTE services.
- Disable Bluetooth connectivity.
To enable Wi-Fi data:
- Go to the home screen of your device.
- Go to Settings > Wi-Fi.
- Enable Wi-Fi.
- Choose your Wi-Fi network. You may need to enter a security code to connect to the Wi-Fi network.
If you have questions about your Wi-Fi network, contact your local IT support.
To disable 3G/4G/LTE:
- Go to the home screen of your device.
- Go to
-
go to Cellular Data Options and disable Enable LTE.
To disable Bluetooth connectivity:
- Go to the home screen of your device.
- In your device Settings, go to Bluetooth.
- Disable Bluetooth to reduce data usage.
If you start a call on 3G/4G/LTE and your phone switches to Wi-Fi during the conversation, the call stays on the original data network until you hang up and make another call.
If you are on a call in the L'application mobile Virtual Office using data network and enter a spotty data coverage area, you can transfer the conversation to your cellular voice.
- Enter your cell phone number into your Favorite or Device contacts.
Note: For a quick transfer, create a contact with your cell phone number prior to the call.
- Tap Transfer when a call comes in.
- Search for your contact in the Contact de l'entreprise. Find your contact number and tap to transfer the call to your cell phone.
Your call is now over cellular voice.
The issue of placing/receiving a VoIP call while already on a cellular call is not something we can resolve. The device OS prohibits other applications from using the audio subsystem while a cellular call is in place, even if the cellular call is on hold. This means our application has no resource to record/play audio, and hence no VoIP call can take place.
You can easily reproduce this with any other application. Pandora, Skype, YouTube, etc. all automatically yield the audio over to the native phone app when a call comes in. Once the call ends, the OS yields the audio subsystem back over to the app that was using it before the call was made/received.
To compensate for this, the following behavior has been implemented:
- If a cellular call is proceeding, the VOM app will prevent a user from being able to place an outbound VoIP call. However, CCR calls can be placed.
- If a cellular call is proceeding, the VOM app will decline any incoming VoIP call. Incoming CCR calls will be treated like any other incoming cellular call.
- If a VoIP call is proceeding and a cellular call is received and accepted, the VoIP call is automatically placed on hold.
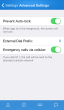
- If Emergency calls via cellular is enabled, the emergency call is routed via cellular network.
- If Emergency calls via cellular is disabled, the emergency call is routed via 8x8 VoIP service.
Starting with version 6.4.1 of the L'application mobile Virtual Office, we have extended compatibility with IPv6 for T-Mobile users. If T-Mobile has transitioned you to IPv6, you will have a smooth communication experience on the L'application mobile Virtual Office while connected to your data network.
Note: 8x8 does not currently support IPv6 for all carriers.
Settings and App Behavior
In addition to using your standard 8x8 username and password, you can use either your company's identity provider or your company Gmail credentials to sign in to SSO from the application login screen.
To log in using Single Sign On (SSO) credentials:
- Once you have launched the L'application mobile Virtual Office, tap Use Single Sign On in the main login screen.
- In the SSO login screen, enter your 8x8 username or company email.
- Tap Continue.
You see a list of SSO login options. - From the SSO options available to you, select:
- Log in using SSO: Log in using your company's identity provider login credentials.
- Log in using Google: Log in using your company Gmail address and password. You may need to click Allow to grant 8x8 single sign-on access to your Gmail profile.
- Based on your selection, log in using the relevant credentials.
Upon login, the app opens your Company contacts tab.
To exit the application:
- Double-press your device's home button to view all recent apps.
- Close the L'application mobile Virtual Office by swiping up.

Exiting the L'application mobile Virtual Office quits the app, and you will not receive any incoming calls, messages, voicemails, or fax notifications to the app. When you initiate the app again, it launches automatically without requiring you to log in again.
User status in Virtual Office is either automatically set based on the user's actions, but a user can also choose to set a custom presence status and status message. You can set a custom presence status from the main menu of the L'application mobile Virtual Office, and enter an accompanying custom status message to give other users details about your status. This helps other users when deciding who to speak with. Let's say that Lisa is busy with an urgent project. She can manually set her status to Busy and set her custom status message to say <On a deadline>, so that other users know to speak with someone else for the time being.
- Tap to open the main menu.
- In the top-right corner of the menu, tap your status icon.
The status options appear in a drop-down.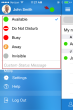
- Select the desired status.
- Optionally, enter a custom status message and tap Done.
The message appears under your name in the contact list, along with your presence status.
When you first install the L'application mobile Virtual Office, you receive a prompt asking whether to allow the application to send you device-based notifications. If you refuse the prompt, notifications are disabled by default.
If you do not see notifications despite being logged in, go to your device settings to enable notifications.
Note: In order to stay up-to-date on communications in Virtual Office, it is highly recommended that you enable notifications on your device.
To enable notifications on your device:
- In your device Settings, scroll down to and tap Virtual Office in your list of applications.
- Tap Notifications.
- Enable Allow Notifications.
Remarque : pour afficher les notifications en temps réel, vous devez être connecté à l'L'application mobile Virtual Office sur votre appareil. Si vous êtes déconnecté de l'L'application mobile Virtual Office, les notifications sont uniquement visibles lorsque vous vous reconnectez.
You can take a break from receiving notifications by:
- Logging out of the L'application mobile Virtual Office. This prevents all Virtual Office interactions and notifications, and other users see you as offline.
- Enabling Do Not Disturb on your device. This prevents all notifications on your device.
- Enabling Do Not Disturb in the L'application mobile Virtual Office. This prevents calls and call notifications; you still receive voicemail, chat, and meeting notifications.
To log out of your application:
- Tap to open the main menu.
- From the main menu, select Log Out and confirm.
When you log out, you disable call activity and app-related notifications. To launch the application, you must log in again.
To enable Do Not Disturb on your device:
-
-
OR
Enable Scheduled, and select the start and end time you would like to avoid notifications.Note: Enabling Do Not Disturb on your device prevents notifications from all apps.
To enable Do Not Disturb in your application:
- Tap to open the main menu.
- In the top-right corner of the menu, tap your status icon.
The status options appear in a drop-down. - Select Do Not Disturb.
Note: Enabling Do Not Disturb only prevents call notifications; you still receive voicemail, chat, and meeting notifications.
- Log in to the L'application mobile Virtual Office.
- From the main menu, go to Settings > Advanced Settings.
- Enable Prevent Auto-lock.
Call forwarding gives you the flexibility to direct calls to your voicemail, or a specified destination when you are unable to answer a call. By default, calls are forwarded to your voicemail under the following circumstances:
- When your Internet connection is down
- When your phone is busy
- When you do not answer your call
However, you can direct them to Auto Attendant, your cell phone, or an external number. Refer to information on editing default rules or creating your custom rules.
- Default Rules: If you make any changes to the default rules of call forwarding in the L'application de bureau Virtual Office, such as dropping the calls during an Internet outage or forwarding calls to your cell number, the respective call forwarding setting in the L'application mobile Virtual Office changes to One Number Access (ONA). For example, changing the call forwarding rule during an outage from voicemail to mobile phone switches the parallel setting in the L'application mobile Virtual Office to ONA.
- My Rules: Custom rules added in My Rules are inherited by the L'application mobile Virtual Office. Please note the L'application mobile Virtual Office does not show these rules in the app.
- Always: Setting call forwarding in the L'application mobile Virtual Office is always inherited by the L'application de bureau Virtual Office and vice versa.
Note: To see the changes you have made in the L'application mobile Virtual Office, you need to log out from the L'application de bureau Virtual Office and log back in.
Call forwarding default rules in the L'application de bureau Virtual Office are synchronized with the L'application mobile Virtual Office rules as soon as you log out and back in.
To set the default rules in the application:
- From the main menu, go to Settings > Call Forwarding.
- Define rules for the following conditions:
- When Busy
- When No Answer
- During Outage
- Log out and log back in to the L'application de bureau Virtual Office. The rules are now synchronized with the L'application mobile Virtual Office.
- On iOS, copy and paste the number into the L'application mobile Virtual Office dialer.
If you are on a call via the L'application mobile Virtual Office and receive an incoming cellular call, or vice versa, you will observe different call behavior depending on whether you are using iOS 10, iOS 9 or earlier, or Android. In these situations, the call behavior is as follows.
Scenario 1: During a L'application mobile Virtual Office call in progress, a cellular call comes in
What happens:
| Operating System | Behavior |
|---|---|
| iOS 10 | Your device rings, and you see the incoming cellular call on your screen. |
| iOS 9 and earlier, and Android | Your device rings, and you see the incoming cellular call on your screen while the Virtual Office call is automatically placed on hold. |
| Operating System | Behavior |
|---|---|
| iOS 10 | Until you answer the cellular call, your Virtual Office call remains active. The incoming call prompt allows you to hang up or place the Virtual Office call on hold before answering the cellular call. Notify the Virtual Office speaker of the incoming call before you make your selection. You can select from two options to answer:
|
| iOS 9 and earlier | The party calling via Virtual Office hears hold music while you take the cellular call. After the cellular call ends, your call on the L'application mobile Virtual Office automatically resumes. |
| Android | The party calling via Virtual Office hears hold music while you take the cellular call. After the cellular call ends, you should retrieve the held call manually. |
| Operating System | Behavior |
|---|---|
| iOS 10 | The cellular caller is forwarded to your voicemail without interrupting your Virtual Office call. |
| iOS 9 and earlier | The cellular caller is forwarded to your voicemail. Your Virtual Office call automatically resumes. |
| Android | The cellular caller is forwarded to your voicemail. You should retrieve the held Virtual Office call manually. |
Scenario 2: During a cellular call in progress, a L'application mobile Virtual Office call comes in
What happens:
| Operating System | Behavior |
|---|---|
| iOS 10 | Your device rings, and you see the incoming Virtual Office call via the native iOS incoming call screen. |
| iOS 9 and earlier, and Android | Your device may ring based on your application and device settings, and you see the incoming Virtual Office call on your screen. The size of the incoming call notification can vary based on your device settings. |
| Operating System | Behavior |
|---|---|
| iOS 10 | Until you answer the Virtual Office call, your cellular call remains active. The incoming call prompt allows you to hang up or place the cellular call on hold before answering the Virtual Office call. Notify the cellular speaker of the incoming call before you make your selection. You can select from two options to answer:
|
| iOS 9 and earlier, and Android | You must first end the cellular call. Otherwise, decline or ignore the Virtual Office call and continue your cellular call. |
On iOS and Android, the Virtual Office caller is forwarded to your voicemail without interrupting your cellular call.
There are two ways to enter IVR menu choices ahead of time: either by saving a contact for repeated use, or by adding your choices while entering a number in the L'application mobile Virtual Office dialer.
If you commonly call an organization such as a large office or pharmacy, you are familiar with that organization's IVR menu: "For sales, press 1. For billing inquiries, press 2. To return to the main menu, press *..."
You can save the organization number as a personal contact, and append your IVR choices to the saved number in order to save time.
Note: You can also add pauses to calls without saving a new contact by holding down the * , key in the L'application mobile Virtual Office dialer.
- Tap to open the main menu.
- From the main menu, select Contacts.
OR
From the navigation menu, tap .
.
Your contact list opens. - In Contacts, tap
 to start creating a new contact.
 - In the New Personal Contact screen, enter the contact name, and tap
 to add a phone number to the contact.
 - Enter the phone number, and tap the
 key to show more keys.
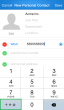
- Tap the pause key to insert a pause for the IVR menu.
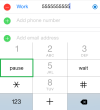
You are taken back to the standard keypad. The pause you entered is indicated by a comma in the phone number. - Insert your IVR menu choice numbers, each separated by a pause.
Tap Save.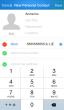
- The contact is saved with your IVR choices.
While dialing out using the L'application mobile Virtual Office dialer, you can enter your IVR menu choices by holding down the * , key.
Similarly, you can add pluses for international calls by holding down the 0 + key.
Tapping the key enters the first character (* or 0), while holding down the key enters the second character (, or +).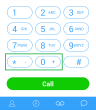
The L'application mobile Virtual Office now supports French (French and Canadian), German, Dutch, and Spanish. To access the app in a different language, you must change the language settings in your device.
If the app does not reflect your device language settings, please contact your phone system administrator.
To change your language settings:
-
- Go to Language & Region.
- Select your language of choice
-
When you open the L'application mobile Virtual Office, it opens in the selected language.
Depending on your device settings, your L'application mobile Virtual Office will display the date and time in different formats.
To change your date and time format:
-
- Go to Language & Region.
-
- The device date and time change.
When you open the L'application mobile Virtual Office, it opens using the corresponding date and time formats.
Contacts and Communications
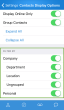
- To access personal contacts in your Contact de l'entreprise, go to Contacts > Company tab. You can see the personal contacts listed in alphabetic order. If you have modified the contacts display option to group your contacts, the personal contact are grouped under Personal. To access the contact display settings, tap to open the main menu, go to Settings > Contacts Display Options, and enable Personal.
- To access personal contacts from your device using the app, go to Contacts > Device.
For details, refer to Display Contacts.
You can add new contacts to the Contact de l'entreprise. They get grouped under Personal contacts in the Contact de l'entreprise. You may also add new contacts to the device from the 8x8 app.
- For details on adding a new contact under Company, click here.
- For details on adding a new contact under Device, click here.
Your Contact de l'entreprise lists your company contacts with added information tags such as job title, department, and office location.
You can search for contacts using these tags instead of their names if you are looking for contacts within the same category.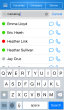
To edit a personal contact, open the contact and tap Edit in the top-right corner of the screen. The editing screen opens, allowing you to make changes.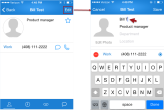
Messages and Sharing
Currently, SMS is only supported on Virtual Office Unlimited and Global extensions with United States phone numbers. Metered and Virtual extensions cannot send SMS.
- Tap to open the main menu.
- From the main menu, select SMS and IM.
OR
From the navigation menu, tap .
.
The SMS and IM page opens, listing the name and presence of contacts you have previously sent or received messages from. - Tap Edit, and tap
 next to conversations to be deleted.
OR
Swipe left on the SMS or IM to be deleted. - Tap Delete.
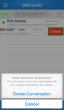
- At the prompt, confirm the deletion.
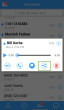
- From the navigation menu, tap Voicemails.
- Select the desired voicemail and tap it for details.
- Tap the share icon and select the tool to share by.
Video Calls
Video calls are allowed between Virtual Office extensions only. You can initiate video during a live call between two extensions using:
- Any Virtual Office client: the L'application de bureau Virtual Office, Virtual Office : application en ligne, or L'application mobile Virtual Office.
- Any of the following phone sets: Polycom VVX 500, VVX600, and VVX1500.
To block video feed from your end during a video call, go to Settings > Video Settings and enable Privacy Mode.
The caller on the other end is notified of the privacy mode and sees a black screen.
Conférences Virtual Office
Once you join the meeting, you can join meeting audio to hear and speak with other participants. To switch between your available audio channels at any time, tap ![]() during the meeting.
during the meeting.
Depending on your calling network options under Call Mode, you join audio automatically using your data network at the start of the meeting, or receive a prompt to choose between Wi-Fi and cellular data. In Call Mode, you can select:
- Always Ask (prompts you to choose between your selected data network and cellular data)
- Use Data Network (always uses data network)
- Use Cellular Voice
- While in a Conférence Virtual Office, tap
 in the meeting interface to share your video.
You are now visible to other participants. - Other video participants appear in a row at the bottom of the screen. Flick left or right along the row of videos to see all of them.
Tap a small video to bring it up as a large video in the center of the screen.
- To switch between views, tap
 in the meeting interface to open a drop-down menu.
 - In the drop-down, tap:
- Home: Switch to the main meeting information screen.
- Video: Switch to the video screen.
- Content: If another participant is sharing desktop content, you can switch to the shared content view.
- To stop sharing video, tap
 .
.
You are no longer visible to other participants.
Note: You cannot turn another participant's video on for them, or start a meeting with participant video switched on.
Feedback and Reporting Bugs
By default, after the end of a call lasting more than 10 seconds, you will see a prompt to rate the quality of the call.
In one tap, you can rate the quality of the call on a scale of one to five stars, or choose to dismiss future prompts.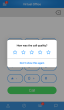
For details on disabling or enabling call quality prompts via Settings, refer to Rate Call Quality.
To send feedback via Help:
- From the main menu, tap Help > Send Feedback.
- In the following screen, add your notes describing the issue. The log file is automatically attached.
- Tap Submit.
Note: You can also submit feedback by shaking your device.
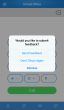
If you find a bug in the app, you can instantly report it to us by shaking your device. The prompt is automatically dismissed after 5 seconds if you do not tap Send Feedback or Dismiss.
To send feedback via shake:
- Make sure this feature is enabled by going to Settings > Shake to Send Feedback.
- Shake your device while in the app.
- At the prompt, tap Send Feedback.
- The Feedback screen pops up. You can include optional feedback or an issue description.
Tap Submit when you are finished.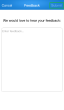
Your feedback, debug log, and a screenshot are sent to 8x8.
Note: You can also send a debug log via Help.
Copyright © 2017 8x8, Inc. Tous droits réservés – Version 7.0