In 8x8 Contact Center, you can create elaborate HTML-formatted signatures to be rendered in the email notifications sent to customers by creating a signature in your profile, saving it, and inserting in the Description field of notification emails.
To create a signature:
- Go to Change status > My profile.
-
In the Control Panel, go to Email > Email signature to create a signature using HTML tags.
To create HTML tags you need to type a command before and after each line. Refer to the following table for most common examples:Command Formatting Action <b>...</b> Bold Text <i>...</i> Italic Text <u>...</u> Underline Text <sup>...</sup> Superscript: Smaller text placed below normal text <sub>...</sub> Subscript: Smaller text placed below normal text <small>...</small> Small: Fine print-style text 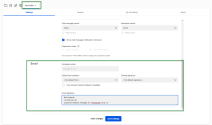
- Click Save settings.

To insert a signature in Case description:
- From the Cases tab, click New Case, or open a case and click Reply or New Follow-up.
- Under Details, place the cursor in the Description field where you wish to insert the signature.
- Go to Signature and select a signature from the drop-down list.
- Click Insert.
Your HTML formatted signature gets inserted in the email description field.
Note: Click ![]() below the Description to hide/unhide the Signature field.
below the Description to hide/unhide the Signature field.