Set up Paging
Paging allows users to make announcements to a department or a team by dialing an extension or pressing the softkey on their activated Poly or Cisco phones. 8x8 Work offers two types of paging:
Group Paging
Group intercom paging is used to make real-time announcements to a department, team or work area using the intercom feature on your Poly and Cisco phones. Send a one-way message to specific paging groups or broadcast your page to all other Poly, Yealink, Ago, or Cisco phones in your office. In order to access paging functionality, the user must have an activated Poly, Yealink, Ago, or Cisco phone and be a member of the paging group. With Poly, Yealink, Ago, phones, you can choose normal, emergency, or priority group.
Features
- Up to 25 free paging groups per site is included with Poly, Yealink, Ago, and Cisco phones.
- Create up to 23 normal paging groups with Poly, Yealink, and Ago phones. One priority and one emergency group already exists by default.
- Set priority levels for your pages: Normal, Priority, and Emergency (Poly, Yealink, and Ago phones only).
- Create one emergency paging group with Cisco phones.
- Set permissions for who can broadcast pages and who can only receive them.
- You can include a user in multiple paging groups.
- You need at least one member for every paging group.
- You need at least one member with Send capabilities for emergency or priority paging.
- You need at least one member with Send capabilities and one member with Receive capabilities for normal paging.
Note: Paging group uses IP multicast to send group pages to all registered phones on the network at once. This technology requires all phones in a group page have access to the same multicast IP address. In most cases, it requires all phones receive their IP address from the same router. Geographically-dispersed phones that are serviced by separate routers do not support uniform access to intercom paging group.
Limitations
- Only emergency paging is supported in Cisco phones. Emergency paging interrupts the group members active calls.
Let's assume you must broadcast an important message to a handful of employees in your store's backroom and do not want customers on the floor to hear it. All you need, is to create a paging group in 8x8 Admin Console and add those employees as the group members. Set the message priority, enable send option, and save. Your message is sent to those employees only, but not everyone else in the store.
Now let's assume you need to announce the store's closing time to your customers and remind them to bring their purchases to the cash register as early as possible. As long as you have an ATA device in your inventory, you create a user account for your overhead paging. Assign a telephone extension number and ATA device, and save. You can make your announcement by calling the overhead paging extension number from any other phone.
To create group paging:
- Go to Home > Groups Paging, then click + Create Paging Group.
- Enter a Name for the paging group and select a Site.
- Select a Device Model: Poly/Yealink/Ago or Cisco. Once you select a device model, the field becomes disabled. Only members with that specified device can be added to the paging group.
- For Poly phones, determine the Priority to deliver paging, such as normal, priority, or emergency. You cannot unsubscribe from a priority or emergency group. A priority page interrupts normal pages or active calls. An emergency page interrupts normal pages, priority pages, and active calls and plays out at near maximum volume even if Do Not Disturb (DND) is turned on. In Cisco phones, only emergency option is available.
- For Cisco phones, add an Extension number. This option is not available for Poly phones.
- Add Members to the group and Save. You can select members from the specified site or all sites within the same phone system (PBX) as long as users have the same device model, Cisco or Poly/Yealink/Ago.
Notes:
-You must add at least one member to the paging group.
- In order to access paging functionality, the user must have an activated Poly, Yealink, Ago, or Cisco phone and be a member of the paging group.
- In Poly, Yealink, or Ago phones, the paging group must have at least one member with Send or Receive option. The user's phone reboots and displays Paging soft key in the menu. If you cannot see it, press More on your phone display. See how to use Paging Group.
- In Cisco phones, however, the paging group must have at least one member with Receive option. The Send option is not enabled and the users must dial the group paging extension number to page. -
Note: To edit the device model, you must delete the members first.
After you create a paging group in 8x8 Admin Console, your Poly, Yealink, or Ago phone reboots and displays Paging soft key on the display. Follow the instructions below to page. The phone sends a preamble or repetitive set of alert messages that ensure receiving phones are ready to receive the broadcast.
To send paging using a Poly phone:
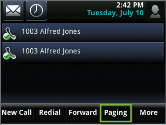
- From the main screen, select Paging.

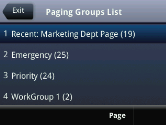
- Scroll through the list to locate the group you want to page, then select Page.

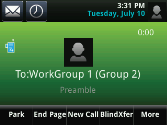
- Wait while your phone sends the preamble.
- After you hear the beep, begin your announcement.

- When you are done, select End Page, or pick up the handset.
As the page receiver, you can terminate an incoming page by pressing the End Page soft key. To make a call during an incoming page announcement, simply begin dialing.
After you create a paging group in 8x8 Admin Console, all the Cisco phones in that group are ready to receive pages. For example, to page all the phones in the shipping department, a person at any phone dials the extension number associated with the paging group. The phone sends a preamble or repetitive set of alert messages that ensure receiving phones are ready to receive the broadcast. Follow the instructions below to page.
To send paging using Cisco phones:
- Dial the paging group extension number from any Cisco phone.
- Wait while your phone sends the preamble.
- After you hear the beep, begin your announcement. The group members receive the page on their Cisco phones.
- When you are done, simply hang up.
The emergency page interrupts normal pages, priority pages, and active calls and plays out at near maximum volume even if Do Not Disturb (DND) is turned on.
Note: See our 8x8 supported Cisco phones.
Overhead Paging
With 8x8 Work overhead paging system (also known as ZONE overhead paging) you can dial an extension number and connect to an announcement paging system. The announcement system is a one-way speaker system, such as an amplifier connecting to a speaker. After dialing the extension number associated with the overhead paging (and an optional password check), the caller can begin speaking immediately. See our Knowledgebase articles about Overhead Paging.
Features
- Support multiple overhead paging extensions within a phone system (PBX).
- Install Overhead Paging systems in different time zones and have specific extension numbers for each zone.
- Works with paging systems that have a standard analog phone input.
- Set up a password for the overhead paging extension. The password is blank by default.
- The password check is skipped if the user is calling from the receptionist extension.
Limitations
- In Obihai OBI 508, port number 9 must be saved for overhead paging and not used for analog voice or analog fax devices.
Setting up overhead paging is a two-step process: you first need to add an ATA device to your inventory and then create a user with a license and phone number dedicated to the overhead paging. For extra security, you can assign a password to the account so that only people in charge can make announcements. To use the overhead paging, call the extension number, enter the password, and begin the announcement.
To create overhead paging:
- Go to Home > Devices.
- Add an ATA device such as Obihai OBi 300 1 port SIP ATA to your device inventory.
You must then create a new user for the overhead paging, and assign the ATA device to it. - Go to Home > Users, then click + Create User.
- Enter a name for the overhead paging, such as AcmeOverhead Paging.
- Enter the Site and assign a service.
- Select a telephone number and an extension number.
Each user is associated with a DID in 8x8 Admin Console. The extension number is used to call and make overhead paging announcements. - Select Overhead Paging device. You need to activate the device if not done already.
- Click to Select ATA terminal and a Port.
- Optionally, you can enter a password in the Overhead paging device password.
Password gives you an extra layer of protection, making sure unauthorized users cannot access overhead paging. The password is not required if you leave it unfilled during the set up. If you define the password, the user must enter it each time she uses the overhead paging. See how to use Overhead Paging. - Click to Save the changes.

Setting up Overhead Paging may require some advanced set up. See our Knowledgebase article about Overhead Paging for more information.
8x8 supports multiple overhead paging extensions within a virtual phone system (PBX). 8x8 Work subscribers can install overhead paging systems in different time zones and have specific extension numbers for each zone. In order to configure overhead paging, you must configure and activate a user's device as an overhead paging device using a device that supports the feature, such as a Grandstream ATA or Algo IP alerter. To use overhead paging system, you must dial the overhead paging extension number (and the password, if set up) and connect to the announcement paging system. The announcement system is a one-way speaker system, such as an amplifier connecting to a speaker. Once connected, you can begin speaking immediately.
FAQ
Refer to the following frequently-asked questions for more information:
To change the password, while editing the overhead user's account, click Reset Password. Enter a new password and save. The new password will be in effect the next time the user uses overhead paging. To remove the password, delete it from the overhead paging user account, and save.
A paging announcement continues until the sender terminates the page by pressing the End Page soft key, by pressing a line key, or by picking up the handset. The page receiver can terminate an incoming page by pressing the End Page soft key. If the receiver wants to make a call during an incoming page announcement, simply begin dialing.
If you receive an incoming page during an active call, by default, the page is automatically placed on hold and its status changes to Pending, which means that the page is temporarily on hold. When you end your call and the page is still incoming, the page will continue. You can also configure the phone to accept pages during active calls.
If two users simultaneously start a page on the same paging group, the phone with the lower serial number will continue to transmit while the other phone will enter the receiving state.
You cannot unsubscribe from a priority or emergency group. A priority page will interrupt normal pages or active calls. An emergency page will interrupt normal pages, priority pages, and active calls and plays out at near maximum volume even if Do Not Disturb (DND) is turned on.
If you change the volume on your phone, it will only affect Normal and Priority pages. If Do Not Disturb (DND) is turned on, Normal pages and Priority pages are blocked and the phone screen is cleared of all page related items. Incoming page status will become pending.
- To edit a paging group, go to Home > Paging and click
 next to the desired group.
 - To delete a paging group, go to Home > Paging and click
 next to the desired group.
