Review Profile Policy
The 8x8 Profile Policy service offers the ability to restrict users from using certain capabilities of the 8x8 Work applications. Whether it is accessing Virtual Office Meetings, or upgrading to recent version of 8x8 Work for Desktop, or accessing and deleting call recordings, you can disable these features company wide by using a master profile policy. Companies with existing solutions for meetings may want to disable access to Virtual Office Meetings. The master user policy allows you to disable meetings. As an IT admin you may need to ensure that every single software installed on user's machines is approved and validated by the IT department. So, you may want to prevent users from automatically updating their software until validated. By disabling the update prompt for 8x8 Work for Desktop, you can facilitate this validation.
Features
- Prevent users from using Virtual Office Meetings, 8x8 Work for Desktop or 8x8 Work for Mobile.
- Prevent users from upgrading 8x8 Work for Desktop.
- Restrict users from accessing messaging in 8x8 Work for Desktop and 8x8 Work for Mobile.
-
Prevent users from creating group MMS messaging.
- Prevent users from uploading attachments in messaging or SMS/MMS.
- Restrict users from accessing and deleting call recordings.
-
Prevent users from accessing voicemail transcription.
-
Prevent users from controlling the presence-driven VOD calendar feature.
- Edit these restrictions as desired via a master profile policy.
- Apply the policy per user while creating a user.
Edit the Master Profile Policy
- Go to Profile policies from the main menu.
- You will see the master user policy. Click
 to edit the 8x8 Master User template policy.
 - Edit the policy name as desired.
-
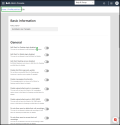
Click to turn on the following settings in the profile policy. If enabled, users cannot modify their account settings or preferences in the 8x8 Work for Desktop or 8x8 Work for Mobile.
- General: If enabled, it prevents users from accessing virtual meetings, receiving upgrade prompts for 8x8 Work for Desktop, using messaging functionality, creating group MMS messaging, or having access or deleting call recordings.
- Basic information: If enabled, it prevents users from modifying their basic information in 8x8 Admin Console.
- Voicemail settings: If enabled, it prevents users from modifying their voicemail settings in 8x8 Admin Console.
- External caller ID: If enabled, it prevents users from modifying their external caller ID in 8x8 Admin Console.
- Internal caller ID: If enabled, it prevents users from modifying their internal caller ID in 8x8 Admin Console.
- Call forwarding rules: If enabled, it prevents users from modifying their call forwarding rules in 8x8 Admin Console.
- Music on hold: If enabled, it prevents users from modifying their music on hold in 8x8 Admin Console.
- Call recording settings: If enabled, it prevents users from modifying their call recording settings in 8x8 Admin Console.
- Emergency address:If enabled, it prevents users from modifying their emergency address in 8x8 Admin Console.
- Fax settings: If enabled, it prevents users from modifying their fax settings in 8x8 Admin Console.
- Click Save.
Note: By default, the above settings are available to the 8x8 Work users. The 8x8 Admin Console administrator can limit the access by turning on the settings in 8x8 Admin Console.
Note: The chat messaging only applies to VOD version 6.1 and newer, or VOM version 7.7 and newer.
Create a new profile policy
You can create multiple profile policies in a company or select a profile policy as the default policy. If no profile policy is selected when creating a user, the default policy will be assigned to the user.
To create a new profile policy:
- Go to Home > Profile Policies.
- Click + Create new profile policy.
- Define the profile policy settings as desired.
- Click Save.
To mark a profile policy as default:
- Go to Home > Profile Policies.
- Find the profile policy from the list and select Make default from the
 menu.
menu.
Change Profile Policies in Bulk
You can change multiple profile policies in bulk. The bulk user assignment is also accessible through bulk CSV update.
To change profile policies in bulk:
- Go to the Users page and select the users you would like to update.
- Click Bulk Edit.
- Go to Services and permissions.
- Check Assign a profile policy.
- Select a profile policy from the list, and click Continue.
- Review the report to see whether all selected users with the new profile policy have been correctly updated. Click Confirm Bulk Edits. A task will be created and you can monitor its progress in the tasks area.
Delete Profile Policies
To delete a profile policy, go to Home > Profile Policies, select a profile policy from the list and select Delete from the ![]() menu.
menu.
Note: You cannot delete a profile policy if users are assigned to it. To delete a profile policy, you must remove the users first.


