Create user accounts and assign subscriptions
Setting up 8x8 users involves creating user accounts and assigning the right subscriptions, services, or permissions to enable communication features.
Prerequisites
Before assigning subscriptions to a user, ensure the following are configured in the 8x8 Admin Console:
- Phone Numbers: Ensure phone numbers are available on the Phone Numbers page. To learn more, see Get telephone numbers.
- Sites: Add and configure any additional locations on the Sites page. To learn more, see Set up Sites.
- Devices: Add devices you intend to assign on the Devices page. To learn more, see Manage your devices.
To accomplish this, the following steps are necessary:
- User Accounts creation: Create user accounts independently of subscription or permission assignments.
- Assign subscriptions to users: Select a user and assign the required subscription(s).
- Additional configurations: Optional, you may also need to configure further settings.
To set up 8x8 users, begin by creating a user account Users cannot access 8x8 services until subscriptions, services, or permissions are assigned, or an administrator role is granted.V
How to create a user account:
- Log in to the 8x8 Admin Console.
- From the home page, click Users.
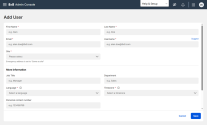
- In the top right, click Add Users > Add user
 .
. - Enter the user’s basic information: first name, last name, email address, username, and site.
- Follow the prompts to complete the process.
- Click Save.
Important! The user appears in the list, but will not have full access to 8x8 services until subscriptions or permissions are assigned.
Provide the user’s basic information
| Field | Description | Required |
|---|---|---|
| First Name | User’s First Name | Mandatory |
| Last Name | User’s Last Name | Mandatory |
| User’s email address | Mandatory | |
| Username | Login username | Mandatory |
| Site | User’s business location | Mandatory |
| Language | Language for voice prompts, email and device prompts | Mandatory |
| Time Zone | Controls scheduling, reporting, and call timing | Mandatory |
| Job Title | User’s job title | Optional |
| Department | User’s department | Optional |
| Personal contact number | User's personal (mobile/home) contact | Optional |
| Contact Directory scope | Visibility of contacts across PBX, site, or company | Optional |
| Display in the company directory | Whether to include the user in the company contact directory | Optional |
Notes:
- Incomplete fields will redirect you to the appropriate section.
- Errors are highlighted in red.
- A welcome email with activation information is sent when a contact is upgraded.
- You can reset the password from Home > Users list. Hover over the user, and click Reset user password from the menu ![]() next to their name.
next to their name.
To enable 8x8 services for a user, assign them the appropriate subscriptions.
How to assign subscriptions:
- Log in to the 8x8 Admin Console.
- From the Home page, click Users.
- Find the user, hover over their name, and click Edit
 .
.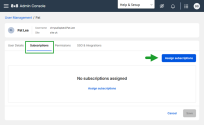
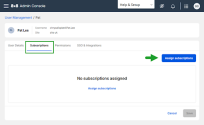
- Click Assign subscriptions.
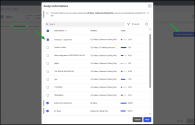
- In the Assign subscriptions dialogue that opens, select the required subscriptions.
- Click Next.
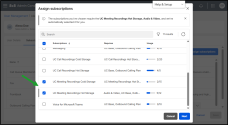
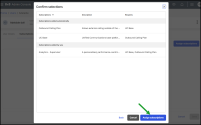
- Review your selections in the Confirm Subscriptions window and click Assign Subscriptions to confirm.
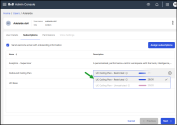
- On the Subscriptions tab, select a calling plan in the Description column.
- Click Save.
Note: Some subscriptions are interdependent and will be selected automatically.
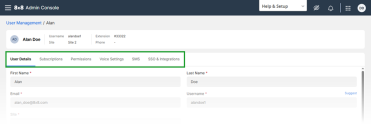
Note: Use the top tabs to navigate to additional configuration sections quickly.
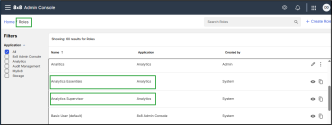
Users with a UC Base subscription must be assigned a role, either the Analytics Essentials or Analytics Supervisor role, to access the 8x8 Analytics app.
Important! Only one Analytics subscription can be assigned at a time, Analytics Essentials or Analytics Supervisor.
Prerequisites
Before assigning subscriptions to a UC Base user, check the following in the 8x8 Admin Console:
-
Roles: Confirm that Analytics Essentials and Analytics Supervisor roles exist under Roles & Permissions> Roles. If not, create roles.
To learn how to create a custom role, see Role-based access control - Create custom role.
-
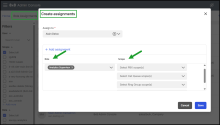
Role Assignments: Assign the Analytics Essentials or Analytics Supervisor role for a selected user and choose which PBX(s), call queue(s), ring group(s), or user group(s) the user can access.
To learn how to grant users access to a subset of data based on their roles and permissions, see Control access to 8x8 Analytics for Work data by user roles and permissions.
How to assign an Analytics subscription to a UC Base:
- Log in to the 8x8 Admin Console.
- On the Home page, click Users.
-
Find the user you want, hover over their name, and click Edit
 .
. -
In the Subscriptions tab. click Assign subscriptions.
-
In the Assign Subscriptions window, select one option:
- Analytics Essentials for standard users.
- Analytics Supervisor for supervisors.
The UC Base and Outbound Calling Plan subscriptions are automatically included because they depend on each other.
Important! Only one Analytics subscription can be assigned at a time, Analytics Essentials or Analytics Supervisor.
- Click Next.
-
Review your selections in the Confirm Subscriptions window and click Assign subscriptions to confirm.
-
On the Subscriptions tab, select a calling plan in the Description column.
- Click Save.
Configuring 8x8 users may also require the following settings:
- Permissions: Assign a profile policy to limit certain features for the user. See 8x8 Admin Console: Assign services and permissions to the user > Assign licenses for details.
- Voice settings: Configure the following:
- Extensions: Add extension numbers for internal calls. See 8x8 Admin Console: Set up voice basic settings for details.
- Devices: Set up and activate devices. See 8x8 Admin Console: Set up voice basic settings for details.
- Phone numbers: Enter the main phone number and any additional contacts. See 8x8 Admin Console: Set up voice basic settings for details.
- Emergency address: Optional field for users located outside their primary phone number's country. United States). See 8x8 Admin Console: Set up emergency address for details.
- Caller ID: Set up caller ID for inbound, internal, and external calls. See 8x8 Admin Console: Set up CallerID for details.
- Voicemail: Configure voicemail greetings, access PINs, and notifications. See 8x8 Admin Console: Set up voicemail settings for details.
- Music-on-hold: Select music or messages to play for callers on hold. See 8x8 Admin Console: Set up music-on-hold for details.
- Call forwarding rules: Set up rules for calls during off-hours or when a user cannot answer. See 8x8 Admin Console: Call Forwarding Rules for details.
- Call recordings: Define whether call recording will be enabled for this user and how parties will be notified when a recording is in progress. See 8x8 Admin Console: Set up call recording for details.
- External calling permissions: Specify the user's calling country and whether international dialling is allowed. See 8x8 Admin Console: Set up External Calling Permission for details.
- Fax: Set the e-fax phone number and notification options. See 8x8 Admin Console: Set up fax notifications for details.
- SSO & Integrations: Display the identity integration with SAML 2.0-compliant identity and security systems, such as Okta, OneLogin, Azure AD, or Google Apps, configured in the Identity & Security section. See 8x8 Admin Console: Single Sign-On (SSO) for details.
Notes:
- Use the tabs to jump to the desired section quickly.
-When creating or editing users, incomplete fields will take you to the relevant section. Errors will be marked in red. Correct the information and save.
