Set up the Agent Menu
The Agent Menu object in IVR offers callers multiple choices of alternate actions if the agent is unable to answer the call. In a direct agent routed call, based on the reason why the agent is unable to answer, you can offer the caller any number of choices of alternate actions to take. You can provide more personalized service to your customers by using agent specific prompts. For example, if an agent is busy with another call, the caller can be assured of a quick call back with a specific prompt such as "Hello, Sorry I missed your call. I am currently busy with another call. I will get back to you shortly". But, if an agent has logged off for the day, then the prompt may be "Hello, Sorry I missed your call. I am away from my desk for the day. Press 1 to leave me a message. Press 2 to reach my back up agent for immediate assistance.". With these personalized messages and menus, you can improve callers' experience.
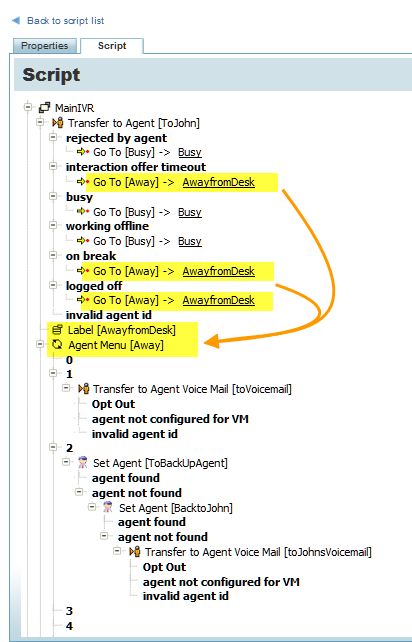
In 8x8 Contact Center IVR script, the Agent Menu object must be added under Transfer to Agent object.
Use Case
The following diagram illustrates a simple use case of a direct agent routed call. A caller is trying to reach her assigned agent, John on his dedicated channel. If John is busy on another call or working offline, the caller hears a personal greeting in John's voice that offers an option to leave a voicemail. If John is logged off or on a break, then the caller is given choices to either leave a message or talk to John's backup agent. The Agent Menu object handles this call flow quite efficiently.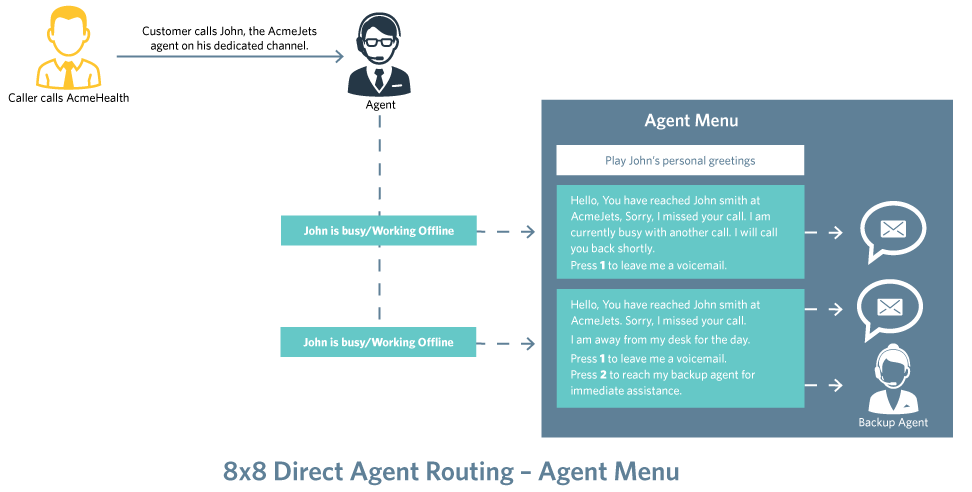
To create an IVR Script that facilitates the call flow shown in the diagram:
- Log in to 8x8 Configuration Manager and navigate to Scripts tab.
- Add a new script.
- Add Transfer to Agent object.
- Add a Label- <Busy> under Transfer to Agent.
- Add an Agent Menu object with this label. This agent menu executes when the agent is busy or working offline or when the agent rejects the call.
- Specify the choices under this agent menu as shown in the diagram.
- Add the Go To object for the desired exit points and point the destination to the label - Busy.
- Add another Label - <AwayfromDesk> under Transfer to Agent.
- Add an Agent Menu object with this label, which executes when the agent is on break, or logged off, or the interaction time out occurs.
- Specify the choices under the agent menu as shown in the diagram.
- Add the Go To object for the desired exit points and point the destination to the label - AwayfromDesk.
- Save the script and assign it to a channel dedicated to the agent.