A screen pop presents customer data to an 8x8 Contact Center agent automatically during an interaction, eliminating the need to manually search for the customer data. During an inbound call, 8x8 Contact Center looks up the caller ID in the existing customer data. On finding a record with a matching number in the Phone field, 8x8 Contact Center fetches and pops the record details to the agent presented with the interaction. If the search does not yield a matching record, it pops a new record entry screen.
A screen pop is presented for:
- Inbound transactions, including phone, voicemail, chat, and email media
- Outbound campaign phone transactions
- Transactions involving web callback
To enable an External CRM integration for a tenant, you have to configure screen pop settings in 8x8 Configuration Manager. You need to select a target CRM, specify events that trigger screen population of customer data, and specify screen pop window properties. An agent has to then save the login credentials of the External CRM account in the agent’s profile. Integration enables searching for records containing phone data matching caller ID, and pops up the corresponding record(s) for specific events.
The events triggering a screen pop may be one or more of the following:
- An agent is offered an interaction.
- An agent has accepted an interaction.
- An agent has completed an interaction.
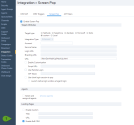
Use Integration > screen pop to configure the contents and appearance of the messages sent to the Web browser associated with a particular interaction.
- From the Configuration Menu, open Integration.
- Go to the screen pop tab.


-
Select the CRM of your choice from the available options. For other details refer to the table below.
The following table summarizes the options under Integration > Screen Pop:Screen Pop Option Description Enable Screen Pop If enabled, screen pop is offered during an interaction. Target Type Select a third-party CRM product.
The selection of a product enables and disables other features on the screen pop page.Integration Type If you have selected NetSuite, then choose one of the following: - Legacy
- Displays External CRM information in a separate browser window.
- SSO
- Allows the External CRM user to enter 8x8 Contact Center via NetSuite's website.
- Provides Single Sign-On; the user presents the authentication information only once per NetSuite session.
If the Target type specifies Salesforce, then choose one of the following: - Legacy
- Displays information from the Salesforce database in a separate browser window.
- Provides less integration with Salesforce than Enhanced mode.
- Enhanced
If you choose Enhanced, 8x8 Configuration Manager disables the Size and Position area described later in this table.- Displays information from the Salesforce database in a frame with 8x8 Agent Console window.
The agent can optionally move the Salesforce frame to a separate browser window. - Provides more complete integration with Salesforce than Legacy mode.
- Displays information from the Salesforce database in a frame with 8x8 Agent Console window.
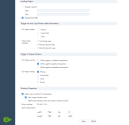
Account If the Target type is NetSuite or custom, then type the account name required to access the data the third-party CRM incorporates into the screen pop message. Service Name Service name is the URL used to log in to your External CRM account. Login URL Enter the login URL starting with <https://> Branding URL The custom URL provided by your CRM if you have customized your help desk to match your brand’s look and feel. URL For the Custom target type only. Type the URL where 8x8 Contact Center sends information about the interaction reported on by the screen pop. Enable Customization This option instructs the On Demand Contact Center to execute a custom XML Salesforce integration script using the specified Script URL. Script URL If Customization is enabled, the Script URL must contain a valid URL that points to the location of the custom script. Once the Script URL is specified and the screen pop page is saved, all features and functionality of the standard integration are replaced with the custom functionality. Agents see the changes with their next login. Use Remote Login This option enables Single Sign-On security settings in the Zendesk account. API Token Enter a valid API token to enable searching of the CRM. Use Client Login Session to pop Select the option to enable support for the Salesforce security setting: Lock sessions to the IP address from which they originated. Check the Launch native login window at agent login setting to have 8x8 Agent Console automatically launch a Salesforce login window when the agent logs in to 8x8 Agent Console. If the Launch native login window at agent login is not set, the agent must manually log in to Salesforce using the next tab of the same browser window used for the 8x8 Agent Console session. Launch native login window at agent login This option enables the native login window to launch when the agent logs in. Select and assign all agents Enable this option to grant access to all agents for Salesforce integration, or click (choose agents) to grant the permission to a selected group of agents. Landing Pages 8x8 Contact Center enables the custom landing page, and provides three built-in landing tabs from the 8x8 Contact Center CRM: - Enable Custom: If enabled, enter a title for the landing page, and a URL to navigate to.
- Enable 8x8 CRM
Note: Availability of the tabs depends on the External CRM the tenant is integrated with.
Trigger an Auto Log Window after interactions - For these Media: Select media for auto log from Phone, Voice Mail, and Chat. Auto Log Window is offered after Interactions. You can disable auto log for certain media by clearing the check box of the option.
- Select the type of log window for auto log from the following choices:
- No screen pop: Prevents screen pop for auto log.
- Pop the log for edit: Offers the ability to edit auto logs.
- Pop the log for view: Limits auto log to view mode.
Trigger a Popup Window - For these events:
- When agent is offered transaction: 8x8 Contact Center displays a screen pop when an agent is presented with a new interaction.
- When agent accepts transaction: 8x8 Contact Center displays a screen pop when an agent accepts a new interaction.
- When agent completes transaction: 8x8 Contact Center displays a screen pop when an agent has completed an interaction.
- For these media: Choose 8x8 Contact Center channels that use screen pop. The choices are Phone, Voicemail, Chat, and Email.
Window Properties If enabled by the administrator, the agents can see and configure the setup under Agent's Profile > External Setup. The following options are available in this section:
- Open new window for screen pop: This option allows agents to see screen pop, and the new Salesforce URL launches in new windows instead of tabs within the 8x8 Agent Console window. This option opens a new window for each transaction and each new URL.
- Use single window only: This option allows only one single window to display screen pop notifications and URL launch.
- Hide result listing if one search result is found: The application supports multiple search results displayed on screen pop. With the option enabled, the tab with one result listed will not be open. The screen pop window still will pop with the search result record. Note that with this option enabled, if multiple results are found, tab is open with all the result records listed. If the Salesforce window is collapsed, it will be automatically expanded.
- Show toolbar:
- If the Target type is Salesforce, and the Integration Type is Legacy, then click yes to display the Internet Explorer toolbar at the top of the stand-alone pop-up window.
- If the Integration Type is Enhanced, 8x8 Contact Center ignores the value of Show toolbar.
- Size and position:
- In the width and height text entry areas, type the size as an integer number pixels of the screen pop window.
- In the top and left text entry areas, type the screen position as an integer number of pixels of the screen pop window's upper-left corner.
- Legacy
- Save your settings.
For detailed instructions on setting up an external integration such as NetSuite or Salesforce, refer to the respective CRM integration guides on our documentation page.