You can create campaigns by extracting call list data from the Customer object in the 8x8 Contact Center Local CRM, or any object in your Salesforce CRM provided the object has a phone field. To generate a call list based on an object, you should configure the object with its desired fields in the 8x8 Configuration Manager Outbound Setup. Let's say your customer record has three phone fields and you want to select them all for campaigns; additionally you want to display the customer name and email address in the transaction panel for agents to access the facts quickly; you will need to add these CRM fields in the Outbound setup for campaigns.
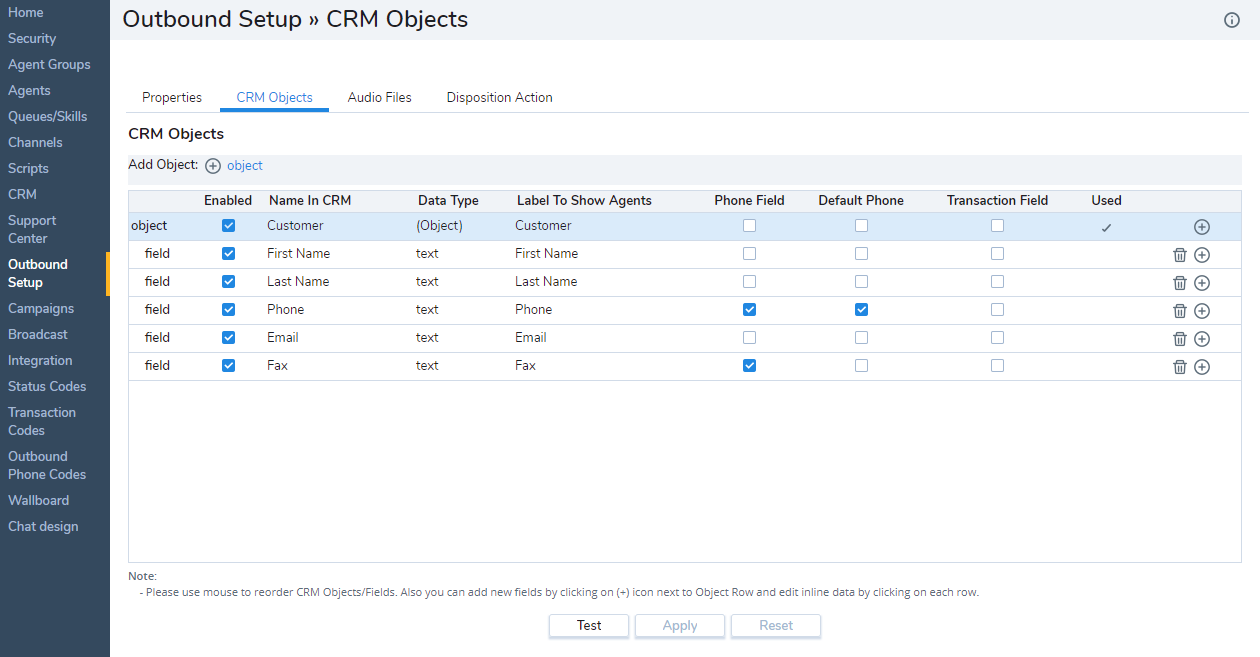
Outbound Setup > CRM Objects enables you to define CRM objects and fields to be used in campaigns.
To add a CRM object:
- From the Configuration Menu, open Outbound Setup.
- Go to the CRM objects tab.

-
Click
 Object.
If you selected to generate call list data from the Local CRM, then you can only select the data from the Customer object. If you selected Salesforce CRM, you can select any object.
- Enter an object name for Name in CRM.
The data type for the object is automatically populated.Note: You must enter the object name as it appears in the CRM.
-
Enter a value for Label to Show Agents in 8x8 Agent Console.
The following table summarizes the options under CRM Objects:CRM Objects Option Description Add Object Lets you add an object from your CRM. If enabled, automatically populates the CRM Objects field while creating a campaign. If disabled, prevents creating a campaign based on the CRM object. Enter the following information to add a CRM object: - Name in CRM: Enter the name of the object from your CRM. Make sure the object name matches the value in the CRM.
- Data Type: Select the most appropriate data type from the drop-down list.
- Label to Show Agents: Enter a label to show on the transaction panel of 8x8 Agent Console.
- Phone Field: Applies to a phone field only. If checked, displays the phone number to the agent on the transaction panel.
- Default Phone: Applies to a phone field only. If checked, dials the number if an agent fails to select a number.
- Transaction Field: Applies to any field. Shows the field on the transaction panel of 8x8 Agent Console.
- Revert Edits: Reverses edits before the last save.
Add Field Lets you add a field under the selected object. You can add any number of fields to filter your campaign call list. If disabled, prevents filtering a call list based on the CRM field.
Enter the following information to add a CRM field under an object:- Name in CRM: Enter the field name from your CRM. Make sure the name matches the value in Field Name.
- Data Type: Select the most appropriate data type from the drop-down list.
- Label to Show Agents: Enter a label to show on 8x8 Agent Console.
- Phone Field: Applies to a phone field only. If checked, displays the phone number to the agent.
- Default Phone: Applies to a phone field only. If checked, dials the number if an agent fails to select a number.
- Transaction Field: Applies to any field. If checked, shows the field on the transaction panel of 8x8 Agent Console.
- Revert Edits: Reverses the edits before the last save.
Move Up Moves a CRM object or field up from its current position. Move Down Moves a CRM object or field down from its current position. Delete Deletes a selected object or field. For more information on deleting objects and fields, see how to delete CRM objects below. Note: You cannot delete an object without deleting its fields.
Save/Revert/Revert Edits
- Save: Saves all changes.
- Revert: Reverses all changes before the last save.
- Revert Edits: Reverses the previous edit.
Add a CRM field to the Outbound Setup
To add a CRM field:
- From the Configuration Menu, open Outbound Setup.
- Go to the CRM objects tab.
- Click next to the Object in the top row. Notice that another field is added.
- Enter a name in Name in CRM for the field.
Note: You must enter the field name as it appears in the CRM.
- Select Data Type to match the CRM field data type. If you do not find an exact match, enter the most appropriate data type. The Dialer supports the Boolean, Integer, Text, Date, and DateTime data types.
Note: Boolean may be used for check box values.
- Enter a value for Label to Show Agents in 8x8 Agent Console.
-
Check the Phone Field to indicate if the data is a phone number. Phone Field is used to populate the list of phone numbers for a particular contact. The number shows on the control panel of 8x8 Agent Console.
Note: If you add a custom phone field, you must identify it as a phone field to include it in campaigns. Learn more.

- Check the Default Phone to assign a default phone number if a contact has more than one number. A default phone number initiates an outbound call if an agent fails to select a particular number from the list. The number shows on the control panel of 8x8 Agent Console.
- Check the Transaction Field for the field data to show on the control panel of 8x8 Agent Console and in the External Transaction Data field of Campaigns.
For example, you can select key information such as company name and phone number to show on the control panel, minimizing the agent's effort to retrieve this information from the contact record details. Custom objects and fields are supported as well. You can add any number of fields to filter your campaign call list.Note: For custom objects and fields, suffix the object and field name with <_c>, such as in <Client_c>.
Custom phone fields in campaigns
The following steps are essential to ensure the custom phone fields are included in campaigns and dialed in a specified order.
After adding a custom phone field in the Local CRM, you must add it and identify it as a phone field in the Outbound Setup. This marks the phone number for dialing during a campaign. If the Customer object has five phone fields three of which are custom fields, and you want to dial all these numbers during a campaign, the custom fields must be identified as phone fields.
Go to Outbound Setup > CRM Objects. In this tab, you can define the fields to be used in campaigns.
Note: Customer object is chosen by default for the Local CRM.
To mark a custom field as a phone number field:
- Click at the end of any row to add a Customer field.
- Select the custom field you added in the Local CRM previously.
- Add a label and click the checkbox to mark it as a phone field. This is required to confirm the field as a phone field. Enable this field for use in campaigns.
- Optionally, enable Transaction field to select the fields to be shown to agents in the Control Panel > Transaction information.
-
Click Test to validate the fields added and click Apply to confirm the changes.
Let’s say you have multiple phone numbers associated with each customer record and you want the dialer to try calling all the listed numbers during a campaign to improve the chances of contact. With sequential dialing, the dialer can now dial upto 22 phone fields. You will also need to determine the order in which they should be dialed. You want to reach a customer on their business number first, if unsuccessful, dial their home phone; if unsuccessful, dial their mobile number and so on; you need to list the phone fields in the order of business phone, home phone, and mobile phone by simply dragging and dropping the rows as desired in the Outbound Setup > CRM fields.
To customize the dialing order of the phone fields:
- From the Configuration Menu, go to Outbound Setup > CRM Fields.
- Select the predefined or custom phone field and drag it to the desired row, then drop. Drag and drop all the fields necessary in the desired order.
-
Click Apply.


Delete a CRM object
To delete CRM objects:
- From the Configuration Menu, open Outbound Setup.
- Go to the CRM objects tab.
- Select a field or object from the list.
- Click
 or Delete. The field is deleted from the list.
 - Click Save.
- Select the object and click Delete after deleting all the fields under the object.
Note: If an object is referenced in a campaign, the Delete button is disabled.
- Click Save.
To delete a CRM field:
Select the field, and click Delete.
Note: If a field is referenced in a campaign, the Delete button is disabled.