What's new for admins in 8x8 Contact Center?
So far in 2026, we have introduced the following features and enhancements requiring admin configuration.
Control IVR Speech in the Say node with SSML support
The February 2026 release of 8x8 Configuration Manager introduces Speech Synthesis Markup Language (SSML), support in the Say node, giving administrators granular control over IVR speech delivery.
With the Speech Editor, you can control pauses, pacing, pronunciation, pitch, and emphasis to create clearer, more natural IVR messages. No SSML expertise is required, though manual SSML input is supported for advanced use cases.
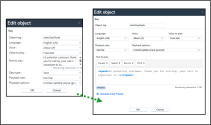
Use the Speech Editor to create and preview natural IVR messages before deployment.
You can access the Speech Editor directly within the Say node configuration dialog.
What’s new
The updated Say node now includes:
- Built-in SSML support through the Speech Editor
- Guided UI controls for pauses, speed, pitch, and pronunciation
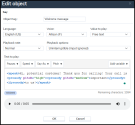
- Instant inline audio preview
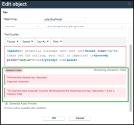
- Real-time validation with actionable error guidance
- Reduced need to dial into the IVR for testing
This enhancement shortens the test cycle and improves caller experience by making speech delivery more precise and predictable.
No SSML expertise is required, but manual SSML is supported for advanced configurations.
The enhanced Say node offers a Speech Editor for faster authoring, fewer errors, and a better caller experience.
Enhanced Say node editor with SSML support, playback controls, and audio preview.
|
Area |
Old Say node |
New advanced SSML Editor |
|---|---|---|
| SSML support | Single text field with no SSML UI | Full SSML support with UI controls and manual SSML tags such as <break>, <prosody>, <say-as>, etc.
|
| Preview and testing | Requires dialing into IVR to test; slow and error-prone | Inline audio preview with regenerate option |
| Validation | No real-time feedback; changes require full test loop | Real-time validation and inline feedback; highlights errors and blocks invalid saves |
| Playback and variables Provider behavior Authoring workflow | Limited playback control | Global playback controls with preview of undefined variables |
| Provider behavior | Inconsistent, manual fixes needed | Real-time validation and feedback: Sanitizes unsupported SSML tags and notifies the user |
| Authoring workflow | Long: edit → dial → listen | Short: edit → preview → validate → save |
The Speech Editor is available within the Say node.
To configure a Say node using the Speech Editor:
Configure a Say node using the Speech Editor
Use the Speech Editor to control how speech is delivered. It is available within the Say node.
To configure a Say node using the Speech Editor:
- From the Configuration menu, open Scripts.
- Select the Phone tab.
- Click Edit
 to open the desired script
 - In the Script tab, add or select a Say node.
-
In the Say node configuration dialog, configure the following:
- Language: Select the preferred language. This determines available voices.
- Voice: Select the predefined voice for the message. Available voices depend on the language selected.
- Value to play: Select Free text.
- Playback rate: Choose Slow, Normal, or Fast.
- Playback options: Select Uninterruptible (ignores input from the caller) or Interruptible (captures input during playback).
-
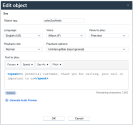
Text to play: Enter your message and use the SSML tags to adjust how your message sounds.
Note: If you apply any speech formatting, either through editor controls or by typing SSML, your content must be wrapped between tags:
xml
<speak>...</speak>- The Speech Editor validates SSML automatically and displays guidance if formatting is incorrect.
- Fix any formatting errors if necessary. When Speech Editor validates SSML, the Validated status appears .
-
Click Generate Audio Preview
 to listen to the message before saving or deploying.
 - Optionally, make the necessary changes.
- Click OK to save
For detailed configuration steps and SSML reference guidance, see Control IVR Speech in the Say Node with SSML Support.
To find more about supported SSML tags and troubleshooting, see SSML reference for the Say node.
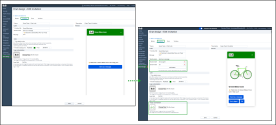
Enhanced chat design invitation
The webchat invitation experience has been significantly upgraded by 8x8. Key improvements include a modern user interface, the integration of quick reply buttons, image customization and increased configuration options.
What’s new
-
New Capabilities
- Quick reply buttons (administrators can add one or more predefined response options in the chat invitation)
- Up to 10 buttons
- Single button: selecting it simply triggers the configured flow; the text is not passed to the agent.
- Multiple buttons: the selected button's text is visible to both the customer and agent, preserving context for the conversation.
- Buttons are configured in CM and automatically adapt to the Invitation Window size
-
Image support
- Optional image insertion
- Auto-scaling behaviour
-
Preview & Configuration Experience
- Real-time preview updates in Configuration Manager
To learn more about designing a chat invitation, see Design a chat invitation.
