Classic Agent groups feature
As an 8x8 Contact Center administrator, you can see the groups, number of agents in each group, outbound phone codes assigned to each group, and if the agent's recording is enabled. Outbound Phone Codes offer a means to set a specific calling line identifier (caller ID) and to set an optional outbound queue for outbound calls from your tenant. Outbound Phone Codes may also be used to track the purpose of an outbound call. For details on the functionality and configuration of Outbound Phone Codes, refer to Outbound Phone Codes Overview.
Administrators go to the Agent Groups tab in 8x8 Configuration Manager to:
- Add a group and assign it to outbound phone codes
- Edit or delete a group
- Reassign an agent group membership
Note: As a member of an agents group, you can view the status and availability of fellow group members in the status tab of your 8x8 Agent Console.
Add an agent group and assign outbound phone codes
To add an agent group you need to complete a two-step process: define group properties, and assign outbound phone codes.
To add a new agent group:
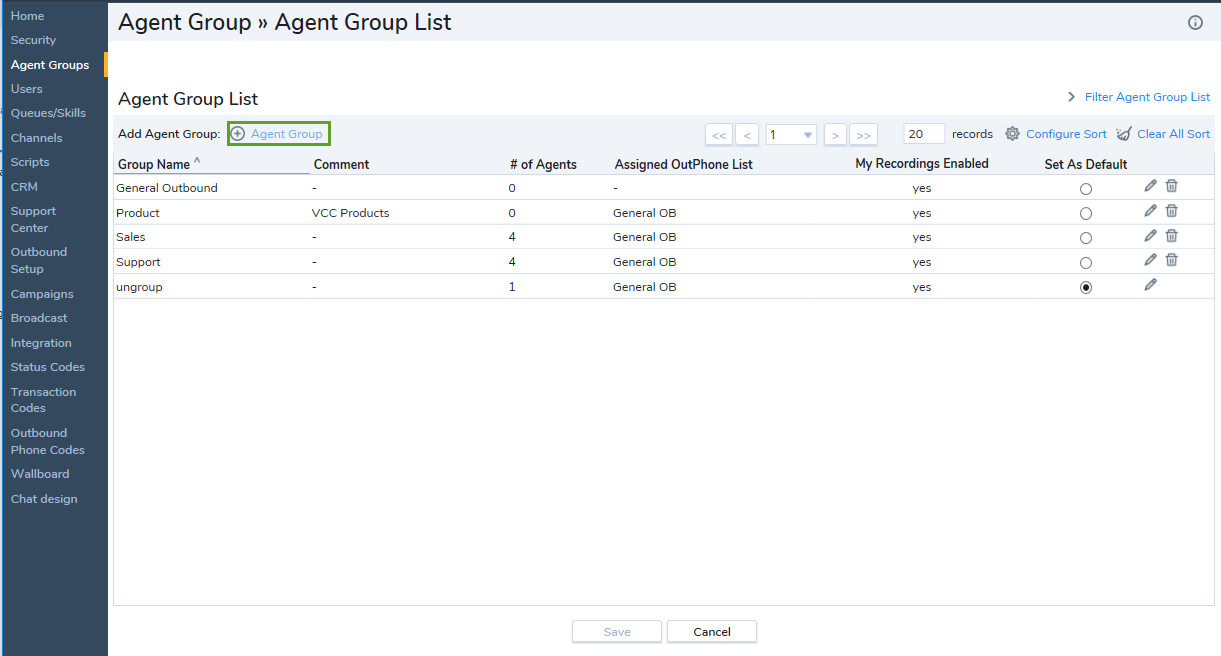
- From the Configuration Menu, open Agent Groups. You can mark and select your default agent group. You can also clone, edit, or delete the agent groups from this page.
-
Click
 to add an Agent Group.
- In the General tab enter a Group Name. Enter the required information and click Save. The Outbound Phone Codes tab opens.
-
The following table summarizes the options found under Agent Groups > General and Agent Groups > Outbound Phone Codes:
Option Description General tab Set As Default Indicates the default group for your tenant. Select another group if you wish to change default from ungroup. Group Name Indicates the descriptive name for the group such as Sales or Support groups. Members of one group are not able to view members of any other group. Note:Ungroup is a default agent group. It allows you to create agents quickly without requiring you to create a group beforehand.
Comment A description of the group's purpose of specialty. Default Agent Display Name Select whether you want to display the word Agent or the agent's first name such as <Robin>. The agent's display name appears in 8x8 Agent Console. Reset all agents, clears all custom display names. This group setting can be overwritten at the tenant level. Allow Agents to Change Display Name Allows agents to change their display name in the 8x8 Agent Console's Profile page. Display Name helps agents save time and effort to introduce themselves to customers every time they start a new chat. The agent's display name appears in the 8x8 Agent Console's control panel, Profile page, chat window, and CRM case created after a chat session. It can be modified by the 8x8 Contact Center administrator in the 8x8 Configuration Manager, or if permitted, by the agents in 8x8 Agent Console. The changes immediately show up in both applications. To prevent agents from changing their display name at the tenant level, clear the Allow Agents to Change the Display Name checkbox under Home > Profile. - To prevent agents from changing their display name at the tenant level, Clear the Allow Agents to Change the Display Name checkbox under Home > Profile. If disabled, this option does not appear at the agent groups level.
- To prevent agents from changing their display name at the group level, clear the Allow Agents to Change the Display Name checkbox from the Agent Group. This option only appears if it is enabled at the tenant level.
Enable Agent's My Recording Functionality Indicates if the agent can record the conversation. This option allows agents to record a voice message for the incoming calls. Allow Agents to Reject Interactions This option is enabled by default allowing agents to reject interactions. If disabled, the Reject button in 8x8 Agent Console is disabled preventing agents from rejecting the interactions they are offered. The Reject button in 8x8 Agent Console appears when an interaction is offered to the agent. You can set up this ability for an agent group, or individual agents. If you disable this option at the tenant level, the checkbox will not show up for agent groups or individual agents. Select the experience mode Choose the agent experience from one of the following options:
- Classic
- Customer 360
Note: Changes done here override settings at the tenant level in the Home > Profile tab.
Phone Connection Mode Default Connection Mode can be On Demand or Persistent:
- On Demand connection mode: On Demand Connection Mode creates a temporary connection from the agent’s workplace phone to the system. The agents have to manually accept the call in their soft or hard phone.
- Persistent Connection mode: Persistent Connection Mode creates a constant connection from the agent’s workplace phone to the system. Once the connection is open, it will stay active until logged out. Any changes to the setting will remain in effect for the whole duration of the agent’s persistent connection.
Enable Auto Answer If enabled, every phone interaction that is offered to an agent is automatically connected eliminating the need to accept it manually. Outbound Phone Codes tab Assign Select a check box to assign an outbound phone code to your tenant. Note that you need to create an outbound code list before being able to assign it. Active Displays a read-only indication of the active outbound phone codes. Outbound Phone list Indicates the outbound phone name assigned to that group. Number of Agents Number of agents in that group. - Click Save to successfully create a new agent group.
Administrators can copy the group name, default agent display name, recording functionality, ability to reject interactions, Phone Connection Mode, and Auto Answer settings with a simple click. Cloning agent groups allows 8x8 Contact Center administrators to create multiple agent groups in a short time. The assigned outbound code list is also copied for the new group. The default agent group remains the same until changed.
To clone an agent group:
- Log in to 8x8 Configuration Manager.
- Go to Agent Groups to display the list of groups.
- Select an agent group and click
 Copy.
Copy.
A single copy is generated. The cloned group has the original group name plus a number appended to the name. For example, Acme-Billing agent group becomes Acme-Billing -1, Acme-Billing -2, and so on. You can rename the group by going to the Agent Group > General > Group Name. The agent groups are listed in the alphabetical order, but you can sort and change their order.Note:
- Agents assigned to an agent group do not automatically transfer to the cloned agent group.
- The cloned agent groups show up in the Agent Group reports.
- Agents with Supervisor access can see all cloned agent groups assigned to them. - If required, modify the agent group properties and Save.
- Make sure the right agent group is Set As Default.
- Click
 to delete the queue. A confirmation message appears for you to confirm.

To edit a group:
- Double-click the desired group from the list view or click
 .
. - Make the desired changes and Save.
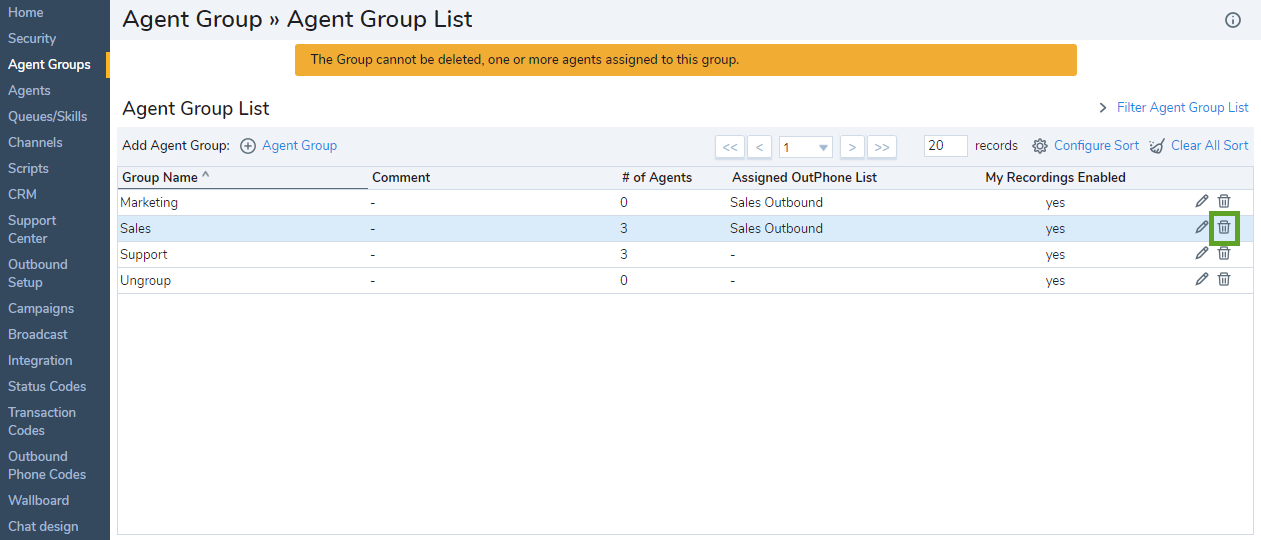
Deleting a group with assigned members requires you to reassign the members of the group to another group.
To delete a group:
- Select a group, and click
 .
.
You are prompted to confirm your action. If the group has members, a message indicates the inability to delete the group.
- Reassign the members to another group and then delete the group.
- Click OK to confirm the deletion.
For details on how to reassign an agent to a different group, refer to Reassign an Agent's Group Membership.
Reassign an agent group membership
To reassign an agent to a different group:
- Log in to the 8x8 Configuration Manager.
- From the Configuration Menu, open Users.
A list of agents and their groups appears. - Look for the group you are planning to delete, and click .
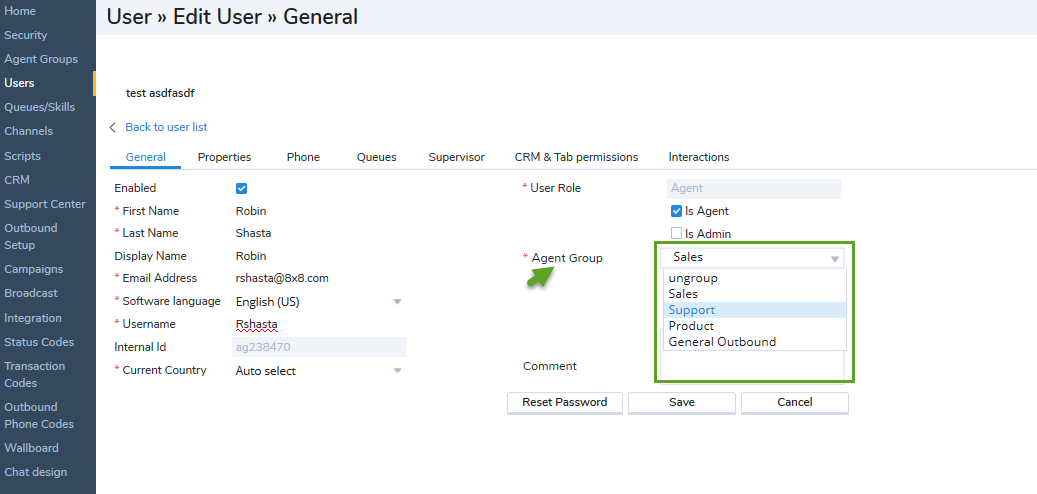
- In the General tab, go to Agent Group.
- Select a different group from the drop-down menu.
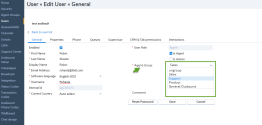
- Click Save to assign the agent to the new group.
- Continue the above search and reassignment for all the agents belonging to the group you are planning to delete.