Handle social interactions (agents)
8x8 Contact Center agents handle social requests similar to handling the regular chat requests. They are offered chats when they are in available status. They will then follow the steps below:
- Accept a chat interaction received via a social channel.
- View the screen pop for existing users in the Local CRM (The screen pop may trigger when the chat is offered).
- For new customers, the system creates a new customer record automatically.
- Interact with the customer, save the transcript to the CRM and end the chat. The chat transcript is saved as a closed case in the Local CRM.
- Access the chat transcript in the Local CRM.
Prerequisites
To receive chat interactions, agents must:
- Be assigned to an enabled chat queue
- Be in Available state
Accepting a chat
- Change your status to Available.
The Chat tab in the Control Panel blinks red indicating an incoming chat request.
Note: The Reject interaction button is disabled if your contact center administrator has not granted the permission. This prevents agents from rejecting the interactions they are offered.
- If the incoming chat is from an existing customer, the customer or case record pops for preview.
- Preview the record details, and click Accept Chat.
Note: If you reject the chat, or failed to accept it before the acceptance interval lapses, your status is changed to On Break.
- Initiate the chat conversation with the customer by typing in the chat window. Click Send.
Your chat entry is posted on the customer's messenger window displayed on the social media page used to initiate the chat. - Notice the name and social ID of the customer are displayed to agents in the transaction panel.
- Optionally, insert information from FAQs. For details, learn how to Insert FAQ Responses into chat Interactions.
- Optionally, select transaction codes to indicate chat disposition.
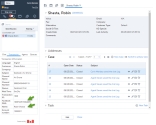
Once you wrap up the chat, click the menu button just above the chat window to bring up the menu. Select Save to CRM to save the chat transcript as a closed case. It is automatically associated to the customer record that popped earlier.
Note: You can save the transcript after ending the chat. It creates an independent open case. You need to manually assign it to the desired customer and close the case.
- To end the conversation, click End Chat.
Your status changes to Post Processing to wrap up. You can end post processing manually, or wait until the post processing timeout occurs. - After ending the chat, if you haven’t already saved the chat transcript, you can save it. It creates a new independent case which needs to assigned to the desired customer record.
-
Edit the chat log case as desired and save.
If the chat request is from a new customer, a new customer record entry in the Local CRM pops up. Enter the details of the new customer, and save the customer record. Supervisors can review all chat interactions in the playback section of the Monitoring tool.