Scheduled report emails
Want a quick overview of your organization's call activity? Schedule a report and set it to repeat at regular intervals, giving you ongoing updates on agent activity and performance.
Scheduled reports support cross-PBX![]() Private Branch Exchange—a private telephone network used within a company. reporting. When you create or edit a scheduled report, you can select one, several, or all of your PBXs.
Private Branch Exchange—a private telephone network used within a company. reporting. When you create or edit a scheduled report, you can select one, several, or all of your PBXs.
Supported reports
You can schedule the following reports and receive them by email daily, weekly, or monthly:
- Company Summary report
- Extension Summary report
- Call Details Record report
- Ring Groups Summary
- Ring Groups Member summary
Feature
The scheduled report offers you the following capabilities:
- Schedule reports to run daily, weekly, or monthly, at the time of your choosing.
- Generate reports in your preferred timezone.
- Aggregate or break down metrics day by day.
- Deliver reports as CSV or PDF attachments.
- Filter Call Detail Record reports to track answered, abandoned, or missed calls.
- Customize the data fields included in each report.
- Deactivate reports you no longer need.
- Reactivate reports you previously deactivated.
Benefits
- Multi-PBX filter. Choose one, some, or all of your PBXs when creating or editing a scheduled report.
- One combined CSV file. All data appears in a single file with a PBX ID column that shows which PBX each call belongs to, so you can filter, extract, and join data more easily.
- Aggregated PDF charts. Top departments, extensions, sites, and user groups now appear as aggregated totals across the selected PBXs.
- Role-Based Access Control (RBAC) support. Cross-PBX scheduled reports respect RBAC permissions.
Limitations
- Cross-PBX scheduled reports are available to users with the Analytics Essential role.
- Scheduled reports for Rring Ggroups require the Analytics Supervisor role, which is part of the X4 license.
- Cross-PBX scheduled reports respect RBAC permissions. If you do not have access to a particular PBX, that PBX does not appear in your report.
Note: The RBAC feature is currently in Beta. To request activation, contact your 8x8 Account Manager.
Access the Scheduled Emails page
- Log in to 8x8 Work.
- From the upper-right corner, select the Welcome > Schedule Report Emails.
- The Scheduled Emails page opens, showing the list of active scheduled reports.
- To view inactive reports, select the Inactive tab.
You can sort the list alphabetically and search by any column, including PBXs.

Schedule a report
- Access the Scheduled emails page.
- In the Scheduled emails page, click New in the upper-right corner.
- Enter or select the required information. For field descriptions, see the Glossary: Schedule report field reference
- Select Schedule.
The report appears in the list.
Note: If you have already created a report with the same criteria, you will not be able to save a duplicate.

|
Field |
Description |
|---|---|
|
Schedule name |
Enter a name for the report. |
| Report | Select a report type. You can schedule the following reports: Company Summary, Extension Summary, Call Detail Record, Ring Groups Summary, and Ring Groups Member Summary. Depending on the report type you select, some fields may be enabled or disabled. |
| PBXs | Select the PBXs to include. Only PBXs you have access to are shown. Data is combined across your selection. Selecting all covers the PBXs available to you at the time the report is generated. Select the field to view all. |
| Group by | Select Extension, User Groups, or None. |
| Report date range | Select the date range for the report, such as last week, last month, this week, or this month. |
| Intraday time range | Select a time range within 24 hours, such as 6 am to 2 pm. When generating a Call Detail Record report for an overnight shift, first select both dates that cover the shift, then set the start and end times, such as 7 pm to 7 am the next day. |
| Time |
Select the time of day you want to receive the report, such as 7 am. Note: The report contains data up to two hours before the scheduled delivery time. For example, a report scheduled for 6 am contains data up to 4 am. |
| Custom timezone | Select your preferred timezone for the scheduled report. You are not limited to the PBX timezone. |
| Site | Filter data by selecting a specific site or all sites. You can select up to 25 sites. When multiple PBXs are selected, each site is followed by its corresponding PBX name in brackets, for example, Denver (Headquarters PBX). Available sites are based on site names present in call data for approximately the last 60 days. |
| Department | Filter data by selecting a specific department or all departments. You can select up to 25 departments. When multiple PBXs are selected, each department is followed by its corresponding PBX name in brackets. Available departments are based on department names present in call data for approximately the last 60 days. |
| User Group | Filter data by selecting a specific user group or all user groups. You can select up to 25 user groups. When multiple PBXs are selected, each user group is followed by its corresponding PBX name in brackets. Available user groups are based on user group names present in call data for approximately the last 60 days. |
| Ring Group |
Filter data by selecting a specific ring group or all ring groups. When multiple PBXs are selected, each ring group is followed by its corresponding PBX name in brackets. NoteThis field applies to the Ring Groups Summary report only. Select a site first to automatically populate the Ring Group filter. |
| Direction |
Select the call direction: Inbound, Outbound, or Internal. Note: This field applies to the Call Detail Record report only. |
| Call Status |
Select one of the following options.
Note: This field applies to the Call Detail Record report only. |
| Participants |
Filter data by Caller and/or Calee extension. Note: This field applies to the Call Detail Record report only. |
| Extensions |
Add specific extension numbers to filter by the selected participants. You can add up to 125 extensions. Note: This field applies to the Call Detail Record report only. |
| To |
Search for a user or enter an external email address. You can add an unlimited number of recipients. Important!: The report is sent only to recipients configured in the scheduled report. Before saving, confirm that your email address is included in the recipient list. If it is not, edit the report and add your address. |
| Subject | Use the default subject line or select Change to enter a custom subject. |
| Message | Enter a brief message to include in the scheduled report emails. |
| Customize Report | Select the data fields to include in the report from the list. of available fields for the report. Use the icons to show or hide individual fields, and to move a field up or down. The PBX ID column is always included and cannot be hidden or removed. |
| Format |
Choose to send the report as a PDF file, a CSV file, or both. The PDF format includes column charts showing the top 10 extensions, sites, departments, and ring groups (where applicable) by inbound calls, along with a data table where the first column is the PBX ID. Important!: This field applies to the Call Detail Record report only. The PDF report is sent only to recipients configured in the scheduled report. Before saving, confirm that your email address is included in the recipient list. If it is not, edit the report and add your address. |
| Frequency | Select how often to receive the report: daily, weekly, or monthly. After saving: a daily report is delivered the next day; a weekly report is delivered on the same day of the following week; a monthly report is delivered on the first day of the following month. |
| Starts on | Select a date to begin the report schedule. |
| Ends on | Select whether the scheduled report runs indefinitely or enter a date to end the schedule. |
Deactivate or reactivate a report
You can deactivate any active report you no longer need. Marking a report inactive stops it from being generated and delivered to recipients.
- Access the Scheduled emails page.
- In the Active tab, find the desired report you want to deactivate.
- Select Inactive
 in the report row.
The report moves to the Inactive tab.

Reactivating a report resumes generation and delivery to its configured recipients.
- Access the Scheduled emails page.
- In the Inactive tab, find the desired report you want to reactivate.
- Click Active
 in the report row.
The report moves to the Active tab.
Edit a scheduled report
Edit an existing report at any time. You can change any field and save your updates.
Note: The PBX filter respects your RBAC scope. You can only select and view PBXs you have access to. If you lose access to a PBX included in a scheduled report, the report is automatically set to inactive and stops generating and delivering to recipients. It appears in the Inactive tab of the Scheduled Emails page.
To edit an existing scheduled report:
- Access the Scheduled emails page.
- In the Active tab, click the report you want to edit.
- In the Edit Schedule Report panel, make your changes.
- Select Schedule.
Download a report
The scheduled report runs at the set time and sends an email to all named recipients. The email includes a link to download the report. This link expires in seven days. After expiry, log in to Analytics for 8x8 Work to access the report directly.
The email also includes the report as an attachment, provided the file does not exceed 6 MB. Archived reports remain available in Analytics for 8x8 Work.
- Access the Scheduled emails page.
- In the Active or Inactive tab, find the report and click the download
 icon.
icon. - Select the date for which you want to see the report.
- Save the report in a CSV format to your computer.
Important! The PDF report is sent only to recipients configured in the scheduled report. Before saving, confirm that your email address is included in the recipient list. If it is not, edit the report and add your address.

The report is sent to the recipients configured in the scheduled report. To stop receiving these emails, edit the report and remove your email address from the recipient list.
- Open the scheduled report email.
- Select the CSV or PDF download link.
- Save the report to your computer.
When you select multiple PBXs for a scheduled report, data is combined and delivered as follows:
- One file, not many. All call data from your selected PBXs is delivered in a single file. You do not receive a separate file for each PBX.
- PBX ID column. Each row includes a PBX ID column identifying which PBX the activity came from. This applies to reports created before this feature was introduced.
- Aggregated PDF charts. Top departments, extensions, sites, user groups appear as aggregated totals across all selected PBXs. The PDF's PBX field lists the selected PBXs, or shows All PBXs when every PBX is selected.

Use cases
Here are some use cases that demonstrate the usability of the scheduled reports.
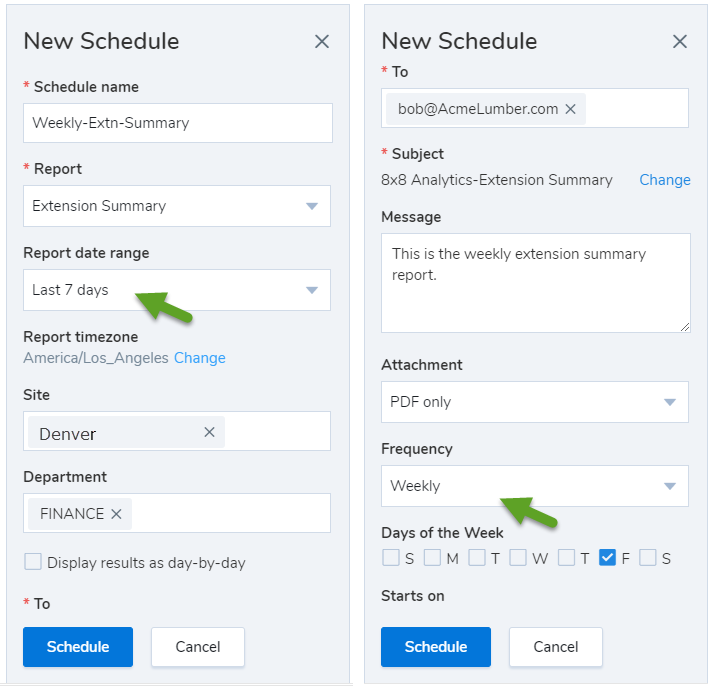
Bob, a site supervisor for Acme Lumber’s Denver office, needs to include call data from VOA Extension Summary report in his weekly status report each Friday. Instead of logging in to VOA each week, Bob schedules a Scheduled Email that will generate a weekly Extension Summary report, each week beginning this Friday, for the previous 7 days, using US/Mountain time zone (his corporate office is on CA, so his PBX’s Analytics default time zone is set to US/Pacific), and sets a filter that limits the data for that report to ‘Site = Denver’. Each Friday Bob will receive the report he needs, already limited to the data he cares about, presented in the proper timezone.
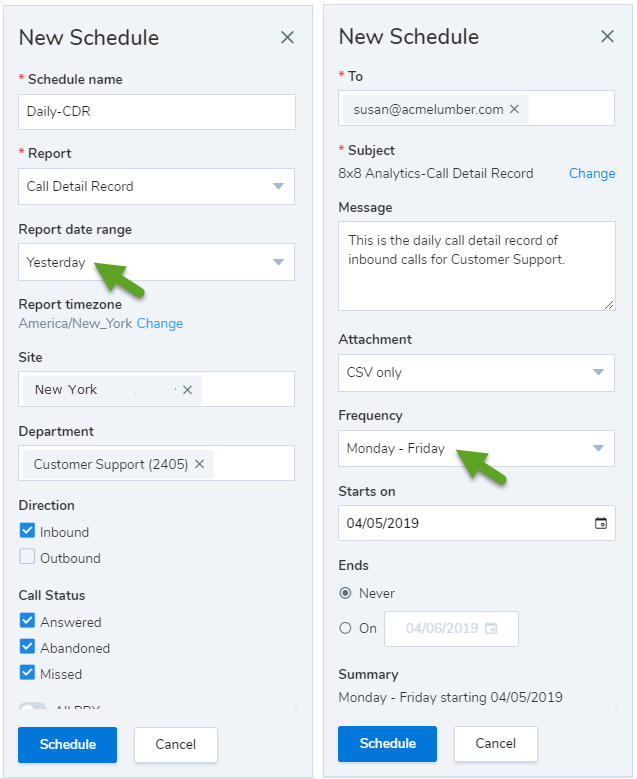
Susan, the VP of Acme’s Support department, is located along with her team in NY, and on weekday mornings she needs to see Call Detail Records for all inbound calls from the day before, so that she can work with her team to optimize coverage. Susan schedules daily Call Detail Records reports, scheduled for M-F, and uses filters for ‘Department = Sales’ and ‘Direction = Inbound’, using the US/Eastern time zone. Each weekday morning she will have the details she needs in her Inbox.
Fred, the Sales team admin at Acme, needs to provide weekly updates to the senior Sales executives regarding call activity for his Inside Sales and Outside Sales departments, but only needs to share Inbound Call rankings by Extension and by Department, and doesn’t want to have to download the detail and prepare an easily-consumed custom report for them each week. Instead Fred schedules an Extension Summary report, using the PDF-only option, applying 2 department filters (Inside Sales and Outside Sales), and including the sales team’ group email address on the To: field. Each week the sales executives will receive a PDF report that includes Top Inbound Calls by Extension, Department and Site for his team, and it will be attached to the email and will not require any VOA authentication.
Multi-PBX regional overview
Maria, a regional operations manager, oversees several offices, each running on a separate PBX. Instead of opening a separate report for each one, Maria schedules a weekly Extension Summary report, selects all managed PBXs in the PBX filter, and receives a single consolidated report with a PBX ID column on each row and top departments ranked across all selected PBXs.