Add additional attribute mappings
The installation of the 8x8 app from the Okta marketplace includes a minimal default set of attributes. You may add the following additional attributes to suit your environment:
- Job title
- Department
- Site
- Mobile phone number
Configure attribute mappings
Follow these steps to configure the additional attribute mappings:
The Site attribute is not a built-in user attribute and you must add it to the default User profile before it can be used.
Note: If you want to set the site for your newly created users in 8x8, you need a User attribute to contain the site name for each user. The value of the Site attribute must exactly match one of the sites listed in 8x8 Configuration Manager.
The following instructions describe how to add a specific attribute for Site to the default user profile, however you can use any user attribute to suit your Okta environment. For example, instead of adding a specific Site attribute, you might select deliveryOffice if this is an attribute you have mapped into your Okta user profile from your on-premise AD.
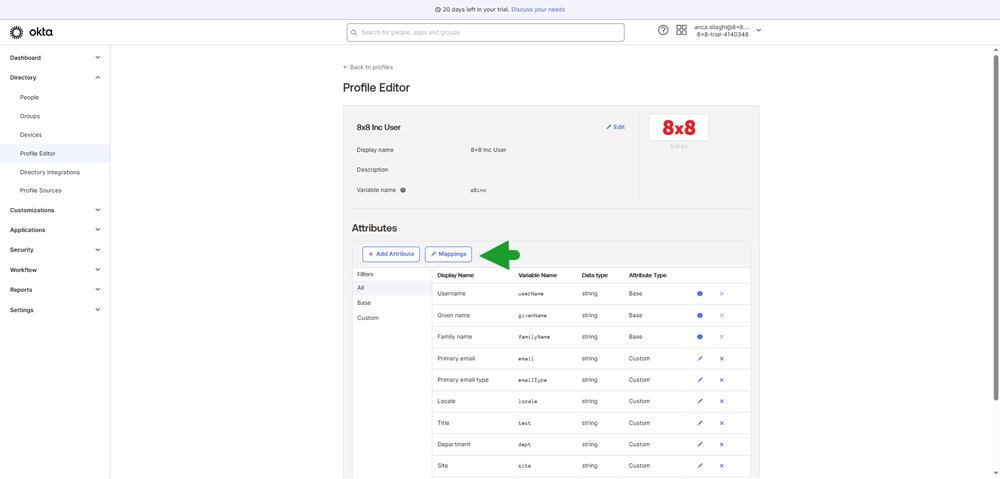
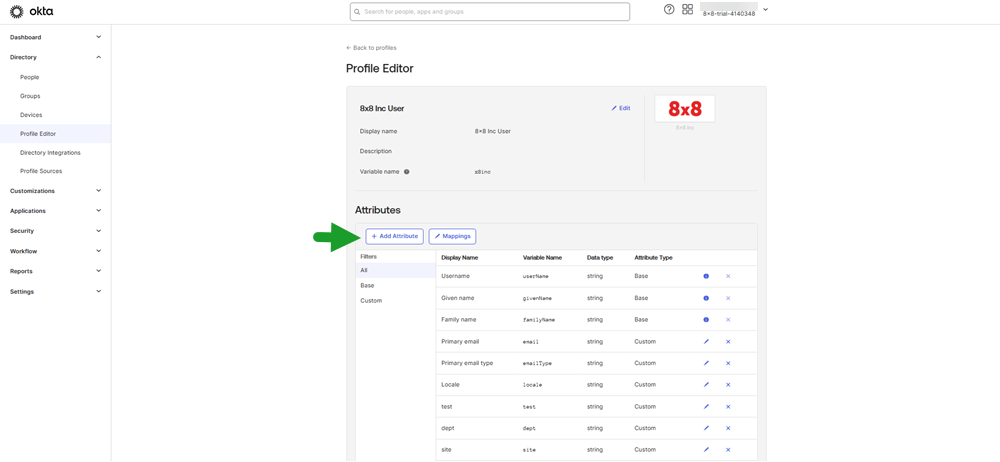
- From the Directory menu, go to Profile Editor.
- Click on the User (default) profile (usually at the top).
- Click Add Attribute. In the Add Attribute box, set the following:
- Data type: string
- Display name: Site
- Variable name: site
- Click Save.

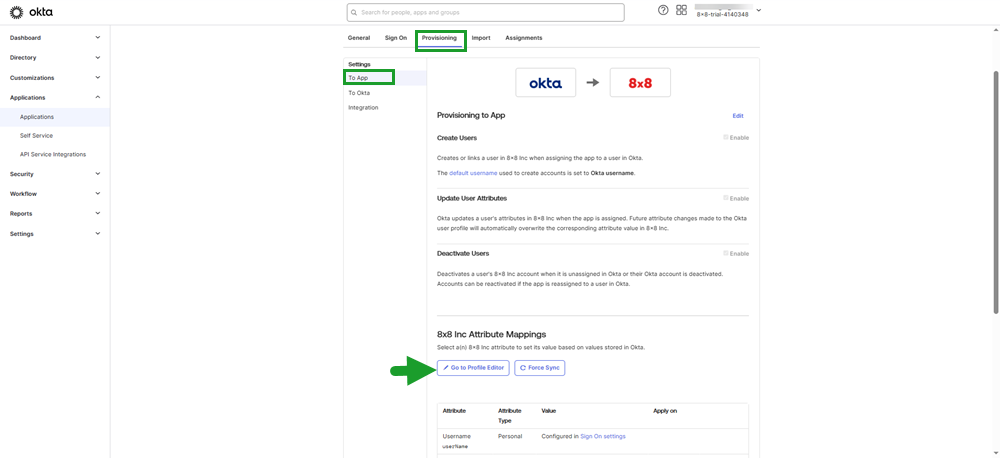
- Locate your 8x8 Inc app in your list of installed applications.
- Go to Provisioning > To App and scroll down to the 8x8 Inc Attribute Mappings section.
- Click Go to Profile Editor.
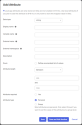
- Click Add Attribute. The Add Attribute dialog displays.

-
Complete the fields required for the newly added attribute then click Save or click Save and Add Another to add additional attributes.
Note: The Display name and Variable name fields shown below may be adjusted to suit your environment. However, the External name and External namespace fields must be set exactly as shown; any deviation will cause the SCIM attribute mapping to fail.
- For the Job title attribute add these values to the following fields:
- Data type: string
- Display name: Title
- Variable name: title
- External name: title
- External namespace: urn:ietf:params:scim:schemas:core:2.0:User
Attribute type: Select the radio button next to Personal.

- For the Department attribute, add these values to the following fields:
- Data type: string
- Display Name: Department
- Variable name: department
- External name: department
- External namespace: urn:ietf:params:scim:schemas:extension:enterprise:2.0:User
Attribute type: Select the radio button next to Personal.
- For the Site attribute, add these values to the following fields:
- Data type: string
- Display name: Site
- Variable name: site
- External name: site
- External namespace: urn:ietf:params:scim:schemas:extension:8x8:1.1:User
- Attribute type: Select the radio button next to Group if you want to assign the site attribute at the group level.
- For the Mobile phone number attribute, add the values below and click Save and Add Another to add the new attribute values listed at step e:
Note: When using the Mobile phone number attribute you are required to create an additional attribute titled Mobile phone type as provisioning requires both a phone number value and its corresponding type to ensure proper data mapping. If the Mobile Phone Type attribute is missing, provisioning may fail or result in incorrect phone type assignment.
- Data type: string
- Display name: Mobile number
- Variable name: mobile
- External name: phoneNumbers.^[primary==true].value
- External namespace: urn:ietf:params:scim:schemas:core:2.0:User
- Attribute type: Select the radio button next to Personal.
- If you added the Mobile phone number attribute, you must also add the Mobile phone type attributes with the following values:
- Data type: string
- Display name: Mobile Phone Type
- Variable name: mobileType
- External name: phoneNumbers.^[primary==true].type
- External namespace: urn:ietf:params:scim:schemas:core:2.0:User
- Attribute type: Select the radio button next to Personal.
- From the Profile Editor in the 8x8 app, click Mappings.
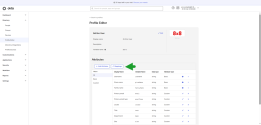
- Click the Okta User to 8x8 Inc tab.
- At the bottom of the list, the newly added attributes of the 8x8 app display and ready to be mapped to Okta user attributes:
- In the drop-down to the left of the title attribute, select title.
- In the drop-down to the left of the department attribute, select department.
- In the drop-down to the left of the site attribute, select either site or your choice of user attribute. For example, deliveryOffice (see Step 1 on adding a Site attribute ).
- Click the green arrow drop-down and change the mapping for site to Apply mapping on user create only.
- Click the green arrow drop-down and change the mapping for site to Apply mapping on user create only.
- Click Save Mappings. We recommend clicking Don't apply updates, so that the new mappings can be tested on a single user before resyncing all users.
- Test the mapping by assigning a new user to the 8x8 app to ensure that the three new attributes are correctly set.
-
When you verify that mapping works as expected, you may want to resync all users to push the newly mapped attributes through to 8x8. Do this by changing any attribute mapping, saving without a resync, then changing the mapping back to what it was, and save by resyncing.