Edit Individual Extensions
By editing an individual extension, you can view or configure:
- External caller ID, phone number and extension, calling plan, type of phone equipment, and group paging.
Note: Phone numbers appear in the E.164 numbering format.
- Time zone, preferred Codec, emergency service address, calling options, Music on Hold selection, view billing statements, etc.
- Voicemail password, and email notification options.
- Call recording, fax notification, and Internet fax numbers.
- Call forwarding types and destinations.
- Membership information.
- Newsletters, product and promotion emails, surveys, and monthly bill notifications.
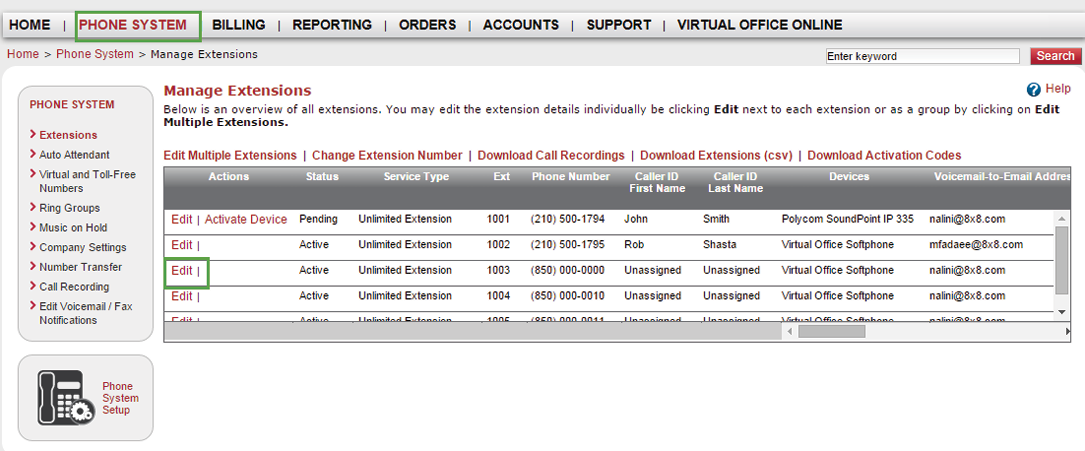
To access an Individual Extension:
- Go to Phone System in the top navigation bar.
- Click View All Extensions.
- Click Edit next to the extension you want to edit.

- Use Expand
 or Collapse
  to view and edit the extension.
Note: The panes displayed varies depending on whether the selected extension is Basic, Virtual, Fax, Shared, Unlimited, Unlimited Pro, Metered, etc. If you are editing a Shared extension, see Set up Shared Lines.

In the Extension Information pane, you can:
- Assign an existing user profile to an extension, or create a new user profile.
- Assign an external or internal caller ID to the extension.
- Enable or disable access to Virtual Office applications.
To edit your extension information and set up a caller ID:
- Click Expand to display the Extension Information.
- Choose a caller ID:
- External Caller ID: To select an optional caller ID displayed for outbound calls made to outside your PBX, such as when you call your customers.
- Internal Caller ID: To display the caller's first and last names for internal calls within the PBX, such as when you call your coworkers in the company.

- Select a Phone Number from the list to display for the outbound calls.
Notes:
-If you choose a regular DID number, the company's name can be edited. If you choose a virtual toll-free number, however, it is read-only and the name shows as populated.
-If you leave the external Caller ID Full Name blank, it displays the internal caller ID during the outbound call without automatically populating the field.
-If you assign a user profile to an extension, the extensions internal caller ID is automatically populated, but you can edit or change it as you wish. - Enter the External Caller ID Full Name.
This name appears during an outbound call. - Enter the Internal Caller ID.
This name appears during an internal call. - Select the Caller ID Option Locked to User check box to prevent a Virtual Office desktop app or Virtual Office mobile app user to change the caller ID settings.
Note: By default, the Virtual Office desktop app is enabled for all unlimited, global, and metered Virtual Office extensions. The Virtual Office desktop app allows extension users to manage and use their phone features, including accessing the contact directory and call forwarding settings, from any computer. A username and password are required to access these features.
- Select the Enable Virtual Office check box to allow extension user access to the Virtual Office desktop app and Virtual Office online app.
- Select the Enable Virtual Office Mobile check box to allow extension user access to the Virtual Office mobile app. This option is enabled by default.
- Click Save Changes at the bottom of the screen.

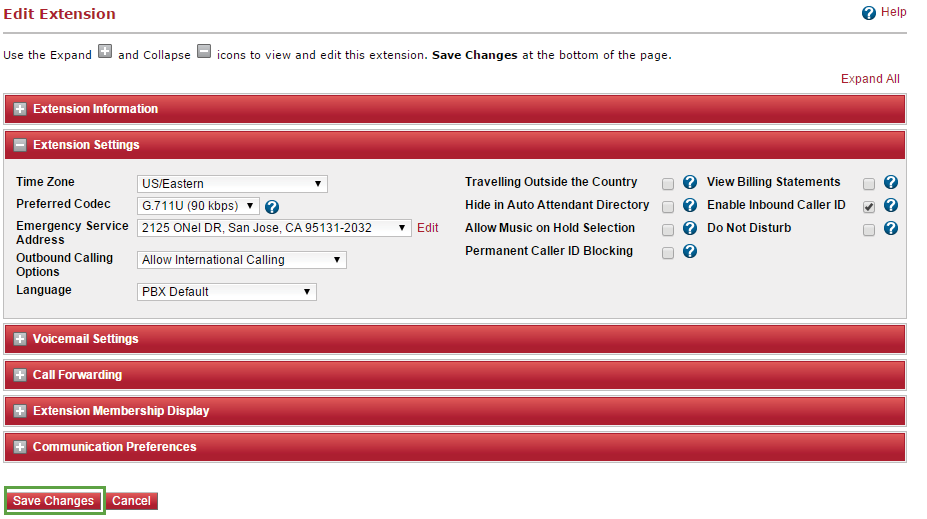
In this pane, you can:
- Configure time zone.
- Choose a preferred compression/decompression (Codec).
- Edit the emergency service address.
- Allow international, domestic, or emergency calling options.
- And much more!
To configure extension settings:
- Click Expand to display the Extension Settings pane.
- Enter, select, or deselect from the list of options.

-
Select a Language from the list.
This setting determines the language of Telephony IVR messages such as voicemail greetings. The display on the user's desk phone also appears in this language. This setting overrides the default language of PBX or branch. Review the following table for the available localization settings. Summary of Localization Settings
The following table summarizes the localization settings in Account Manager:
Setting Description Configured At Edit My Profile
The primary or secondary administrators who have access to Account Manager can configure the Language setting in Edit My Profile to communicate emails in their language of choice.
This setting overrides the default PBX or branch language setting. It only applies to the administrator's email communications.
User level
Account > User Profiles
Configure the Language setting for extension users to communicate emails in their language of choice.
This setting in user profile overrides the default PBX or branch language. It only applies to the user's email communications.
User level
Phone System > Company Settings
Configure the Language setting for all users in the PBX to receive Telephony IVR messages, such as voicemail greetings in the selected language. This setting is overridden by language settings at the branch and/or individual extension level.
In the absence of the individual extension user's language of choice, the language setting of branch overrides the PBX language setting.
PBX level
Phone System > Branches (Add-on subscription-based)
Configure the Language setting for users to receive Telephony IVR messages, such as voicemail greetings in the selected language.
In the absence of the individual extension user's language of choice, the branch language setting overrides the PBX company language setting. In other words, if an extension belongs to a branch set to Japanese, and if you have not defined another language at the extension level, Telephony IVR messages are played in the Japanese language. If the extension belongs to a branch with no other language defined, you inherit the PBX language.
Branch level
Phone System > Edit Individual Extension
Configure the Language setting for extension users to receive Telephony IVR messages, such as voicemail greetings in the selected language. The display on the user's desk phone also appears in this language.
This setting overrides the PBX and branch language setting.
Note: If you need help with setting the user language in bulk, contact 8x8 Support for help.
Note: To access localized versions of 8x8 Virtual Office applications, refer to your computer or device manual to learn how you can change the display language of your operating system.
Extension level
- Click Save Changes at the bottom of the screen.
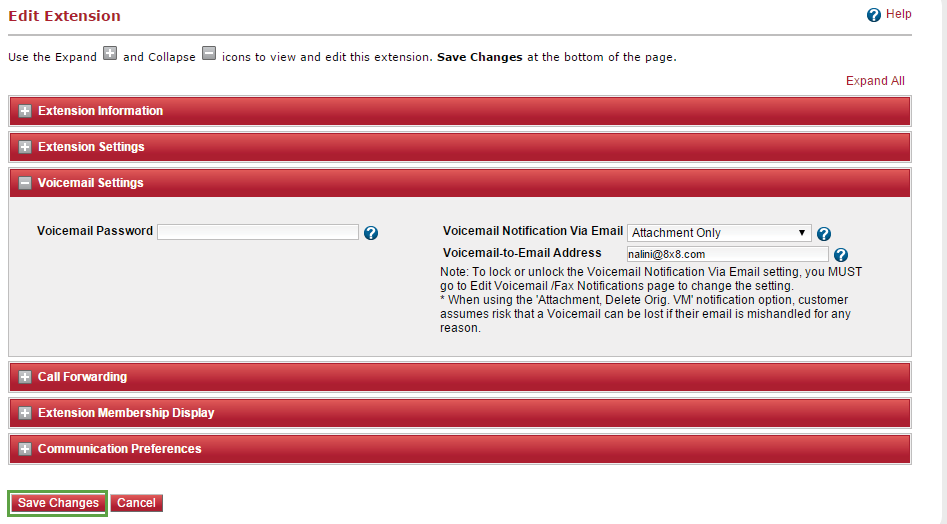
In this pane, you can edit a specific extension's voicemail password, and set up email notification options.
To define voicemail settings:
- Click Expand to display the Voicemail Settings pane:

-
Enter a voicemail password.
Note: The minimum required length of the voicemail password is set in the Company Settings. It is 4-15 digits long.
Voicemail Password Security Guidelines
To secure your voicemail password, the following password restrictions are enforced. The password:
- Should be 4-15 digits long.
- Should not use same digits such as 1111, 2222.
- Should not use years from 1900 till present.
- Should not be of ABAB format such as 1010, 2121,3131.
- Should not use sequential numbers such as 1234, 4567.
- Should not use easy to key in numbers from the center of keypad. The following numbers are not allowed - 2580, 0582, 5683 (spells LOVE).
- Select a voicemail notification via email:
- Disable Notification: An email notification is not sent.
- Attachment Only: An email notification is sent with an audio file of the voicemail attached.
- Notification Only: An email notification is sent without an audio file or link to the voicemail (recommended for companies requiring HIPAA compliance).
- Link & Attachment: An email notification is sent with both a link to the voicemail and an audio attachments, plus links to Delete Voicemail and to manage multiple voicemails.
- Link Only: An email is sent with a link to the voicemail and links to Delete Voicemail and to manage multiple voicemails.
- Attachment, Delete Orig.VM*: An email notification is sent with an audio attachment, but the original voicemail is automatically deleted.
Note: To configure multiple extensions at once, go to the Edit Voicemail/Fax Notifications page.
- Enter an email address in Voicemail-to-Email Address to notify the user of a new voicemail.
- Click Save Changes at the bottom of the screen.
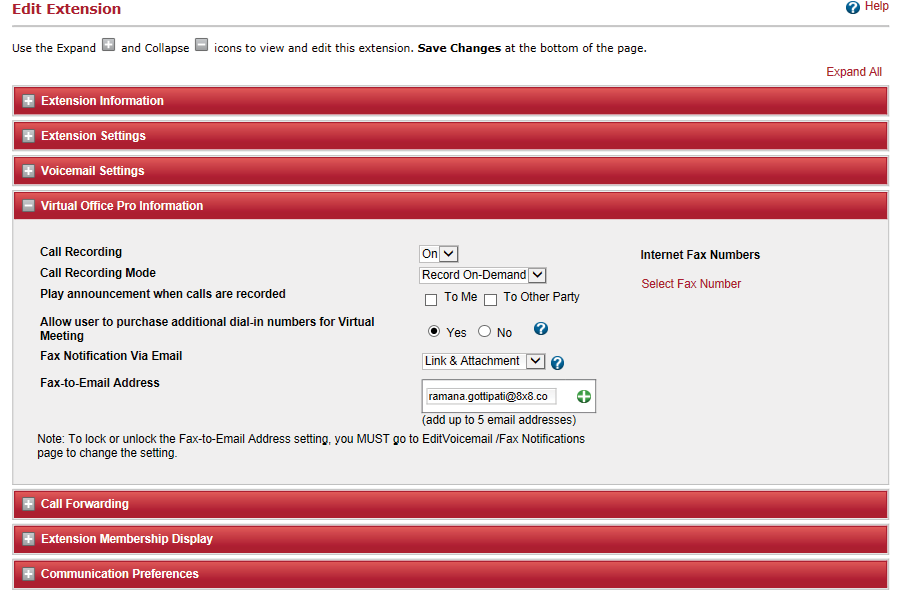
Depending on your 8x8 subscription, you are able to edit and configure additional features.
- Click Expand to display the Virtual Office Pro Information pane.

- Select your preferred options for the individual extension:
- Call Recording
Note: Additional options to restrict extensions, such as the user's ability to listen and delete recordings, are available in the Call Recording section under the Phone System tab.
- Call Recording Mode
- Play announcement when calls are recorded
- Allow user to purchase additional dial-in numbers for Virtual Office Meetings
Note: The additional dial-in numbers can be domestic, international, or toll-free.
- Fax Notification Via Email
- Fax-to-Email Address
Notes:
-To lock or unlock the Fax-to-Email Address setting, you must go to the Edit Voicemail/Fax Notifications page to change the setting.
-To configure multiple extensions at once, go to Edit Voicemail/Fax notifications. - Internet Fax Numbers for Virtual Office
- Call Recording
- Click Save Changes at the bottom of the screen.
Call forwarding allows you to set up rules to direct how calls are forwarded to different destinations, either sequentially or simultaneously.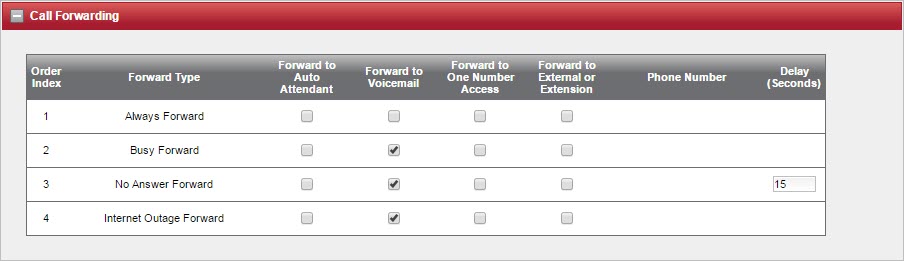
You can manage call forwarding using:
Call Forwarding offers control over:
- Forward to Auto Attendant: Calls are answered by the Auto Attendant. Callers can select from available options, such as: Press 1 to leave a message, press 0 to reach an operator, etc.
- Forward to Voicemail: Callers are forwarded to a destination voicemail box, where they will hear a greeting and/or be able to leave a message.
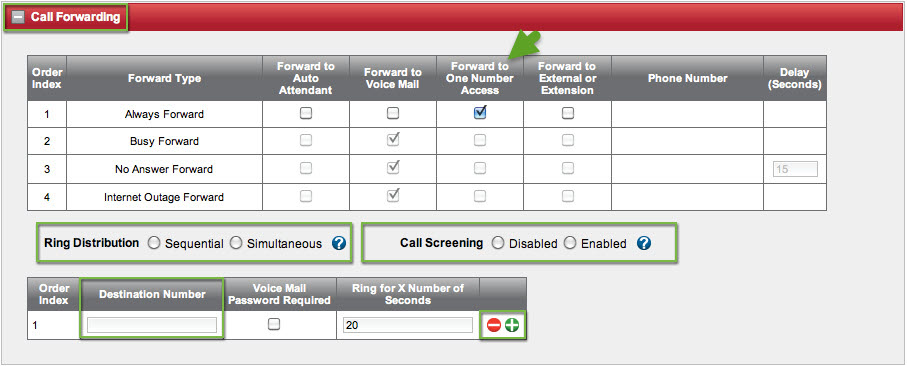
- Forward to One Number Access (ONA): Calls can be forwarded to up to four destinations sequentially or simultaneously. If a call is not answered at any of the target destinations, it will then be forwarded to voicemail.
- Forward to External Number or Internal Extension: When you select this feature, a field appears in the Phone Number column where you can enter the number you would like the calls forwarded to.


To Manage Call Forwarding:
- Click Expand to display the Call Forwarding pane.
- Select the desired options for these call forwarding types:
Forward Type Note Always Forward If you select the Always Forward check box, all other forwarding options will be disabled. To re-enable them, clear the Always Forward check box. Busy Forward No Answer Forward You can also select a delay time, in seconds, for this feature. The default time is 15 seconds. Internet Outage Forward - If you select Forward to One Number Access:

Option Note Select whether ring distribution is Sequential or Simultaneous. Select whether call screening is Disabled or Enabled. Enabling this feature requires callers to record their name so you can screen their calls before answering. Enter the first destination number your calls will be forwarded to. The number could be a phone number, extension number, Ring Group number, call queue number, etc. Select the Voicemail Password Required check box if you want to ensure that only you can answer forwarded calls at a target destination. Selecting this option means you must enter your voicemail password before you can answer the call. Enter the number of seconds the phone will ring before forwarding to the next destination or to voicemail.
The default time is 20 seconds. - Click Add
 to enter more phone numbers.
 - Click Save Changes at the bottom of the screen.
Users can set up their own call forwarding rules by logging in to the Virtual Office desktop app. When you edit an extension that already has call forwarding rules, you have the option to click Revert to Basic Call Forwarding or Manage Call Forwarding.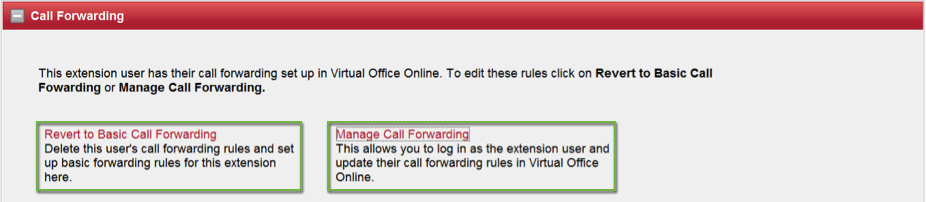
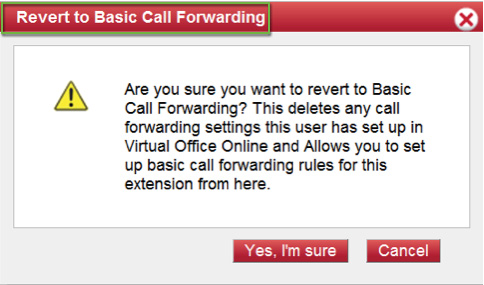
- Revert to Basic Call Forwarding
Deletes the user's rules, and allows you to set up basic call forwarding by following the steps in the Manage Call Forwarding section.
Manage Call Forwarding
Allows you to log in as the user, and manage rules using the advanced options in the Virtual Office desktop app. For more details on this feature, refer to the Virtual Office desktop app user guide.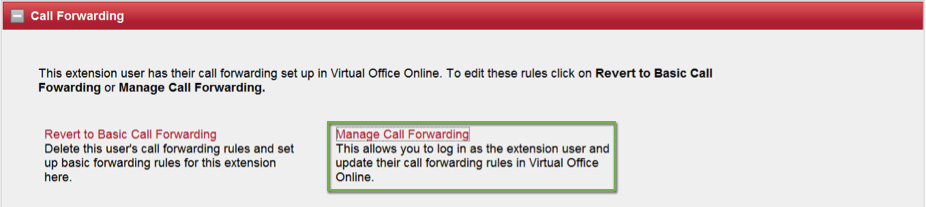
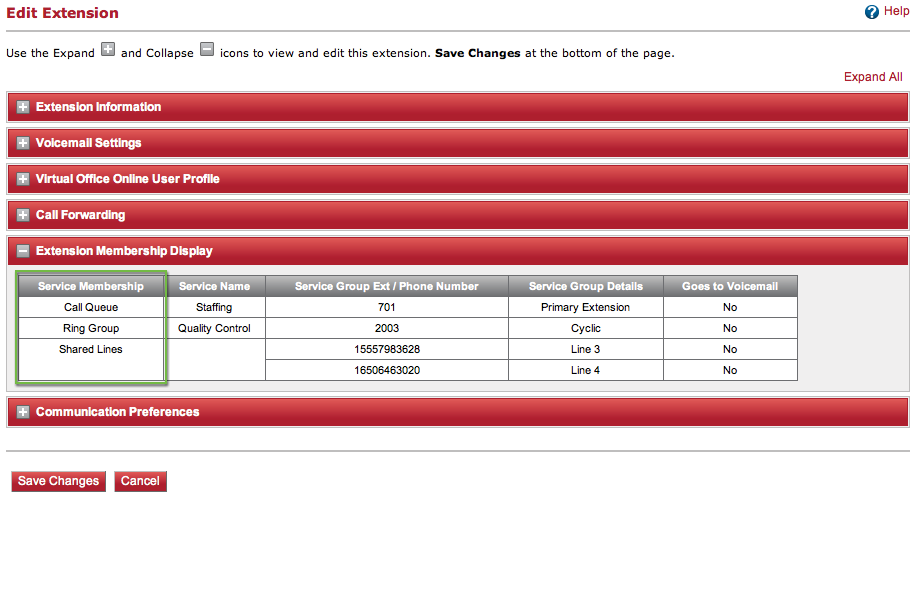
Refer to this display-only pane to view details about:
- The extension's services such as Call Queue, Ring Group, and Shared Lines.
- Service group extension or phone number.

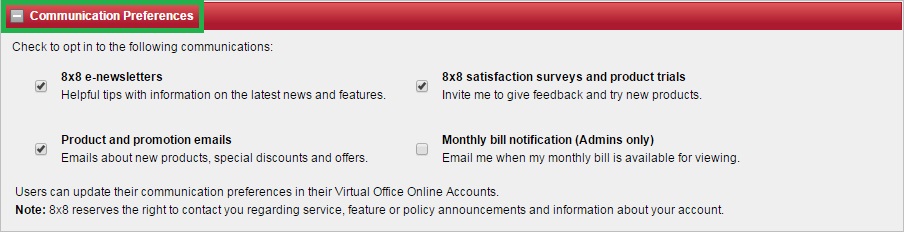
This pane controls all 8x8 communication preferences for each individual extension user. User can opt in or out of receiving updates, surveys, and promotional material from 8x8.
- Click Expand to open the Communication Preferences pane.
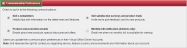
- Select or deselect options to determine whether the extension user receives the following communications from 8x8 services:
- 8x8 newsletters
- Product and promotion emails
- 8x8 satisfaction surveys and product trials
- Monthly bill notifications (administrator-only option)
- Click Save Changes at the bottom of the screen.
Note: Refer to Configure Company Settings to view and modify the company's preferences at the PBX level.
Agents can select their own communication preferences via the Virtual Office desktop app.