Note: This version of the integration is no longer supported. For the latest version of this guide, see Virtual Office for Salesforce 3.1.
With the Virtual Office Salesforce integration, you have full call control capabilities including transferring calls, merging three-way calls, placing calls on hold, and recording calls.
New Release Improvements
The following improvements are introduced in this release:
- Ability to view and select from multiple matching records for screen pop
- Search for matching records
- Create new Salesforce records
- Creating follow up tasks while on a call
Make Calls
Users of the 8x8 Virtual Office Salesforce integration need to select an 8x8 phone to handle calls. If your Virtual Office extension uses a softphone, you must log into one of the following clients to handle calls.
- 8x8 Work. You can download the Virtual Office Desktop app from our Support page.
- 8x8 Work for Mobile. You can download the Virtual Office Mobile app from our Support page.
Note: If your Virtual Office extension uses a desk phone, use the call control panel in the application to answer calls.
Note: You can dial out using the dial pad, or use click-to-dialcapability from contacts list or call log. You can also click-to-dial from Salesforce.
When you dial out:
- Your extension phone rings first. Answer the call:
- If your extension uses a desk phone, use the call control panel in the application to accept the call.
OR
If your extension uses a softphone, accept the call in 8x8 Work or 8x8 Work for Mobile - The call then dials out to the destination.

For a faster dialing experience, go to Settings and select Auto Answer Hard Phones Outbound to enable the auto answer. Clicking to dial out automatically answers the desk phone and dials out to the destination number.
Receive Calls
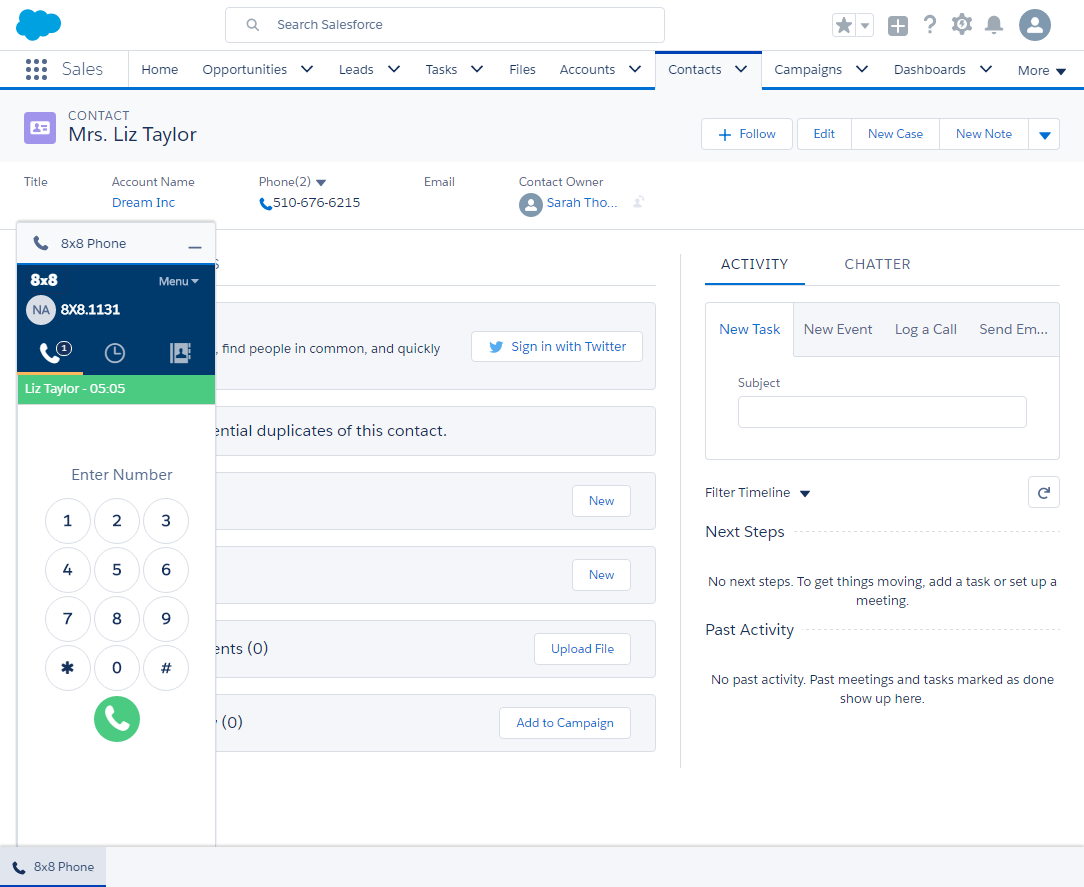
When you receive a call, the call control panel pops indicating an inbound call. Click Accept to answer the call if you use a desk phone. Based on your screen pop preferences, the matching contact record pops.

Note: If your extension uses a softphone, you must accept the call in the softphone client such as 8x8 Work.
Screen Pop
During an inbound call, the 8x8 Virtual Office app searches for records with matching phone number in the following Salesforce objects.
- Account
- Contact
- Case
- Lead
- Opportunity
End users can select one or more objects to search from. For details, check out End User Settings.
On finding a matching record, it presents the record in a separate browser tab or a window
Based on your settings, the screen pop:
- can occur when a call is ringing
- can occur when a call is connected
- can be disabled
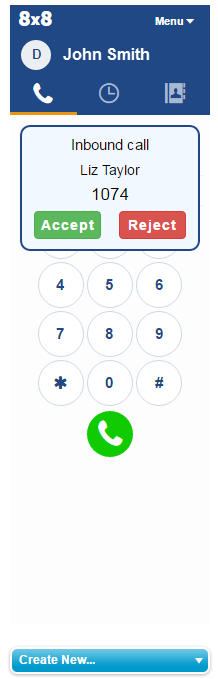
Single Match
If an incoming phone number matches an existing record, then the matching record pops. The matching contact's name and number are displayed while the call is offered. Accept the call to proceed.
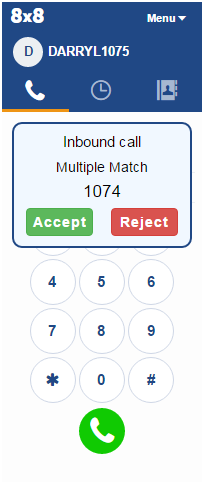
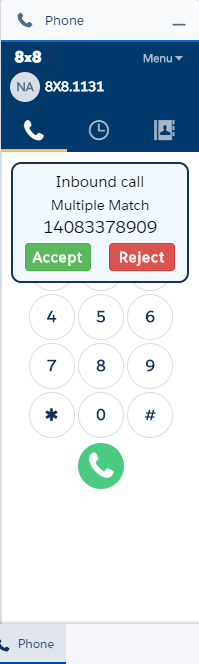
Multiple Matches
In the event of multiple matching records, the call control panel indicates multiple matching records are found. Accept the call and click on the assign page to view a list of matching records. You can then select and/or open the desired record. The call log is associated with the selected Salesforce record. The name of the select record replaces "Multiple Match" in the call controls.
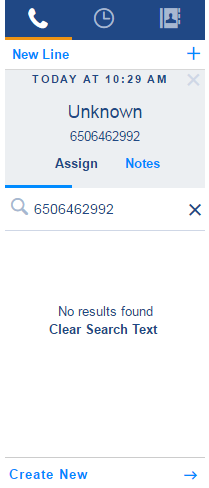
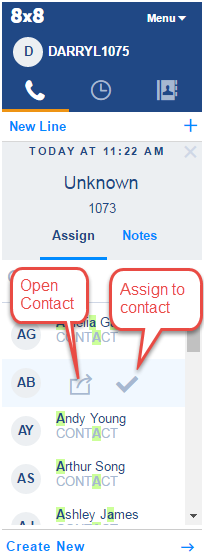
Unknown Contact
In the absence of a matching Salesforce record, the call control panel indicates the call is from an unknown contact. Accept the call, click the Assign tab. You can then proceed to add a new Salesforce record or search for an existing contact and then assign the call log to the record.
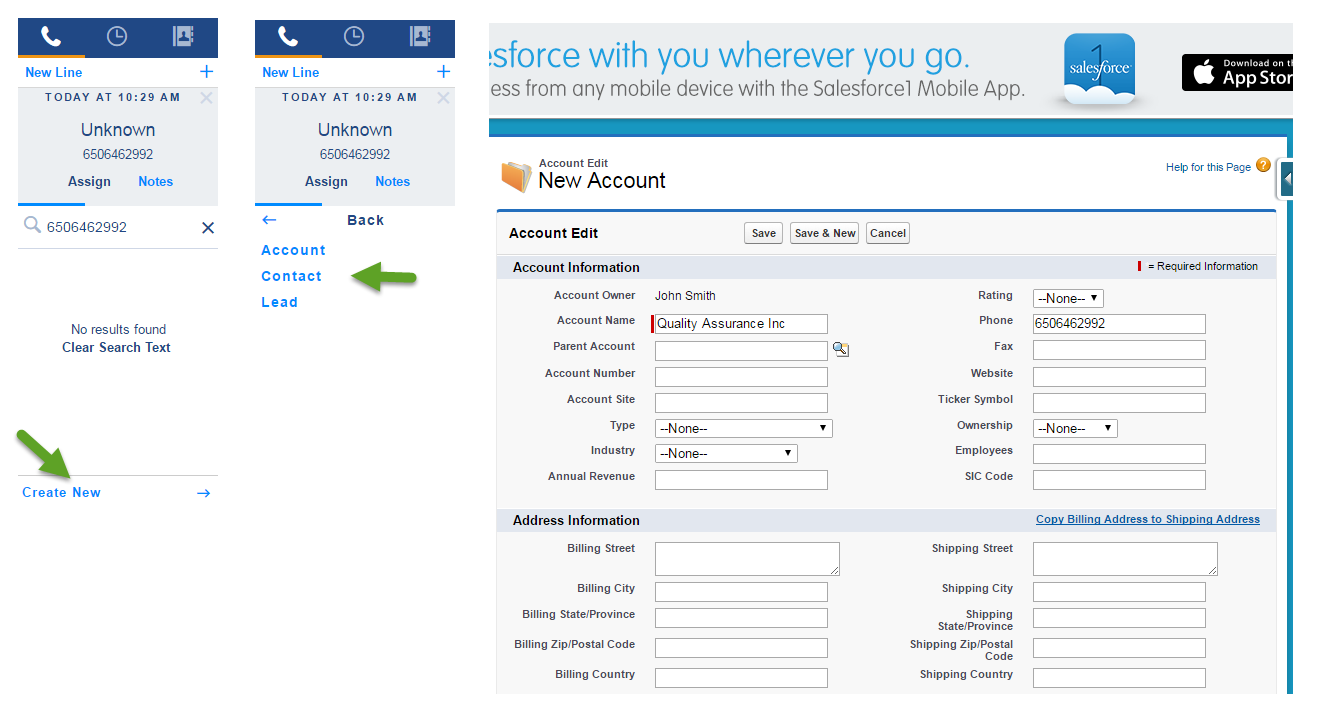
Add New Contacts
On receiving a call from an unknown contact, the app allows you to create a new record.
To create a new record:
- Upon an incoming call from an unknown contact, click Accept to answer the call.
- Move to the Assign tab. Click Create New. You are prompted to choose the object type for the record.
- Select the Salesforce object from the following choices:
- Account
- Contact
- Lead
- A new tab or window opens in Salesforce to create a new Salesforce record. It pre-populates the phone number with the caller Id number.
- Enter the desired details and save the new record.
- On terminating the call, the call log gets saved and assigned to the new Salesforce record.

Note: If you receive a call from an unknown contact, you must create a new record or manually assign the call log to the appropriate customer record during or after the call.
Hold and Resume Calls
While on an active call, you can place the call on hold. The other party listens to music while on hold.
- To place a call on hold, click
 in the call control panel.
 - To resume the call, click
 .
.
Add a Call and Merge Calls
With multiple line calling, the app allows you to add a call, switch between calls, and conference multiple calls.
Note: The ability to make additional calls depends your Virtual Office extension.
- To conference a 3rd party to an on-going conversation, place the first call on hold.
- To transfer the call to an internal employee or a contact in Salesforce, click
 from the navigation menu, and type the name of the person you want to bring into the call.

- Hover over the contact and click
 to place a call to the contact.
 - Once the call is established, from the call control page, click
 .
. - Alternatively, you can dial a new number by clicking New Line in the call control panel.
- Enter the number to call and click
 .
.
Once the second call is established, inform the third party about the intent to merge calls. - To merge the calls, click from the call control panel.
The calls are merged. - After terminating the call, enter comments, select who to assign the ticket to, select the type of call, level of urgency and custom call results upon completion of the call/s.
Note: The plug-in supports two lines only.


Record Calls
You have the flexibility to record calls on demand during a call. You can initiate, stop, and resume recording any number of times during a call.
Note: Call recording is available based on your extension.
During a call, click ![]() from the call control panel to begin recording. Click again to stop recording.
from the call control panel to begin recording. Click again to stop recording.
Access Call Recordings
You can access call recordings from call logs. Call logs of recorded calls contain a link to call recordings. Click the link to download. You can also access call recordings by logging in to the 8x8 Work.
To access call recordings via 8x8 Work app:
- Log in to 8x8 Work app.
- Navigate to Messages tab.
- Select Recordings tab. List of call recordings show.
- From the list of call recordings, choose a recording and click
 to play.
 - You can also download, forward, or delete the call recording.

Transfer Calls
You can transfer a live call to another Virtual Office extension or another phone number. You can choose to speak to the party you plan to transfer the call to (Warm Transfer) or can do a blind transfer.
Warm Transfer
- While on a call, inform the caller about the transfer.
- If you are transferring to an internal employee or a contact in Salesforce, click from the navigation menu, and type the name of the person you want to transfer the call to in the search box.
- From the search results, hover over the contact and click to place a call to the contact.
- If you are transferring to an external number, click New Line at the top of the call controls to dial a number manually.

- Once the second call is established, click
 again.
 - In the list of contacts, select the original caller at the top of the list.
The call is transferred and you are disconnected from the call.
Blind Transfer
- While on a call, inform the caller about the transfer.
- Click in the call control panel. Simply click on a contact to blind transfer your caller to the selected recipient.
Log Calls
On terminating a call, the plug-in creates a call log and adds it as a task to the Salesforce record. The call log captures details such as the time the call was placed, duration of the call, number called, and any comments added during the call. You can find a link to the call recording for the recorded calls. The call log is automatically assigned to the matching record.
On ending a call, the plug-in automatically moves to the next step. If the call is unassigned, the plug-in opens the Assign page. If the call is assigned, the plug-in automatically moves to the Notes page.
In the event of a single match, the call log is automatically assigned to the single matching record. If no matches were found or if multiple matches were found, you need to find or create the right record and assign the call log.
On ending a call, your call log behavior lets you do one of the following:
-
 If the call fetched a single matching record:
- In the Notes tab, enter a subject for the call.
- Add additional comments about the call.
- Select a desirable call result code.
- Click Save and Close to save the call log. The call log is assigned to the record.

-
If the call fetched multiple records, you are navigated to the Assign tab:
- From the list of matching records, hover over the desired record.

- Click
 to assign the call log to the record or click
  to open the Salesforce record.
 - Once the record is assigned, click Notes tab to add more details to the log.
- From the list of matching records, hover over the desired record.
-
If the call is from an unknown contact:
- Add a new record.
- After saving the new record, search for this new record in the Assign tab.
- From the result, select the desired record to assign.
- Click Notes tab to add more information to the log.
- Click Save and Close.
- Select the object to associate the call log to. This option is available only when you have navigated to another object during the call. For example, During a call, if an agent opened an existing case and wrapped up the call with a new case, at the call termination the call log pop-up allows you to select which of the cases you wish to associate the call log with.
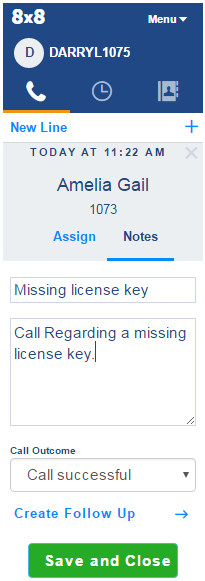
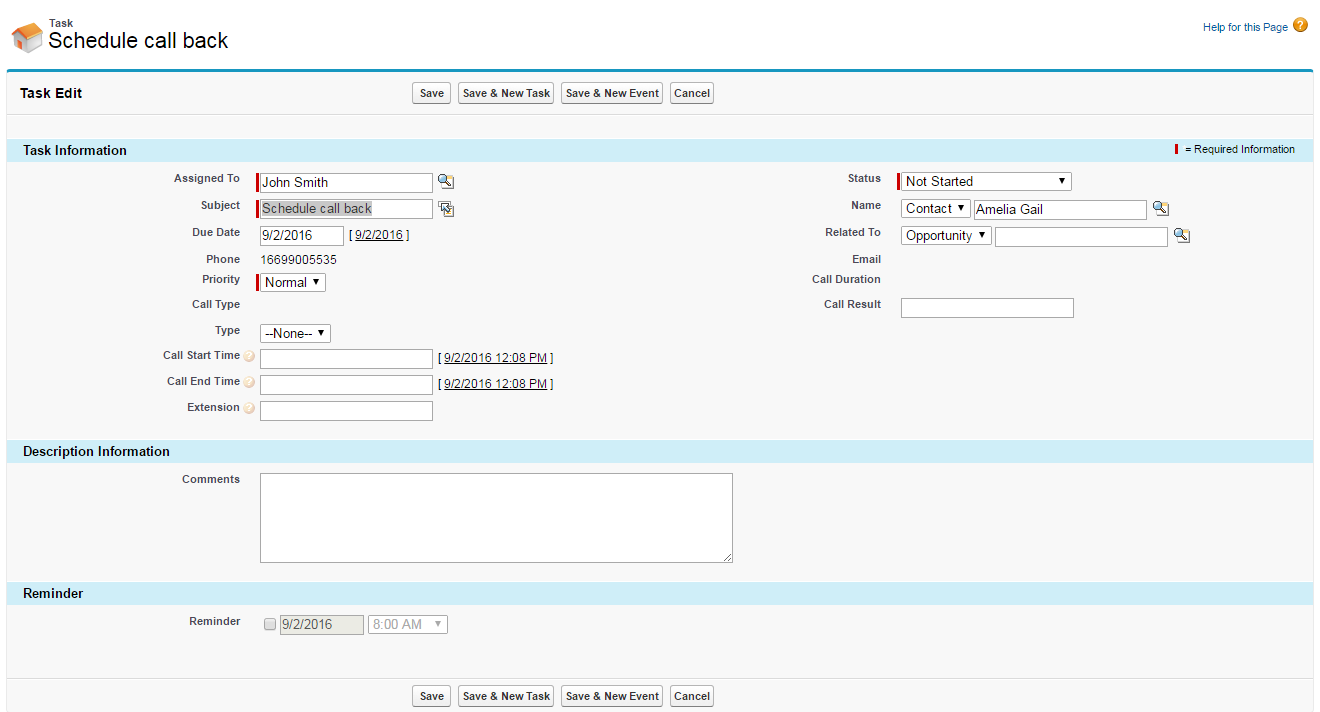
Creating a Follow-up
A follow-up task allows you to indicate any pending task related to the call. You can indicate the type of the task such as schedule another call or defer the case to your supervisor. You can also set a priority and set a date for that task, for example to call a customer back in three days.
To create a follow-up:
- Click Create Follow-up in the Notes tab while you are completing the call log.
- Add the details of the follow-up task such as scheduling a call back.
- Save the task.


The task gets added under Open Activities in the Salesforcerecord.
Note: If the call log is customized, then the call log data is stored in respective fields.
Mapping Call Log Data to Task Fields
Prior to the release, the call log details were saved in comment field within the task. With this release, data from the call log are extracted and mapped to respective fields. This requires customizing the task object.
Tracking Incomplete Call Logs
If agents are busy and unable to complete the call log activity immediately after the call, they can do so at their leisure by accessing the incomplete logs by the following two methods:
If agents are busy and unable to process the call logs immediately, these calls are tagged as Unworked and listed in the Recents tab. This allows agents to access those logs quickly and process them efficiently. These call logs require agents to add business context information from the conversation. The system adds a default subject line (Call with John Smith) which can be revised and saved.
Select a log from the list, assign it to the right Salesforce record if required, add additional notes, and save the log. 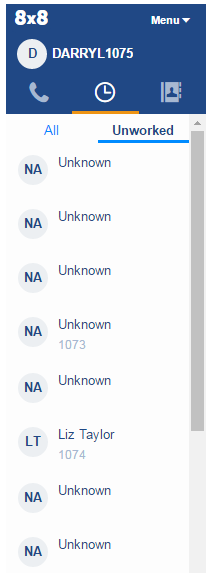
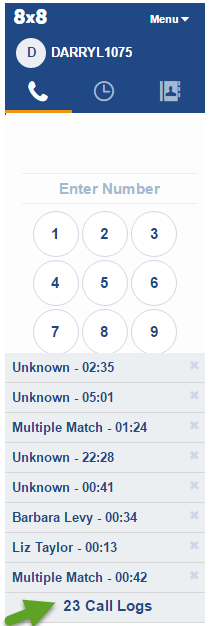
Call logs pending business context information are organized in a call drawer for agents to review and follow-up.
- In the Phone tab, click Call Logs to open the drawer.

- Select a log from the list.
- You are navigated to the Assign tab if the log is not already assigned. Select a Salesforce record and click Assign.
- In the Notes tab, add additional details about the call including the call outcome.
- Click Save. The call log will be cleared from the call drawer.