Note: This version of the integration is no longer supported. For the latest version of this guide, see 8x8 Integration for NetSuite 3.1 For Administrators.
The Single Sign-On integration allows a common authentication for NetSuite and 8x8 Contact Center. By logging in to NetSuite, the user automatically signs in to 8x8 Contact Center. The user is required to enter the authentication information only once per session.
Note: Moving to Single Sign-On integration from Individual System Sign-On is a one-way process. Once you set up Single Sign-On integration for your tenant, you cannot revert to Individual System Sign-On.
- Easy installation using SuiteBundler: A NetSuite user is mapped to their 8x8 Contact Center agent profile
- Reduced 8x8 Contact Center sign-in time while working on NetSuite
- Improved security; NetSuite user credentials do not need to be stored in 8x8 Contact Center
- Enhanced user experience: Users can seamlessly sign in to 8x8 Contact Center from the NetSuite dashboard
The advantages of Single Sign-On are:- No need to remember or enter 8x8 Contact Center user credentials
- Full functions of 8x8 Contact Center and NetSuite
- No need to refresh 8x8 Contact Center while using NetSuite
Notes:
-iframe is not supported: The 8x8 8x8 Contact Center appears on a separate browser window.
-Single Sign-On is the only option for new customers. Existing customers cannot revert to Individual System Sign-On once they choose Single Sign-On for integration.
- The change from Individual System Sign-On to Single Sign-On is done at the tenant level, and is therefore applied to all agents. Once you choose Single Sign-On, you cannot go back to Individual System Sign-On.
- You can associate only one tenant per 8x8 Contact Center bundle. To work around this, contact 8x8 Professional Services.
Configuring Single Sign-On Integration
Setting up NetSuite for Single Sign-On integration with 8x8 8x8 Contact Center requires you to:
To install the 8x8 Contact Center bundle:
- Log in to NetSuite as an administrator.
- Go to Customizations > SuiteBundler > Search & Install Bundles.
- Type <8x8 Virtual Contact Center>, and click Search.
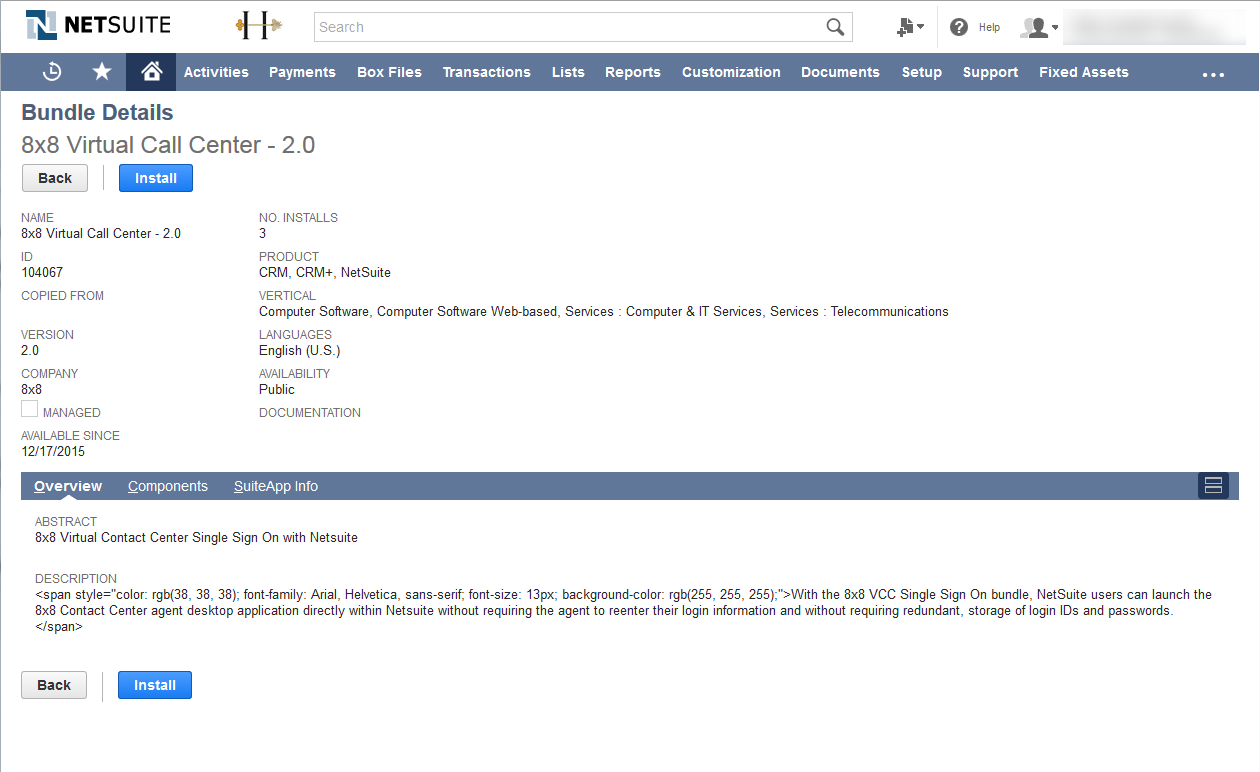
- From the resulting list, select 8x8 Virtual Contact Center - 1.X with bundle ID 315689.
A new page opens containing the bundle details.
- Click Install. The Preview Bundle Install page opens.
- Click Install Bundle.
- Click OK at the prompt.
A page opens with a list of the installed bundles. The status of the new bundle is Pending. - Refresh the page to see the check mark under 8x8 Virtual Call Center status.

To create the SSO connection:
- In the NetSuite Setup menu, go to Integration > SuiteSignOn. A list of bundles appears.
- Click Edit next to 8x8 Virtual Contact Center.
The SuiteSignOn page appears containing the Connection Points tab.
- Edit the URL field value to match your cluster URL.
Your cluster URL may be in this format:
<https://vcc-naX.8x8.com/AGUI/login_ns_sso.php?tenant=yourtenantname>
In the URL, <X> is the 8x8 Contact Center instance your tenant is created on, and <yourtenantname> is your tenant ID.
For example, AcmeJets has the following URL: <https://vcc-na8.8x8.com/AGUI/login_ns_sso.php?tenant=AcmeJets> - Click Save.

The screen pop feature allows agents to access and preview customer records before accepting a call. It reduces time in identifying the customer. To enable automatic screen pop for interactions, you must configure screen pop settings in 8x8 Configuration Manager.
To enable screen pop:
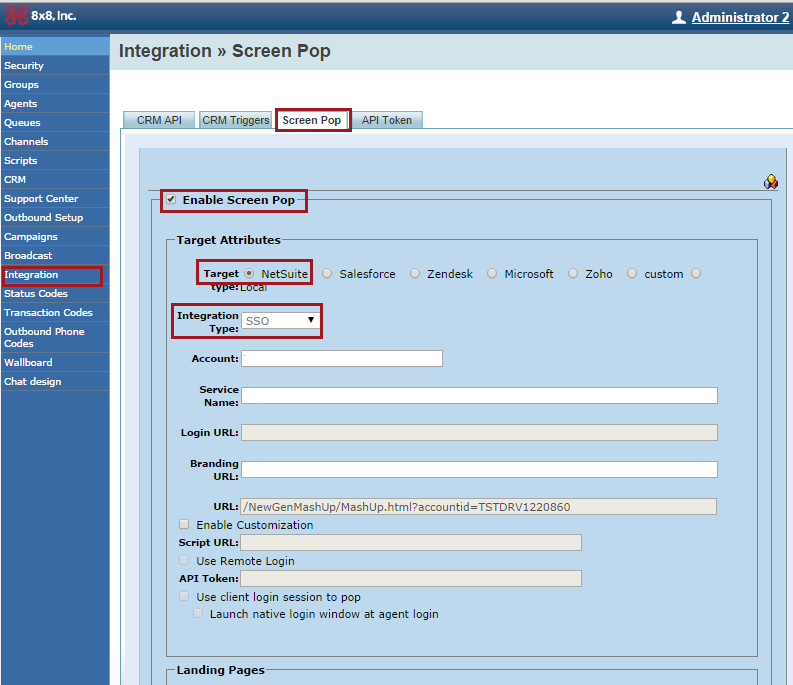
- In 8x8 Configuration Manager, go to Integration > Screen Pop from the navigation menu.

- Select Enable Screen Pop.
- Select NetSuite.
By default, the Integration Type is SSO. - Click Save.
For NetSuite users to log in to 8x8 Contact Center, you must create an agent account in 8x8 Configuration Manager. You must then link the agent account to the NetSuite user account with the same email address. See Create Agent Accounts in 8x8 Contact Center for more information. Before you start, locate the agent’s email address in NetSuite.
Note: If an agent changes their email ID using 8x8 Agent Console, the 8x8 Contact Center login fails.
For customers using VCC-8x8 Configuration Manager:
- Log in to VCC-8x8 Configuration Manager.
- Go to the Agents or Users tab to create a new agent for NetSuite, or use an existing account.
- In the General tab, make sure the agent's email address matches the user's email address in NetSuite.
- Save your changes.

You have now completed the integration setup for 8x8 8x8 Contact Center.

For customers using Account Manager:
- Log in to Account Manager.
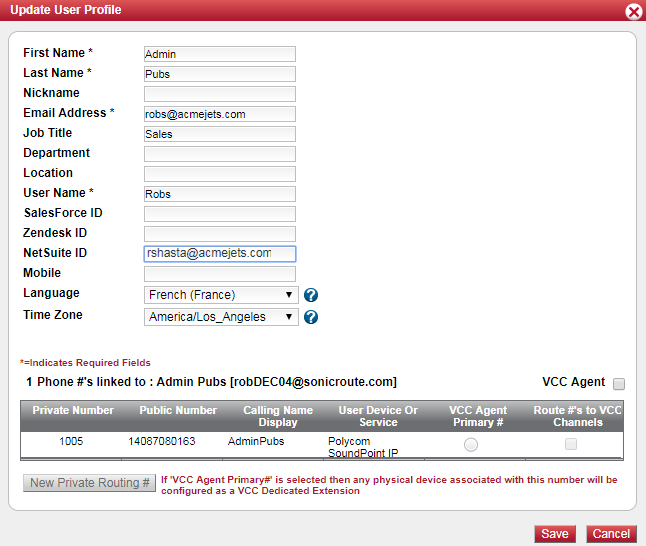
- Go to Accounts > User Profiles and edit the user profile of the prospective NetSuite user.
- Enter the NetSuite ID and click Save.

You have now completed the integration setup.
For customers using VO-8x8 Configuration Manager:
- Log in to VO-8x8 Configuration Manager.
- Go to Home > Users and edit the user profile of the prospective NetSuite user.
- Scroll down to Advanced settings > Third-party integration.
- Enter the Third party (CRM name) and Username (user's email address).
- Save changes.
You have now completed the integration setup for 8x8 8x8 Contact Center.

As a NetSuite user, you must add a portlet to initiate a login session with 8x8 Contact Center. Log in to your NetSuite account and follow the instructions below to create a 8x8 Contact Center portlet:
- In NetSuite, go to Home > Dashboard.
- On the Dashboard page, click Personalize Dashboard, or find Settings and click the Personalize Dashboard link.
- Click Custom Portlet in the list of available portlets in the left tree.
An empty portlet is created. - In the new portlet, click
 in the top-right corner.
 - Click Setup.
- Select VCC Integration from the list.

- Click Save.
The 8x8 8x8 Contact Center portlet is now displayed on the dashboard. Drag and drop it to the desired location on the dashboard.
To launch 8x8 Contact Center, click the link inside the portlet.

To launch 8x8 Contact Center from NetSuite:
- In NetSuite, go to Home > Dashboard.
- Click the link in 8x8 Virtual Office Portlet.
The 8x8 Contact Center window launches. Resize and place the window as desired.
Note: For a smoother call flow, 8x8 Contact Center offers click-to-dial API that allows you to click hyperlinked phone numbers in CRM records to place outbound calls from the native NetSuite interface. This eliminates the need to enter an outbound phone number in the 8x8 Agent Console Control Panel. Click here to learn how to set up click-to-dial functionality.

To Uninstall NetSuite SSO
To uninstall NetSuite SSO:
- In NetSuite, go to Customization > SuiteBundler > Search & Install Bundles > List.
- Locate 8x8 Virtual Call Center in the list.
- Hover over
 next to the 8x8 Contact Center.
 - Click Uninstall.
- Refresh the screen to update.