Handle emails in the 8x8 integration for Microsoft Dynamics
Emails are handled from the same 8x8 Contact Center app panel as phone calls and chats. To receive or place emails using the 8x8 Contact Center app, you must:
- Be a member of the email queue to which the email is routed.
- Set your status to Available in the 8x8 Contact Center app.
What happens when I am offered an email?
When you are logged in to the 8x8 Contact Center integration app with the status set to Available, and an email is offered, a notification pops on the screen, prompting you to accept ![]() or reject
or reject ![]() the incoming email. The notification lists the name of the customer, the email subject, the queue it came from, and the time spent waiting in the queue.
the incoming email. The notification lists the name of the customer, the email subject, the queue it came from, and the time spent waiting in the queue.
What is a typical email flow?
8x8 Contact Center directs emails to agents via an email queue. When an email is offered to an available agent, a notification displays prompting the agent to accept or reject the interaction. The agent can accept, or if permitted by administrators, reject the request. On accepting, the agent's status changes to Busy. On rejecting the email, the agent's status changes to Working Offline.
Note: To receive interactions, set your status to Available.
- Log into your Microsoft Dynamics account.
- Open the desired app.
-
Select Accounts or Contacts from the side navigation menu.
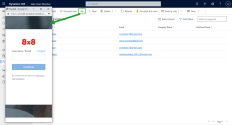
- On the top left corner of your home screen, click
 . The 8x8 Contact Center app launches in a floating window.
 - Log in to the integration app using your credentials.
- Select Ready to work, or set your status to Available.
- When an email interaction is offered, click
 to accept it. Notice the acceptance timer ticking down around the accept interaction icon. Accept the email before the timer expires.
 - The email opens in the 8x8 Contact Center app, and the system searches the Microsoft Dynamics CRM for customer records that match the email address. The number of matched records is displayed in the customer's avatar
 in the 8x8 integration panel. For more information about matching customer records and screen pop behavior, refer to What is the screen pop behavior for email interactions?.
 - Click Reply to reply to the email.
- Type the response.
- Click
 next to the contact’s name.
 - Select a From address for your reply.
- Click
 to send the email.
If your administrator has set it up for your tenant, the post-processing time initiates. Post-processing allows you to wrap up notes for the interaction. - Add any relevant notes about the interaction in the Notes tab.
- If your admin has set up transaction codes, go to the Disposition tab or click Go to disposition, and select a transaction code.
- Click Wrap up.
Note: This step is only required when you first log in to your account, or after clearing your browser’s cache.
Note: Ensure that your browser allows pop-ups from 8x8.
Note: You can also choose to Forward or Transfer the email.
Note: To preview the original email, click the ![]() icon in the message panel.
icon in the message panel.
Note: Your status changes to Available when post-processing times out.
The case is updated with the reply email, and the app sets your status to Available. If you need more time to complete any post-processing task, set your status to Work Offline.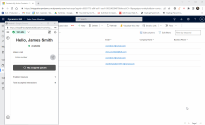
What is the screen pop behavior for email interactions?
When an email interaction is offered, the 8x8 Contact Center integration app looks up the email address of the incoming interaction and then searches the Microsoft Dynamics CRM for a matching record. The number of matched records is listed in the customer’s avatar ![]() in the 8x8 Contact Center app panel. Clicking the avatar opens the list of customer record matches. The list is empty if no matches are found.
in the 8x8 Contact Center app panel. Clicking the avatar opens the list of customer record matches. The list is empty if no matches are found.
Depending on the situation, the CRM search could return:
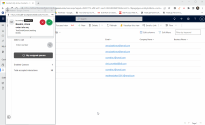
- No matching records: The search yields no matching customer record. The CRM screen pops a Case, and a New Contact record in new browser tabs for you to fill in with relevant information.
Note: Agents must create the new contact before wrapping up the email to ensure the case is linked to the new contact record and not a ghost record.
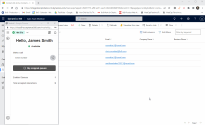
- A single matching record: The search yields a single matching record. The CRM screen pops a Case record, and the customer record in new browser tabs. The inbound email message is included in the Case record in Microsoft Dynamics.
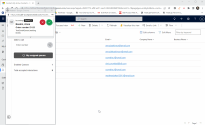
- Multiple matching records: The search yields multiple matching customer records and only the Case record pops in a new browser tab. In this case, you must click the avatar
 and manually select the customer record to link the new case to. After selecting the correct customer record, click
  to return to the email in the 8x8 Contact Center app panel.
Forward emails
Note: The option to forward emails is used to forward an email interaction to an external email address.
Let’s say you receive an email from a customer seeking information on a missing package. As lost-package inquiries are handled by the claims department, which is external, you can easily forward the email to the claims department so they can provide a solution to the customer. The forwarded email includes the original message received from the customer.
Note: Forwarded emails remain linked to the customer database in the Microsoft Dynamics CRM, not to the address the email is forwarded to.
- When an email interaction is offered, click
 to accept it.
 - The email opens in the 8x8 Contact Center app, and the system searches the Microsoft Dynamics CRM for customer records that match the email address.
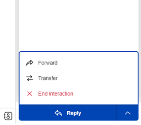
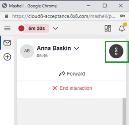
- Click the arrow
 next to the Reply button and select Forward.
- OR-
Click Reply > More actions > Forward.
- Add the external email address(es) in the To field.
- Select a From address.
- Click Continue.
- Type a message or simply leave the original message received.
- Click
 to send the email.
If your administrator has set it up for your tenant, the post-processing time initiates. Post-processing allows you to wrap up notes for the interaction. - If your admin has set up transaction codes, go to the Disposition tab or click Go to disposition, and select a transaction code.
- Click Wrap up.
Note: If multiple matches are found, click the avatar ![]() and select the correct customer record. By default, the CRM matches the case to the first match in the list.
and select the correct customer record. By default, the CRM matches the case to the first match in the list.
Note: Your status changes to Available when post-processing times out.
The case is updated with the forwarded email, and the app sets your status to Available. If you need more time to complete any post-processing task, set your status to Work Offline.
Transfer emails
The Transfer option allows agents to transfer an email interaction to another queue.
Let’s say as a sales agent, you receive an email from a customer who requires help from Customer Support. You can easily transfer the email to the support queue so they can assist the customer.
Note: Emails can only be transferred to a single queue.
- When an email interaction is offered, click
 to accept it.
 - The email opens in the 8x8 Contact Center app, and the system searches the Microsoft Dynamics CRM for customer records that match the email address.
- Click the arrow
 next to the Reply button and select Transfer.
-OR-
Click Reply and from the bottom of the panel select the transfer icon.
icon. - From the queue list, select the queue to which you want to transfer the email.
- Select Transfer.

- If no agents are logged into the queue, a warning pops seeking your confirmation to continue. You may select Continue to transfer the email, or Cancel to abandon the transfer.
- If your admin has set up transaction codes, go to the Disposition tab or click Go to disposition, and select a transaction code.
- Click Wrap up.
Note: If multiple matches are found, click the avatar ![]() and select the correct customer record. By default, the CRM matches the case to the first match in the list.
and select the correct customer record. By default, the CRM matches the case to the first match in the list.
Note: Your status changes to Available when post-processing times out.
The app sets your status to Available and new interactions can be assigned to you. If you need more time to complete any post-processing task, set your status to Work Offline.
End an interaction
Let’s say you receive an email interaction from a customer that does not require follow-up, such as the customer informing you about their invoice payment. If no follow-up is required, you can simply end the interaction from the 8x8 Contact Center app.
- When an email interaction is offered, click
 to accept it.
 - The email opens in the 8x8 Contact Center app, and the system searches the Microsoft Dynamics CRM for customer records that match the email address.
- Click the arrow
 next to the Reply button and select End interaction.
-OR-
Click Reply > More actions > End interaction.

- In the confirmation window that displays, click End.
- If your admin has set up transaction codes, go to the Disposition tab or click Go to disposition, and select a transaction code.
- Click Wrap up.
Note: If multiple matches are found, click the avatar ![]() and select the correct customer record. By default, the CRM matches the case to the first match in the list.
and select the correct customer record. By default, the CRM matches the case to the first match in the list.
Note: Your status changes to Available when post-processing times out.
The app sets your status to Available and new interactions can be assigned to you. If you need more time to complete any post-processing task, set your status to Work Offline.
Send new emails
Let’s say you have to send a new email to the Sales department regarding a warranty claim. You can easily create new emails from the 8x8 Contact Center app. When you start creating an email, the app changes your status to Busy to prevent you from receiving new interactions until you wrap-up or change your status to Available.
- Click Add interaction
 from the left side of the 8x8 Contact Center app.
 - Select Email.
Your status changes to Busy.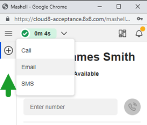
- Fill in the required fields:
- From: Select an email address that the recipient will see.
- To: The email address of the recipient.
- Subject: Used to add a description to highlight what the email is about.
- Click Compose.
- Type your message.
- Click
 to send the email.
If your administrator has set it up for your tenant, the post-processing time initiates. Post-processing allows you to wrap up notes for the interaction. - Click Wrap up.
Note: You can use the features at the bottom of the panel to add your signature, attach files, or access the knowledgebase.
Note: Your status changes to Available when post-processing times out.
The case record pops in a new browser tab and includes the email and attachments, then the app sets your status to Available so new interactions can be assigned to you. If you need more time to complete any post-processing task, set your status to Work Offline.
Create a follow-up email
Let’s say you sent an invoice to a customer and the invoice is now overdue. You can create a follow-up email to remind the customer of the outstanding invoice, and link the email to the case generated when you first sent the invoice. This ensures that all follow-up emails are documented within the same case.
- From the Microsoft Dynamics navigation menu, select Case.
- Locate the case in the list, or use the filter by keyword search field located at the top right of the window.
- Select the case.
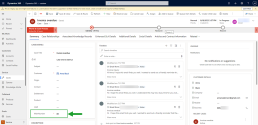
- From the Case details section, go to MainNumber and copy the number listed. You will need it when you create the email.
- In the 8x8 Contact Center app, click Add interaction
 .
. - Select Email.
Your status changes to Busy. - Fill in the required fields:
- From: Select an email address that the recipient will see.
- To: The email address of the recipient from the case you are following up on.
- MainNumberID: Add the MainNumber copied from the case details and verify that the numbers match. This ensures the email relates to the existing case in Microsoft Dynamics.

- Subject: Used to add a description to highlight what the email is about.
- Click Compose.
- Type your message.
- Click
 to send the email.
If your administrator has set it up for your tenant, the post-processing time initiates. Post-processing allows you to wrap up notes for the interaction. - Click Wrap up.
Note: You can use the features at the bottom of the panel to add your signature, attach files, or access the knowledgebase.
Note: Your status changes to Available when post-processing times out.
The follow-up email and any attachments are now visible in the case’s timeline.
Pull emails
You can pull emails from your assigned queues at any time, even if the queues are not enabled, regardless of your status or the limit set by the admin for handling blended interactions.
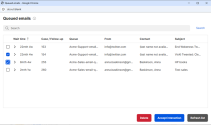
Let's say you are on the phone with a customer who says they sent two emails with pictures of a damaged product they received to the support email address. The emails were routed to the email queue, but you are not enabled to serve emails at the moment. As an agent, you can pull the emails simultaneously from My assigned queues, to assess the damage and speed up the resolution of the case. Click Stop new to prevent the app from offering new interactions, select the emails you wish to pull, and click Accept interaction. The emails open separately in the integration app and you can reply to the emails individually.
Note: This feature is only available if enabled by the admin.
- Log into the 8x8 Contact Center integration.
- Set your status to Work Offline if you want to focus on your tasks without being offered a new interaction. You can pull emails regardless of your status or the limit set by the admin for handling blended interactions.
- Click My assigned queues.
-OR-
Click Show menu and select My assigned queues.
- Hover over a queue and click
 to retrieve an email from that specific queue. The icon displays the number of queued emails.
 - In the Queued emails window that displays, search for the relevant email. You can use the search bar to locate an email or click the arrow > icon in front of the wait time to preview the content of the email.
- Select an email and click Accept interaction. The email opens in the 8x8 Contact Center app. If the email is from an existing customer, the customer info displays in the CRM.
- Click Reply to respond to the email from the 8x8 Contact Center app.
Note: Clicking Pull email next to the header name for the email queues allows you to pull emails from all queues.
Note: You can pull multiple emails at a time, regardless of your status or the limit set by the admin for handling blended interactions. The emails open as separate interactions in the integration app. Additionally, if the admin enabled the permission, you can delete queued emails to prevent spam or remove emails that are no longer relevant or have been resolved, helping to prevent the queue from becoming overloaded.
What information is available in the Queued emails window?
The Queued emails window includes the following information that you can use to determine which email to pull from queue:
- Wait time: Displays how long the email has been in the queue.
- Case/Follow-up: Displays the case or follow-up number for the email. New emails are identified using an integer number (e.g. 406). Follow-up emails are identified using a decimal number (e.g. 406.1).
- Queue: Displays the name of the queue the email came from.
- From: Displays the email address of the sender.
- Contact: Displays the name of the person that sent the email.
- Subject: Displays the subject of the email.
You can use the search bar to search queued emails by queue name, email address, contact name, or subject.
