An 8x8 Contact Center queue is an ordered collection of interactions waiting to be served by agents who are qualified to respond to these interactions. The 8x8 Contact Center administrator can customize how incoming interactions are prioritized and routed in 8x8 Configuration Manager. Queues ensure that interactions are never lost or discarded.
Queues serve to present interactions flowing into 8x8 Contact Center to agents based on skill set and availability. 8x8 Contact Center provides sophisticated logic for matching customers to the agent who can best solve their problem. Queues direct interactions based on the skill level of agents serving the queue. If you have an agent with high skill level vs. an agent with low skill level, the interaction will be directed to the high skilled agent based on their availability.
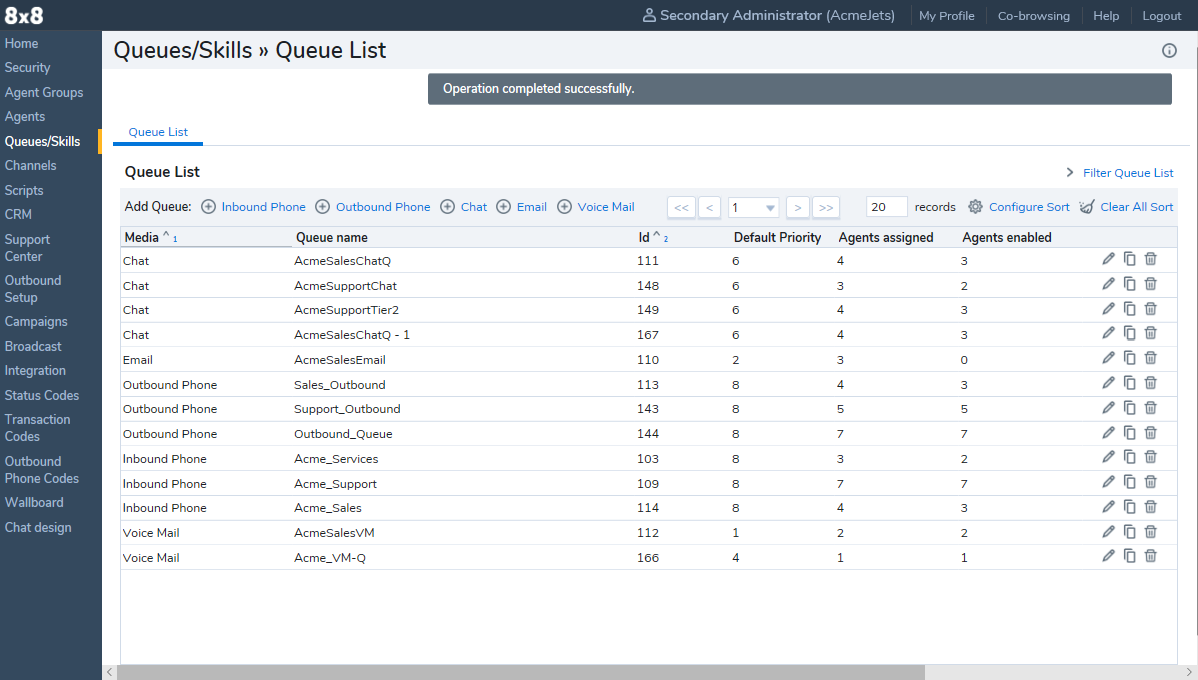
By going to the Queues/Skills tab, you can:
- Create, edit, copy, and delete queues of all media
- Assign members to queues
- Define targeted service level
To access Queues:
- In the Configuration Menu, click Queues/Skills to display a list of queues.
-
In the list view:
- Click
 Add to create a new queue for Inbound Phone, Chat, or Email.
 - Click
 Edit to view or modify an existing queue.
 - Click
 Copy to clone an existing queue.
 - Click
 Delete to delete an existing queue.
- Click
- Configure the queue settings, and Save.
Clone queues
Aministrators can copy inbound phone queues, outbound phone queues, chat queues, email queues, as well as voicemail queues with a simple click. Cloning queues allows Contact Center administrators to create multiple queues in a short time.
When you clone a queue, the queue properties, members, interactions, SLA, and email settings are copied. A queue name is automatically generated. You can modify or make changes to the new queue, if required.
To clone a queue:
- Log in to 8x8 Configuration Manager
- Go to Queues/Skills to display a list of queues.
- Select a queue and click Copy.
A single copy is generated. The cloned queue has the original queue name plus a number appended to the name. For example, AcmeSalesChatQ becomes AcmeSalesChatQ -1, AcmeSalesChatQ -2, and so on. You can rename the queue by going to the Queues/Skills > Properties > Queue name. The queues are listed in alphabetical order, but you can sort and change their order. - If required, modify the queue properties and Save.
- Click to delete the queue.
Note: To delete a queue, you must remove the agents from the queue first.

Configuring a queue varies based on the media of the queue. The following sections describe: