Enable Queued Callback
The 8x8 Contact Center Queued Callback allows callers waiting in a call queue to opt out of the queue and be called back when an agent becomes available This feature which is configured in 8x8 Configuration Manager, detects the caller's phone number or allows the caller to input the callback number before exiting the queue. The system retains the queue position of the call and offers an outbound call to an available agent serving the queue. When the agent accepts the call, the call is dialled out to the caller using the callback number. The call is routed through an outbound queue.
Features
- Allows callers to opt for a callback rather than wait in the queue, ensuring they are called back once an agent is free.
- The queue position is maintained if the caller opts to leave the queue for a callback.
-
The callback is initiated as soon as an agent is available.
- Detects the caller’s phone number or allows the caller to enter the callback number before leaving the queue
-
The system preserves the caller's position in the queue and initiates an outbound call to an available agent assigned to that queue.
Note: For fair callback management, it is advisable to create a distinct callback queue for each inbound queue rather than a single general queue for all. In addition, to ensure equitable treatment, the priority of the callback queue should not exceed that of the inbound queue.
- The caller can enter the preferred callback number or caller's phone number (ANI) is used.
- Callback is initiated as soon as an agent is available.
-
Duplicated callback requests are not registered within the same callback queue. Specifically, we prevent duplicates based on the callback queue system. If a customer requests a callback in different callback queues, each request will be registered separately. However, a callback request from the same customer will not be registered more than once in the same callback queue
Use case
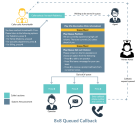
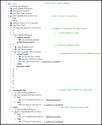
Extending the use case, AcmeHealth offers callers the option to receive a callback from the advise nurse team for a better experience. In addition to the exit choices of operator assistance and leaving a message for the care team, the caller is given a choice to be called back by the advise nurse team. If a caller opts to be called back, he is prompted to input the callback phone number. This number is then restated for confirmation. The following diagram shows the updated call flow for Queued Callback
To enable call back, 8x8 Contact Center IVR offers the following scripting capabilities:
- Get Value supports an additional parameter to collect the caller's phone number
- Callback object supports calling the customer back after the caller exits the queue, by initiating an outbound call when an agent serving the queue is available.
Add Callback option to an IVR script
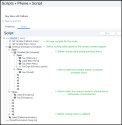
The example below is an IVR script featuring a callback option based on a scenario with separate queues for the available Sales, Support, and Callback options.
Here is the flow for creating an IVR script that includes a callback option:
- Define inbound phone queue properties or outbound queue properties.
- Set new variables.
- Add new variables in the script.
-
Define routing calls when the contact center is closed due to unforeseen circumstances.
To add a callback option to an IVR script:
- Define inbound phone queue properties.or outbound queue properties.
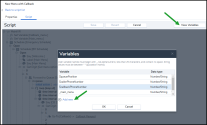
- Click View Variables in the upper right corner to add new variables such as _calback_menu and _main_menu to the script. These variables help prevent a potential infinite loop.
-
Click Add Variables under the variables list:
- Enter the variable name _calback_menu and select Number/string under Data type.
- Repeat for the next variable _main_menu.
- Click OK.
-
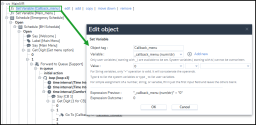
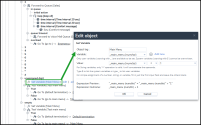
Add a Set Variable object to configure the _callback_menu variable. Enter the object name and choose the _callback_menu variable name from the list. Set Value to 0. This variable helps prevent a potential infinite loop.
- Add a new Set Variable object to configure the _main_menu variable. Enter a tag name and choose the _main_menu as variable name from the list. Set Value to 0. This variable helps prevent a potential infinite loop.
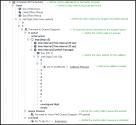
- Add a Schedule object to define routing for received emergency calls based on the contact center program. Select the Default Schedule option.
- Click Open and add a Schedule object to define routing for received emergency calls during business hours. Select the Business Hours schedule.
-
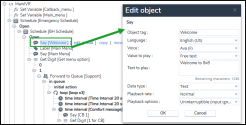
Click Open and add a welcome Say object. Enter a welcome text you want to play to your caller.
- Add a Label object to mark the main menu sequence.
- Add a Say object before to prompt for digit tone input for the Main menu . Enter the text you want to play to your caller. Select Interruptible (input captured) as a playback option to allow the caller to interrupt the message.
- Add a Get Digit object to get menu options. Enter a tag name and an empty timeout.
-
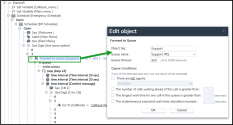
Click 1 and add a Forward to queue object to route the phone interaction to the Support queue. Enter a tag name and choose the target phone queue to receive the call. Enter the number of seconds the call waits in the queue.
- Click in queue and add a loop object to define multiple in-queue treatments using time intervals. These treatments are repeated for a specified number of times. Enter a tag name and the number of repetitions.
-
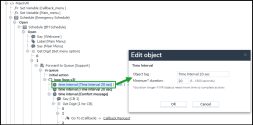
Click in queue and add a time interval object to define multiple in-queue treatments, which are repeated for a given duration. Enter a tag name and the minimum duration for the in-queue treatment.
- Add two additional time interval objects as described in the previous step.
- Add a Say object to inform the caller all the agents are busy, but they can press 1 to request a callback. Select Interruptible (input captured) as a playback option to allow the caller to interrupt the message.
- Add a Get Digit object to request digit tone input for the callback. Enter a name and an empty timeout.
- Click 1 and add a Go to object to redirect the script to continue running at the Callback Request label (location in the script).
- Click queue timeout and add Forward to Voice Mail queue object to transfer phone interactions to a selected voicemail queue. Enter a tag name and a queue name, such as Support VM queue.
- Click overload and add a Go to object to redirect the script to continue running at the Emergency label (location in the script).
-
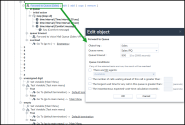
Click 2 and add a Forward to queue object to route the phone interaction to the Sales queue. Choose the target phone queue to receive the call and Enter the number of seconds the call waits in the queue.
- Click in queue and add three time interval objects to define multiple in-queue treatments, as described in step 14.
- Add a Say object to inform the caller all the agents are busy and hold until an agent is available. Select Interruptible (input captured) as a playback option to allow the caller to interrupt the message.
- Click queue timeout and add a Forward to Voice Mail queue object to transfer phone interactions to a selected voicemail queue. Enter a tag and queue names, such as Sales VM queue.
- Click overload and add a Go to object redirect the script to continue running at the Emergency label (location in the script).
-
Click unassigned digit, add and configure a Set Variable object [Main Menu]. Choose the _main_menu(num/str) variable name from the list. Set Value to _main_menu(num/str) +1.
-
Add and configure a Test Variable object [Test main menu] to define the treatment for callers for the main menu. Set Condition to _main_menu(num/str) = 3, meaning that it will repeat this 3 times.
- Click True and add a Go to object to redirect the call to the Default termination label (location).
- Click False and add a Go to object to redirect the call to the Main Menu label (location).
- Click Empty, add and configure a Set Variable object [Main Menu]. Choose the _main_menu(num/str) variable name from the list. Set Value to _main_menu (num/str) +1.
- Add a Test Variable object [Test Main Menu] to define the treatment for callers for the main menu. Set Condition to _main_menu(num/str) = 3, meaning that it will repeat this 3 times.
- Click True and add a Go to object to redirect the Default termination label (location).
- Click False and add a Go to object to redirect the Main Menu label (location ).
- Click Close under Schedule [BH schedule] to perform a particular sequence of script operations for received calls outside business hours.
- Add a Say object to inform callers the contact center is closed (outside business hours).
- Click Close under Schedule [Emergency Schedule] to define routing for emergency calls received while the contact center is closed due to unforeseen circumstances.
- Add an Emergency label.
- Add an emergency Say object to inform callers that the contact center is closed due to unforeseen circumstances.
- Click #6 to define the callback option and add a Hang Up object.
- Add a Callback Request] label.
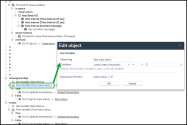
- Add a Say object to request the caller phone number.
-
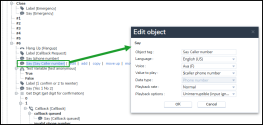
Add a Say object to return the caller's phone number for verification. Set the value to play to $callerPhoneNumber (num/str)=anonymous.
-
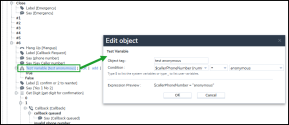
Add a Test Variable [test anonymous] object to check whether the caller's phone number is anonymous. Set Condition to $callerPnoneNumber=anonymous.
- Add a Label object for confirmation: [1 to confirm, 2 to reenter].
- Add a Say object to inform the caller of the necessary actions. Enter the text you want to play to your caller, such as “If yes, press 1. If you want us to call you on another number, please press 2”. Select Interruptible (input captured as a playback option to allow the caller to interrupt the message.
- Add a Get Digit object for confirmation.
-
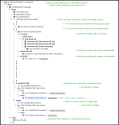
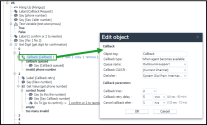
Click 1 and add the Callback object to redirect the call to the callback process. Configure the following parameters:
- Queue name: Select an existing outbound queue to route the call.
- Call back CLI: Select a channel number for outbound caller ID. Using the [Current Channel] option, you can display the caller's original channel number as the caller ID for the callback.
- Dial plan: Select the international dial plan VOVCC, from the list to avoid any issues.
-
Under Callback parameters, specify the number of retries and the duration for time out:
- Callback tries: Select the number of attempts to call back.
- Callback retry delay: Specify the callback retry attempts in seconds or minutes.
-
Cancel callback after: Enter the duration in seconds, minutes, or hours. The requested callback remains in an outbound queue for the duration of that time. Any callback attempt is prevented after the time expires. The callback request is removed from the outbound queue after the Cancel Callback duration has expired.
- Click callback queued and add a Say object to inform the caller about their call status. Enter a name for the object and the text you want to play to your caller, such as “Your callback has been queued. A member of our team will call you as soon as possible. thank you”.
- Click 2 and add a Callback retry label.
- Add a Say object to request the caller to add a new number. Enter a tag name and the text you want to play to your caller, such as “Please enter your new number”. Select Interruptible (input captured as a playback option to allow the caller to interrupt the message.
-
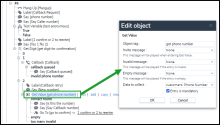
Add a Get value object to the caller's phone number. Set Data to collect to Customers: Phone Number.
- Click contact found and add a Say object to request the caller to check their phone number. Enter a tag name and the text you want to play to your caller, such as “Is this the right number?”.
- Add a Say object to return the caller’s callback number for verification. Enter a tag name and set the Value to play to $callback phone number.
- Add a Go to object to confirm the number. Choose 1 to confirm 2 to reenter destination.
-
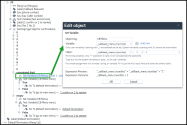
Click unassigned digit and add and configure a Set Variable object CB Menu . Enter the tag name, such as CM_Menu. Choose the _callback_manu (num/str) variable name from the list. Set Value to _callback_manu (num/str) +1.
-
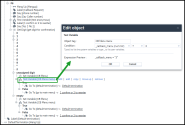
Add and configure a Test Variable object CM Menu menu. Set Condition to _callback_menu (num/str = 3.
- Click True and add a Go to object to redirect the Default termination label (location).
- Click Empty and add a Set Variable object CB Menu . Enter the tag name, such as CM_Menu. Choose the _callback_manu (num/str) variable name from the list. Set Value to _callback_manu (num/str) +1.
- Add and configure a Test Variable object CM Menu menu. Set Condition to _callback_menu (num/str = 3.
- Click True and add a Go to object to redirect the Default termination label (location).
- Click Empty and add a Set Variable object CB Menu . Enter the tag name, such as CM_Menu. Choose the _callback_manu (num/str) variable name from the list. Set Value to _callback_manu (num/str) +1.
- Add a Default termination label.
- Save the script and assign it to a channel.
