8x8 Contact Center transaction codes are mainly used to state the purpose of interactions, and to indicate the outcome of inbound and outbound interactions.
For example, an ACME Sales representative processing a sales campaign for a new product, places outbound calls to prospect customers. He can record the result of each interaction with predefined transaction codes, such as: Successful Sale, Prospect Interested - Call back, Prospect not Interested - Do not call back, Reached Voicemail, Faulty Number, and more. Further in the sales process, you can define transaction codes to identify various stages of the sales process, and apply the codes to convey the status and result of each interaction.
If your contact center includes the optional transaction codes feature, your contact center administrator creates transactions codes that identify call disposition.
Note: With Auto-TCL, AMD, and CCB services, the system creates automatic transaction codes during an interaction and deposits them under Cases > Transaction Codesand Tasks > Transaction Codes.
Optional vs. required
Codes can be configured to be optional or required. If your contact center administrator configures a code list as mandatory, as you process interactions, you are required to select transaction codes. You can end processing a call only after selecting the desired codes.![]()
If your administrator configures a code list as optional, as you process interactions, you have the flexibility to skip codes selection.
To select transaction codes during a call:
- During an active call, go to Options > Transaction Codes.
Note: The Options button or the Transaction Codes button indicates when the code list is mandatory.
The code list assigned to the queue or the agent group appears.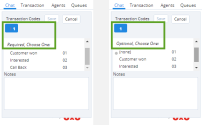
- Select the desired code(s) and click Continue. The code is assigned to the call.
Note: If you end the call without selecting a mandatory code, the call stagnates in the post processing mode. Clicking End Post Processing brings up the code list, forcing a selection.
8x8 Agent Console 8x8 Contact Center's browser-based graphical user interface (GUI) used by Agents to manage customer interactions. applies the code and allows you to begin processing the new interaction. The transaction code gets logged in the contact center's historical reports.
Use keyboard shortcuts
In a contact center environment, the time taken by agents to process calls is critically important. During a call, agents may be required to browse multiple code lists and select the desired code(s) for each call. This process is time-consuming. The keyboard shortcuts for codes minimize the time spent selecting the codes by reducing the number of clicks in the call flow. This feature is useful when the agent knows the code selection and does not have to go through the lists to make choices.
The keyboard shortcut for Transaction Codes is F2 t nn (sequentially, where t is the transaction code, and nn is the code number). Within each code list, each code is numbered from 01 onwards. To select a second code in the list, press F2 t 02.
Note: The keyboard shortcut works with one set of transaction codes only. It does not support more than one set of codes.
To select a transaction code using a keyboard shortcut:
- During an interaction, type F2 and then t, sequentially, to bring up the Transaction CodeThe Transaction Codes feature enables agents to supply supplemental information about the reason for or outcome of an interaction. Transaction codes provide enhanced metrics or enable the calling line ID on an outbound call to be modified. For example, transaction codes could be created for different categories of sales activities such as Initial Contact, Prospect, Customer Satisfied, and so on. list, and then select the desired code.
OR - Type F2 t nn to select a desired transaction code where nn stands for the transaction code number in the list. The code is automatically saved.
Note: While selecting a code using the shortcut, always choose lowercase d or t. Enter the number as 01, not 1.
The following table gives examples of acceptable and unacceptable keyboard shortcut keys:
| Transaction Codes Keyboard Shortcut | Acceptable Format |
|---|---|
| F2 t 01 | Yes |
| F2 T 01 | No |
| F2 t 1 | No |