| Schedule |
Use the Schedule object to perform a particular sequence of script operations when the contact center is either open or closed.
Parameters:- In the Label text entry area, type the alphanumeric label used to uniquely identify the element in the IVR script.
- Labels can contain a maximum of 21 characters, and must be unique within a script.
- In the Select schedule list, choose a schedule definition.
Exit points:
The Schedule object uses the Select schedule value to transfer control to the script sequence specified within the following exit points:- open equals true if the phone interaction has been received within the selected schedule's open hours.
- close equals true if the phone interaction has been received outside the selected schedule's open hours.
- #1 through #6 equal true if the schedule specified in Select Schedule includes an exception condition, numbered 1 through 6, and today's date is within the exceptions from and to dates.
For details on creating schedules, refer to Define Business Hours and Schedules. |
| Check ANI |
Use the Check ANI object to use the phone number of the inbound caller to perform a lookup in the customers file. If a matching phone number is found in the Customer file, the record is loaded in memory and can be used to check the value of picklist fields to determine how to route the call.
Parameters:- In the Label text entry area, type the alphanumeric label used to uniquely identify the element in the IVR script. Labels can contain a maximum of 21 characters, and must be unique within an IVR script.
- In the contact found item, define the call processing steps to be performed if a Local CRM customer record was found.
- In the contact not found item, define script call processing steps to be performed if a Local CRM customer record was not found.
Exit points:
The Check ANI object uses the value of the caller's ANI phone number to transfer control to the script sequence specified within the following exit points:- contact found equals true if the caller's phone number matches one in the Local CRM.
- contact not found equals true if the caller's phone number does not match one in the customer file.
When using the Check ANI object, both exit points should be configured. An exit point does not have any processing steps, and the object exits on that exit point the caller will be disconnected.
|
| Get Value |
Use the Get Value object to request or require the caller to use their telephone's keypad to provide the following Local CRM data: - A Local CRM customer AccountNumber
- A Local CRM CaseID
- An agent's extension number: On selecting this option, the Entry is mandatory check box is checked automatically and grayed out. You are given the option to set the maximum length of the extension. By default, the maximum is eight digits.
- A numeric Customer or Case custom field.
- An external Variable1 or Variable2 that can then be passed to an external program for screen pops or integration with third-party or custom systems.
For details on screen pop, refer to Define Screen Pop Settings for External CRM.
Parameters:- In the Label text entry area, type the alphanumeric label used to uniquely identify the element in the IVR Script.
Labels can contain a maximum of 21 characters, and must be unique within an IVR script. - In the Invite message list, choose the audio file the IVR script plays to prompt the caller to enter specific numerical information.
- In the Invalid message list, choose the audio file the IVR script plays if the caller responds to the invite message prompt with an invalid entry.
- In the Empty message list, choose the audio file the IVR script plays if the caller does not respond to the invite message prompt within 10 seconds.
- In the Data to collect list, select the CRM data to request or require from the user.
- Select Entry is mandatory to require that the user supply a valid response to the prompt before enabling them to proceed beyond the Get Value object.
Exit points:
The Get Value object uses the value of the caller's response to transfer control to the script sequence specified within the following exit points:- found equals true if the caller's numerical entry matches the CRM data that was specified in the Data to Collect list.
If Entry is Mandatory is disabled, or the value to be matched is stored in an external variable, the script exits. - empty equals true if Entry is Mandatory is enabled, and the caller does not supply a value.
- too many invalid equals true if Entry is Mandatory is enabled and the caller made three incorrect attempts to supply a valid response.
|
| Get Digit |
This object is used after Play and Say messages that prompt for digit tone input. Get Digit is a menu optimized for the input of a single digit. Use Get Digit to receive the caller's DTMF input after prompting the caller for input.
Parameters: None
Exit Points:- 0-9, *, # label the script operations performed after the caller has pressed the corresponding key on their telephone's keypad.
- Unassigned digit: Actions defined under Unassigned digit are followed when the caller enters a digit that has no assigned action.
- empty contains the script operations performed if the caller does not respond to an IVR menu prompt within 10 seconds, and the empty exit point is not configured.
|
| Check Picklist |
Use the Check Picklist object to evaluate the value of a particular item from the CRM database.
Perform a Check Picklist comparison after you have used the Check ANI or Get Value object to load a customer or case record into memory.
Parameters:- In the Label text entry area, type the alphanumeric label used to uniquely identify the element in the IVR Script.
Labels can contain a maximum of 21 characters, and must be unique within an IVR script. - In the Data to test list, choose the picklist field to evaluate.
- In the Select operator list, choose the equal to or not equal to comparison operator.
- In the Select values list, choose the picklist values for the data element specified above by the Data to test list.
Exit points:
The Check Picklist object transfers control to the script sequence specified within the following exit points:- matched equals true if one of the selected values equals the value of a record in the Local CRM.
- not matched equals true if one of the selected values does not equal the value of a record in the Local CRM.
|
| Play |
Use the Play object to play an audio file in a particular location in the IVR script.
Parameters:- Object Tag: Enter the alphanumeric label used to uniquely identify the element in the IVR Script.
- Audio File: Select from the default audio files or from the choice of custom uploaded files.
- Playback Options: The playback option can be interrupted by a DTMF input or not. Select from one of the following options:
- Uninterruptible (Input ignored): The playback continues, ignoring the DTMF input.
- Interruptible (Input captured): The playback is interrupted, and the DTMF input is captured.
Exit points: None |
| Say |
This object converts programmed text and variable objects such as phone number and queue position into speech. The Say object is also interruptible or not. For details, see our content on Text To Speech.
Parameters:- Object Tag: Enter the alphanumeric label used to uniquely identify the element in the IVR script.
- Language: Select the language from the available choices.
Available Languages are:  Arabic, Bahasa, Basque, Cantonese, Catalan, Czech, Danish, Dutch, English (AU), English (GB), English (India), English (Ireland), English (Scotland), English (South Africa), English (US), Finnish, French (Canada), Galician, German, Greek, Hebrew, Hindi, Hungarian, Italian, Japanese, Korean, Mandarin (China), Mandarin (Taiwan), Norwegian, Polish, Portugese (Brazil), Portugese (Portugal), Romanian, Russian, Slovak, Spanish (Castillan), Spanish (Colombia), Spanish (Mexico), Swedish, Thai, Turkish, and Valencian. Arabic, Bahasa, Basque, Cantonese, Catalan, Czech, Danish, Dutch, English (AU), English (GB), English (India), English (Ireland), English (Scotland), English (South Africa), English (US), Finnish, French (Canada), Galician, German, Greek, Hebrew, Hindi, Hungarian, Italian, Japanese, Korean, Mandarin (China), Mandarin (Taiwan), Norwegian, Polish, Portugese (Brazil), Portugese (Portugal), Romanian, Russian, Slovak, Spanish (Castillan), Spanish (Colombia), Spanish (Mexico), Swedish, Thai, Turkish, and Valencian. - Voice: Select a suitable voice from the library of digital voices. These voices are available in female and male tone.
- Value to Play: Select to play free text or variables, such as phone number and queue position.
- Callback phone number: Plays the call back number entered by the caller. It is retrieved via Get Value.
- Caller phone number: Plays the calling line ID of the caller fetched automatically.
- Queue position: Plays the queue position of the call.
- Text to Play: Enter the text string to be played.
- Data type: Select from the available data types: Text, Number, Phone number, Date, Time, and Currency. For example, if you select Date as the data type, the system announces the data in the date format.
- Playback rate: Select a value: Slow, Normal, or Fast. The default rate is Normal. You can define the playback speed of IVR Text-To-Speech (TTS) prompts when using the Say object. The Say object converts programmed text and variable objects such as phone number and queue position into speech. You can play these prompts slowly, at a normal speed, or at a faster pace. Using the playback rate option, you can control the speed of the speech that reads your text so your callers do not miss the important information such as names, numbers, or account balances. The default speed is Normal. The playback speed is set per IVR Say node.
- Playback Options: The playback option can be interrupted by a DTMF input or not. Select from one of the following options:
- Uninterruptible (Input ignored): The playback continues, ignoring the DTMF input.
- Interruptible (Input captured): The playback is interrupted, and the DTMF input is captured.
|
| Menu |
Use the Menu object to present a list of options to the caller.
Parameters:- In the Label text entry area, type the alphanumeric label used to uniquely identify the element in the IVR script.
Labels can contain a maximum of 21 characters, and must be unique within an IVR script. - In the Invite message list, choose the audio file the IVR script plays to offer menu options to a caller.
- In the Invalid message list, choose the audio file the IVR script plays if the caller responds to the prompt with an invalid entry.
- In the Empty message list, choose the audio file the IVR script plays if the caller does not respond to an IVR menu prompt within 10 seconds.
In a Menu script object, the Empty message parameter and the empty exit point (described below) are mutually exclusive: If you configure the empty exit point, then the Menu object will not play the audio file specified in the Empty message list.
Exit points:
The Menu object contains the following labeled exit points:- empty contains the script operations performed if the caller does not respond to an IVR menu prompt within 10 seconds, and the empty exit point of the Menu object is not configured.
In a Menu script object, the empty exit point and the Empty message parameter (described above) are mutually exclusive; if you configure the empty exit point, then the Menu object will not play the audio file specified in the Empty message list. - too many invalid labels the script operations performed if the caller makes three invalid responses to the menu prompts.
Invalid responses include three incorrect keypad entries or no response to the menu within 10 seconds.
|
| Voice Recording Settings |
If your 8x8 Contact Center operates in jurisdictions which require seeking the caller's permission before recording a call, the caller's choice must be able to override the queue and agent level recording settings as well as the agent's record on demand capability. Use the Voice Recording Settings object to determine the circumstances under which a call may be recorded.
Parameters:- In the Label text entry area, type the alphanumeric label used to uniquely identify the element in the IVR script.
Labels can contain a maximum of 21 characters, and must be unique within an IVR script. - In the Permission to record, select one of the four options:
- Keep prior setting: Keep prior setting for automatic and agent-initiated recording
- Not asked: No automatic recording, but allows an agent to initiate recording
- Granted: Follows Agent & Queue recording settings for automatic recording, and allows an agent to initiate recording
- Denied: No automatic recording, and does not allow an agent to initiate recording
When Record % of calls is applicable, then IVR, Queue, and Agent voice recording percentages are applied.- In the Automatic Call Recording, based on the settings in Permission to record, one of the following four options get automatically selected, or you can select an option to override the default:
- Keep prior setting: Keep prior setting for automatic recording
- Record this call: The current call is recorded
- Do not record this call: The current call is not automatically recorded
- Record % of calls: IVR %, Queue %, and Agent % probabilities are used to determine if the call is recorded automatically or not
- In the Allow agent to initiate recording, based on the settings in Permission to record, one of the following three options get automatically selected, or you can select an option to override the default.
- Keep prior setting: Keep prior setting for agent-initiated recording
- Yes: Allow the agent to initiate recording of this call
- No: Do not allow the agent to initiate recording of this call
|
| Set Agent |
The Set Agent object facilitates direct agent access. Set Agent checks if the ANI or case number associated with an incoming call has corresponded with an agent on previous calls, and provides call routing choices based on the search result. For details, see our content on Direct Agent Routing.
Set Agent allows you to look up agents based on the following parameters:- Case created by: Find the agent who created the case.
- Case last worked by: Find the agent who last worked on the case.
- Case assigned to: Find the agent who is assigned to the case.
- Channel linked to: Find the agent who is linked to the channel the call was channeled through.
- None: Find an agent by name. By selecting this option, the option to Choose Agent shows up. Click the link, and select an agent from the list.
Set Agent may return empty if there is no agent associated with ANI or case number.
Exit points:
The Set Agent object uses the returning value from the search above to transfer control to the script sequence specified within the following exit points:- agent found equals true if the caller's phone number or the case lookup retrieves an agent who previously corresponded with the contact.
- agent not found equals true if the caller's phone number or the case number does not retrieve any agent who worked with the contact.
|
| Transfer to Agent |
The Transfer to Agent object connects the caller to the agent.
- Use this object with Set Agent to find agents based on case lookup, and then transfer the call.
- Use this object without Set Agent to transfer calls directly to the agent with a personal channel. The agent must be assigned with a personal channel.
Transfer to Agent object provides options which support transferring a call to an agent even if their status is:- busy
- on break
- working offline
- logged off
If you do not select any option, then the call is transferred only if the agent status is Available.
If transfer is successful, change agent status to busy: this option is enabled by default. The agent is offered the post processing state after terminating the call.
The object supports separate logic as to why a call may not reach the target agent depending on the agent’s real-time state.
Exit points:
The Transfer to Agent object uses the following exit points:- Busy equals true if the agent status is busy.
- on break equals true if the agent is on break.
- working offline equals true if the agent is working offline.
- logged off equals true if the agent is logged off.
- rejected by agent equals true if the agent rejected the call.
- invalid agent id equals true if the agent found from ANI or case lookup is found invalid.
- ring no answer equals true if the agent's phone rang but the agent failed to answer.
|
| Agent Menu |
This object offers callers multiple choices of alternate actions if the agent is unable to answer the call. In a direct agent routed call, based on the reason why the agent is unable to answer, you can offer the caller any number of choices of alternate actions to take. You can provide more personalized service to your customers by using agent specific prompts.
Parameters:
- In the Object tag text entry area, type the alphanumeric label used to uniquely identify the element in the IVR script.
Labels can contain a maximum of 21 characters, and must be unique within an IVR script.
- In the Personal Invite list, choose the audio file of a personal greeting by the agent.
- In the Impersonal invite list, choose the audio file of a general greeting message to be played to callers.
Exit points:
The Menu object contains the following labeled exit points:
- 0-9, *, # label the script operations performed after the caller has pressed the corresponding key on their telephone's keypad.
- empty contains the script operations performed if the caller does not respond to an IVR menu prompt within 10 seconds, and the empty exit point of the Menu object is not configured.
In a Menu script object, the empty exit point and the Empty message parameter (described above) are mutually exclusive; if you configure the empty exit point, then the Menu object will not play the audio file specified in the Empty message list.
- agent not configured for VM Specify options if the agent is not configured for voicemail.
- invalid agent id: Specify options if the agent ID is invalid.
Learn more about how to use the Agent Menu object.
|
| Transfer to Agent Voice Mail |
The Transfer to Agent Voicemail object allows a caller to deposit a voicemail for an agent. It assumes the agent is already set through the Set Agent object or Get Value object. The following parameters dictate the call flow.
Parameters:- Name: In the Name text entry area, type the alphanumeric label used to uniquely identify the element in the IVR script for the Forward to agent element. It can contain a maximum of 21 characters, and must be unique within an IVR script.
- Personal Invite: You can set different greetings to inform the caller the available options. The options available under Personal Invite indicate the agent-specific greeting that will be played back to the caller when the call routes through this primitive. The following options act as templates for the actual prompts:
- AgentPersonalGreeting: Plays the personal recording made by the agent through a verification call.
- AgentPersonalrecording_1 to AgentPersonalrecording_6: An agent can also record a maximum of 10 personal recordings using the 8x8 Agent Console and any one of the first six of these personal recordings can be played back to the caller. This is done when the administrator sets the Personal Invite to one of these options. The agent's recording functionality in 8x8 Agent Console is accessible via Menu > My Recording. Agents can record personal greetings using the My Recording functionality.
- Impersonal Invite: If the personal recording of the agent is not available, the IVR system falls back on the Impersonal Invite message. These are the audio prompts that are available to 8x8 Contact Center through the Home > Audio Files interface.
- Digit to opt out: A caller is forced to deposit a voice mail when the “Digit to opt out” is set to false. When it is set to true then the caller has the option of leaving a voicemail or going back to the IVR system via the “opt out exit” point. This is similar to “resume” in the “ForwardToAgent” primitive in the legacy 8x8 Contact Center. When opt out is set to true, the caller can press any DTMF key to navigate to the “opt out” exit point.
Exit Points:- opt out: allows the caller to opt out of voicemail.
- agent not configured for VM: If the Activate agent’s voice mail check box in the Phone tab of the Agent configuration in 8x8 Configuration Manager is not checked, then the caller is directed to the agent not configured for VM exit point even when the agent ID is set.
- invalid agent id: If the agent ID is not set before this primitive is encountered, the caller is directed to this exit point.
|
| Test Condition of Queue |
Use this object to check the condition of a queue before entering a queue. Test queue provides a set of conditions which, when met, triggers specified actions. The test queue object gives the IVR designer much more routing flexibility by allowing testing queue status repeatedly.
Parameters:- In the Object tag text entry area, type the alphanumeric label used to uniquely identify the element in the IVR script.
Labels can contain a maximum of 21 characters, and must be unique within an IVR script. - In the Queue name list, choose the phone queue to test the condition.
- Use the Queue Conditions area to determine routing choices based on agent availability or queue performance. For Queue Conditions, select one or more options below. The following options are presented when you enable There are NO agents:
- Available: Select this option to route the call differently, or to provide the caller with choices when there is no qualified agent available to immediately accept the interaction.
- Available or Busy: Select this option to route the call differently, or to provide the caller with choices when there is no qualified agent available to immediately accept the interaction. The agents may be temporarily busy and cannot immediately take the call.
- Available, busy, or working offline: Select this option to route the call differently, or to provide the caller with choices when there is no qualified agent available to immediately accept the interaction. The agents may be temporarily busy or working offline and cannot immediately take the call.
- Available, busy, working offline, or on break: Select this option to route the call differently, or to provide the caller with choices when there is no qualified agent available to immediately accept the interaction. The agents may be temporarily busy, working offline, or on break and cannot immediately take the call.
- Logged in (assigned but may not be enabled): Select this option to route the call differently, or to provide the caller with choices when there is no qualified agent logged in (assigned but may not be enabled) to immediately accept the interaction. Qualified agents refer to agents set up to receive interactions from the queue specified in the Queue name list.
- To evaluate the condition of a selected queue and then route the call based on the test results of that performance, perform one or all of the following tests:
Select The number of calls waiting ahead of this call is greater than -----, then enter the maximum number of calls that can be ahead of the current call. Warning: Due to race and sync conditions, it is possible that more or fewer calls may be in queue at the time of this test. - Select Current call has been waiting in this queue for more than --- (seconds), then enter a time the current call has spent in its queue exceeds a configurable threshold. Each incoming call gets its own copy of an IVR script to receive treatments. The call being treated is referred to as the Current call.
- Select The longest wait time for any call in this queue is greater than --- (seconds), then enter the maximum time that a call in the queue has waited in the queue.
- Select The instantaneous expected-wait-time calculation exceeds --- (seconds), then enter a time duration in seconds.
Exit points:
Test Queue has two exit points:- Condition Matched
- Condition not Matched
The Test Queue object transfers control to the script sequence specified under the exit points based on the following test results:- There are no qualified agents available in the queue.
- There are no qualified agents available or busy in the queue.
- There are no qualified agents available, busy, or working offline in the queue.
- There are no qualified agents available, busy, working offline, or on break in the queue.
- There are no qualified agents logged in.
- There are n number of calls in the queue ahead of this call, where n is the number specified in the test.
- The current call has been waiting in this queue for more than specified time.
- There is a call waiting longer than the specified time in the queue.
- The instantaneous expected wait time calculation for a call exceeds the specified time.
The expected wait-time calculation is useful only when there are more than 20 qualified agents assigned to the queue and active. Mathematical uncertainty with fewer than 20 active, similarly-skilled agents may produce unexpected results.
One of the many ways the condition matched and condition not matched exit points can be used is to either trigger another test, provide the caller with a choice of waiting in the queue when no agent is available, leave a voicemail, or inform the caller of an approximate waiting time, and then forward to the queue.
For example, if there is a call in the queue that has waited longer than 120 seconds, you can insert the Play object under the Condition matched exit point to play a message informing the caller of an expected waiting time for the call to be answered. You can then use the Forward to Queue object to route the call to a queue. |
| Forward to queue |
Use the Forward to Queue object to forward a phone interaction to a specific phone queue.
Parameters:- In the Object tag, type the alphanumeric label used to uniquely identify the element in the IVR script.
The object tag can contain a maximum of 21 characters, and must be unique within an IVR script. - In the Queue name list, choose the target phone queue to receive the call.
For more information about modifying the default queue forwarding behavior, see the information about the Take the Overload path if area below. - In the Queue timeout enter the number of seconds that call waits in the queue (5 to 20000).
- Use the Queue Conditions area to determine routing choices based on agent availability or queue performance. For Queue Conditions, select one or more options below. The following options are presented when you enable There are NO agents:
- Available: Select this option to route the call differently, or to provide the caller with choices when there is no qualified agent available to immediately accept the interaction.
- Available or Busy: Select this option to route the call differently, or to provide the caller with choices when there is no qualified agent available to immediately accept the interaction. The agents may be temporarily busy and cannot immediately take the call.
- Available, busy, or working offline: Select this option to route the call differently, or to provide the caller with choices when there is no qualified agent available to immediately accept the interaction. The agents may be temporarily busy or working offline and cannot immediately take the call.
- Available, busy, working offline, or on break: Select this option to route the call differently, or to provide the caller with choices when there is no qualified agent available to immediately accept the interaction. The agents may be temporarily busy, working offline, or on break and cannot immediately take the call.
- Logged in (assigned but may not be enabled): Select this option to route the call differently, or to provide the caller with choices when there is no qualified agent logged in (assigned but may not be enabled) to immediately accept the interaction. Qualified agents refer to agents set up to receive interactions from the queue specified in the Queue name list.
- To evaluate the condition of a selected queue and then route the call based on the test results of that performance, perform one or all of the following tests:
- Select The number of calls waiting ahead of this call is greater than -----, then enter the maximum number of calls that can be ahead of the current call.
- Select The longest wait time for any call in this queue is greater than --- (seconds), then enter the maximum time that a call in the queue has waited in the queue.
- Select The instantaneous expected-wait-time calculation exceeds --- (seconds), then enter a time duration in seconds.
Exit points:- In Queue is true if a call has entered the queue. You can define the in-queue treatments for each queue. Callers are served with the treatments and options defined under each queue while waiting to be served. You can add Loop and initial action under In Queue:
- Initial Action: Under In Queue, select to add an initial action, such as announcing the Flu clinic details. Add a Play object and select an audio file to be played to callers once they enter the queue.
- Loop: Under In Queue, add a Loop object. Inside a loop, you can define multiple in-queue treatments using time intervals. These treatments are repeated for a specified number of times, or for a given duration.
- Queue Timeout is true if the call waiting exceeds the timeout period set.
- Overload is true if any of the overload paths are met.
The Forward to Queue object transfers control to the script sequence specified under the overload exit point as follows:- There are no qualified agents available in the queue.
- There are no qualified agents available or busy in the queue.
- There are no qualified agents available, busy, or working offline in the queue.
- There are no qualified agents available, busy, working offline, or on break in the queue.
- There are no qualified agents logged in.
- There are n number of calls in the queue ahead of this call, where n is the number specified in the test.
- There is a call waiting longer than the specified time in the queue.
- The instantaneous expected wait time calculation for a call exceeds the specified time.
The expected wait-time calculation is useful only when there are more than 20 qualified agents assigned to the queue and active. Mathematical uncertainty with fewer than 20 active, similarly skilled agents may produce unexpected results.
The overload exit point can be used to provide the caller with a choice of waiting in the queue when no agent is available, or to leave a voicemail.
For example, in the Forward to Queue object's overload exit point, insert the Forward to voice mail object to route the call based on the caller’s response to a prompt of the form "Press 1 to leave a message or remain on the line to speak to the next available agent"; if the caller does not press 1, the script transfers the call to the queue specified in the Queue Name list.
|
| Callback |
The Callback object allows callers waiting in a call queue to opt out of the queue and be called back when an agent becomes available. This feature fetches the caller's phone number from the calling line ID, the absence of which requires the caller to input the callback number before exiting the queue. The system retains the queue position of the call and offers an outbound call to an available agent serving the queue. When the agent accepts the call, the call is dialed out to the caller using the callback number. The call is routed through an outbound queue. For details, see our content on queued callback.
Parameters:- Queue name: Select an existing outbound queue to route the call.
- Call back CLI/CN: Select a channel number for outbound caller ID. Using the option [Current Channel], you can display the original channel number, which the caller used as the caller ID for the callback. This option is selected by default. If you wish to display any other channel number during the callback, you can select from the list of available channels.
- Dial plan: Select from an existing dial plan.
- In Callback parameters, select the number of callback tries, specify the delay time between tries in seconds or minutes, and enter the duration (in seconds, minutes, or hours) after which the callback request needs to be canceled.
- Callback tries: Select the number of attempts to call back. The call failure is determined by the following factors:
- Agent did not answer the call.
- Agent answered, but the outbound leg dials out and experiences a busy network.
- RNA (Ring no answer)
- Callback retry delay: Specify the callback retry attempts in seconds or minutes. Set a time between 40 secs to 90 minutes.
- Cancel callback after: Enter the duration in seconds, minutes, or hours. The requested callback remains in an outbound queue for the duration of that time (up to maximum 72 hours). Any callback attempt is prevented after the time expires. The callback request is removed from the outbound queue after Cancel Callback duration has expired. The minimum callback time remains 120 seconds.
Exit Points:- Callback Queued: Informs the caller that the callback request is queued for further processing.
- Invalid Phone Number: Informs the caller that the number entered is invalid, and can offer options for further corrective actions.
|
| Forward to voice mail Queue |
Use the Forward to voice mail object to transfer phone interactions to a selected voicemail queue.
If the Forward to voice mail object is inserted under the overload exit point of a Forward to Queue object, the caller can choose between waiting in the queue or transferring to voicemail.
Parameters:- In the Object Tag text entry area, type the label used to uniquely identify the element in the IVR script.
Labels can contain a maximum of 21 characters, and must be unique within an IVR script. - In the Invite Message list, choose the audio file that directs the caller to press 1 to leave a voicemail message.
The audio file must direct the caller to press 1 to leave a voicemail; no other number will work.
If the Access to voice mail is mandatory option, described below, is selected, then the IVR script forcibly transfers the call to voicemail. - In the Queue name list, choose the voicemail queue that receives calls transferred to voicemail.
- Select Access to voice mail is mandatory to have the IVR script forcibly transfer calls to the voicemail queue.
Exit points: None |
| Forward to External IVR |
Use the Forward to External IVR object to forward a phone interaction to an external IVR server. This redirects an incoming call to an external SIP URI address, or a phone number, which lands on an external IVR system. You can complete a self-service authentication on an external IVR server, and resume the call as desired by the customer. The entry point for an incoming call remains the 8x8 Contact Center IVR, with external IVR as an additional tree node within it.
The object allows data exchange between the external IVR server and the 8x8 Contact Center server through a RESTful API interface. The data flow requires a SIP connection.
Parameters:- In the Object tag text entry area, type the alphanumeric label used to uniquely identify the element in the IVR script.
Labels can contain a maximum of 21 characters, and must be unique within an IVR script. - In the Phone number text entry area, type the complete phone number the IVR script dials when transferring a phone interaction.
The Phone number text entry area accepts only the numeric characters 0-9.- In the United States, phone numbers, must be of the form (1 + three-digit area code + seven-digit phone number).
In the United States, when typing numbers into text entry areas, always preface the area code with 1. - Outside the United States, must be of the form (Country Code + phone number).
Exit points:
Resume: Provides the capability to resume within the 8x8 Contact Center IVR tree on detecting a hang-up event on the External IVR server, and redirects a call to a predefined or assigned destination. |
| Forward to External Number |
Use the Forward to external number object to forward a phone interaction to a phone number that is not managed by 8x8 Contact Center.
Parameters:- In the Label text entry area, type the alphanumeric label used to uniquely identify the element in the IVR script.
Labels can contain a maximum of 21 characters, and must be unique within an IVR script. - In the Phone number text entry area, type the complete phone number the IVR script dials when transferring a phone interaction.
The Phone number text entry area accepts only the numeric characters 0-9.- In the United States, phone numbers, must be of the form (1 + three-digit area code + seven-digit phone number).
In the United States, when typing numbers into text entry areas, always preface the area code with 1. - Outside the United States, must be of the form (Country Code + phone number).
Exit points: None |
| Label |
Use the Label object in combination with the Goto object, described later in this table, to redirect call processing to any location in the IVR script. The Goto object redirects the interaction to the parameter of a Label object.
Parameters:
In the Label text entry area, type the alphanumeric label used to uniquely identify the element in the IVR script.
Labels can contain a maximum of 21 characters, and must be unique within an IVR script.
Exit points: None. |
| Goto |
Use the Goto object to redirect the script to continue running at some labeled location in the script.
Parameters:
In the Destination list, choose a labeled script location.
Exit point: None |
| Set Variable |
The ability to set variables allows programming abilities within IVR scripts, enabling better caller experience. You can use variables to remember the user input and use them to drive the call flow. You can create variables to store values of string and number types, and reference them anywhere and any number of times in the script.
8x8 Contact Center allows two types of variables in IVR:- System Variables: These are predefined variables which cannot be edited:
$QueuePosition: Returns the current position of a call within the queue.
$callerPhoneNumber: Returns the caller's phone number based on caller ID.
$callbackPhoneNumber: Returns the call back number input by the caller. - User-Defined Variables: These are variables defined by users. You can initialize these variables with a certain value, and modify them later.
Parameters:- Object Tag: Enter a label to uniquely identify the element in the IVR script.
- Variable: Select a predefined variable from the drop-down list, or create a new variable.
- Value: Select a desired value for the variable.
For example, to offer callers suitable choices based on the queue position, set a variable and check:- If the queue position is greater than 10, offer to call back when an agent is available.
- If the queue position is less than 10, play promotional messages and retain callers in the queue.
Exit Points: None |
| Test Variable |
The Test Variable object allows you to test an already defined variable and test it against a set value. To test a variable, select either a system variable or a user-defined variable, and test it against a specific value. For example, test how many calls are ahead of a call using the system variable $QueuePosition. If there are more than ten calls ahead of this call, announce the position to the caller, and offer the caller to receive a call back. If there are fewer than 10 calls ahead of this call, keep the caller in the queue.
To access the Test Variable object within the script, click Add next to a node, and select the Test Variable object from the Insert Object list.
Exit Points:- True: equals true if it meets the condition set for the variable
- False: equals true If it does not meet the set condition
|
| Randomize |
The Randomize object allows us to randomly pick callers and offer a different treatment from the norm. For example, in a customer survey program, you may want to randomly select 50% of callers, and direct them to a survey. You will need to use the randomize object that randomly picks callers and offers a specific treatment based on the path chosen.
Parameters:- Object tag: Enter the alphanumeric label used to uniquely identify the element in the IVR Script.
- Path A Percentage: Slide the pointer on the scale to indicate the percentage of callers to be directed to the Path A treatment.
Exit Points:- Path A: Allows you define the treatment for callers randomly directed to path A.
- Path B: Allows you to define the treatment for callers not chosen for path A.
|
| Hang up |
Use the Hang up object to disconnect a phone interaction.
The IVR disconnects a phone interaction if the call has not been forwarded to a queue, voicemail, or an external number, and the script flow contains no further script objects.
In the Label text entry area, type the alphanumeric label used to uniquely identify the element in the IVR script.
Labels can contain a maximum of 21 characters, and must be unique within an IVR script.
Exit points: None |
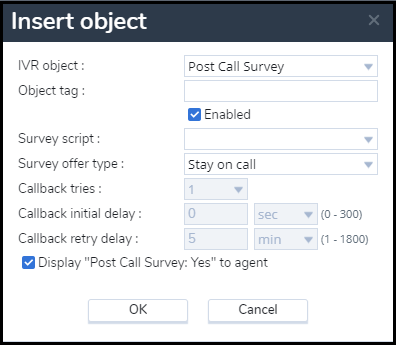
| Post Call Survey |
Use this object to collect feedback about the overall product quality or service quality, get to know the customer satisfaction, and take corrective actions.
Parameters:
- Object tag: Enter the alphanumeric label to identify the script element. Labels can contain a maximum of 21 characters and must be unique within a script.
- Enabled: Select this option to enable the script for Post Call Survey.
- Survey script: Select the Post Call Survey script.
- Survey offer type: Select from the choices of offering the survey at the end of the call or call back later.
- Callback tries: Enter the number of tries you wish to call back to offer the survey.
- Callback initial delay: Enter the duration (seconds, minutes, or hours) before the first callback.
- Callback retry delay: If you specified more than one callback tries, specify the delay between the tries (seconds, minutes, or hours).
- Display "Post Call Survey: Yes" to agent: Enable the option to inform agents that the caller has opted to take the survey. This helps agents to remind callers to stay on the call to take the survey.
For example, The Acme Health clinic experiences a high call volume in their Pediatric department during flu season. Callers are typically parents or caregivers seeking quick advice on non-emergency healthcare needs for their children. The clinic dedicates/assigns advice nurses to address these callers and offer quick assistance. To ensure good service quality, Acme Health wants to gather feedback from these callers about:
- The overall call experience.
- The service quality of the patient care representative.
- The length of waiting to reach an advice nurse.
Using the Post Call Survey feature of 8x8 Contact Center, the Acme Health clinic can now craft a survey, present it to the parents at the end of their call, or call back later to gather the feedback. The survey data helps ensure the best possible care service.
Exit points: None
|