You are here: Install and Activate IP Phones
Install and Activate IP Phones
If you have purchased an IP phone from 8x8, refer to the following instructions to install and activate your device. To view a video demonstration, refer to Activating Your New Phone.
To install and activate an IP phone:
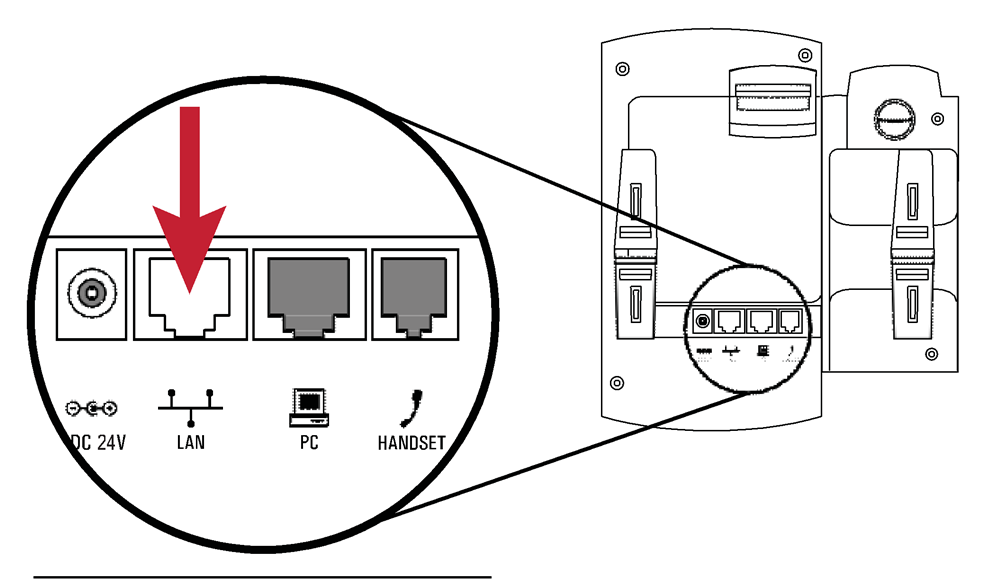
- Plug one end of the Ethernet cable into the jack marked LAN on the back of your phone, and the other end into your router or an Ethernet connection.
- Plug one end of the power cord into the phone, and the other end into an electrical outlet. Connect the handset to the phone with the supplied handset cord.
If you would like to plug a computer into the back of the device, plug one end into the PC port on the phone, and the other end into the Ethernet port of the computer.
- After you plug in your phone, the word Activate appears on the telephone screen. Pick up the handset or press the speakerphone button, and listen to the instructions.
- Enter the activation code that corresponds with the extension number you are activating, and then press #. The activation code to enter is found in the Equipment Shipped email you received from 8x8. After entering the code, a successful activation message plays.
Note: You can also retrieve the activation codes from 8x8 Configuration Manager or 8x8 Account Manager. For details, refer to how you can retrieve activation codes.
- Allow your telephone to restart. After restarting, you see the extension number on the screen.
- You are now able to make and receive phone calls. To reach an external number, dial 1, and then the number. For example: <1 (555) 555-5555>.
Note: If you dial 1 and the telephone number, and your call does not connect, please remove the power adapter connection from the back of the phone and reconnect it.
- Perform these steps for all your IP phones. Once they are activated, depending on whether your organization uses Configuration Manager or Account Manager to set up your phone system, refer to the Configuration Manager user guide or the Account Manager user guide to learn how to set up your extensions, user profiles, and other services.
Reuse Phones from a Previous Service
If you already have valid Polycom or Yealink phones that you want to reuse with 8x8 service, refer to our guides on:
Retrieve Activation Codes from Configuration Manager or Account Manager
Depending on whether your organization uses Configuration Manager or Account Manager to manage your phone system, you can retrieve device activation codes from the appropriate tool.
To retrieve activation codes from Configuration Manager:
- From the top menu bar of www.8x8.com, click Login > My 8x8 Services, log in, and select 8x8 Configuration Manager.
- From within Configuration Manager, go to Home > Devices. All devices in your inventory appears on the device page. You can see how many of any device model is assigned to a user and active.
- Click View device report. In the report, you see the device activation code in addition to other information such as MAC address, device admin password, extension number, status, site, and the user who is associated with the device. You can filter your view by Device Model or activation Status. Clicking the header row allows you to sort the results alphabetically.
To retrieve activation codes from Account Manager:
- From the top menu bar of www.8x8.com, click Login > My 8x8 Services, log in, and select 8x8 Account Manager.
- From within Account Manager, click Phone System from the top navigation bar.
- Under View All Extensions, click View.
- Click Activate Device next to the extension that you wish to activate.
- Click View All Extensions. A pop-up displays the activation code for the extension.
Open topic with navigation