Enable Co-browsing
As an administrator, you can enable 8x8 Co-browsing to work as a link in the user interface of a website, or as an embedded chat window.
To enable 8x8 Co-browsing on your website, you must first purchase a Co-browsing license from 8x8, then configure your website. To enable 8x8 Co-browsing on your website, follow these steps:
-
Determine how many simultaneous remote sessions your website should support, including how many sessions each agent can handle at once.
- Identify the domain address that will host the link for Co-browsing. For example, AcmeJets.com.
Note: If you support Co-browsing across multiple domains, you must communicate the list of domains to your 8x8 sales representative.
- Work with your 8x8 sales representative to place your order.
- Once the order is complete, your 8x8 representative will provide the license ID and a code snippet for implementation.
Embed the code snippet provided by your 8x8 sales representative into your website to allow support agents to initiate remote Co-browsing sessions. The code snippet must be added to every page where you want to enable Co-browsing. Sessions will not work on pages that do not include the snippet.
Note: The code snippet you use varies based on whether you need basic, sub-domain, or multi-domain support.
If your users may navigate across multiple domains or sub-domains, you can use a version of the snippet that supports those scenarios. Co-browsing will continue to work across pages, as long as it is also enabled on the destination domain or sub-domain.
- Do I need multi-domain support? This feature is new to version 2.4.0 of Co-browsing and requires an update to the Co-browsing code snippet to start working with multiple domains. If multi-domain support is not required, the sub-domain and basic code snippets work as before, and there is no need to update to a multi-domain snippet.
Sub-domains are included in multi-domain support. - Do I need sub-domain support? This feature is new to version 1.9.0 of Co-browsing, and requires an update to the Co-browsing code snippet to start working with sub-domains. If sub-domain support is not required, the basic code snippet still works as before, and there is no need to update to a sub-domain snippet.
- How did Co-browsing work prior to this feature? Prior to version 1.9.0 of Co-browsing, if the user started a Co-browsing session in a domain (such as
www.somedomain.com) and navigated to another sub-domain (such ashelp.somedomain.com), the Co-browsing session would be disconnected. - How does Co-browsing work now with this feature?
- With multi-domain support: With the proper code snippet, if the user starts a Co-browsing session in
www.somedomain.comand navigates towww.anotherdomain.comorhelp.somedomain.com, the session continues to work as though the user is still navigating in the same domain. - With sub-domain support: With the proper code snippet, if the user starts a Co-browsing session in
www.somedomain.comand navigates tohelp.somedomain.com, the session continues to work as though the user is still navigating in the same domain.
- With multi-domain support: With the proper code snippet, if the user starts a Co-browsing session in
To embed the code snippet in your website:
- Your code snippet is in the following format:
With multi-domain support:
<script>
(function(e,i,g,h,t,c,o,b,r,w){r=i.createElement(g);r.setAttribute(h,c);
o&&Object.keys(o).map(function(k){r.setAttribute(k,o[k])});
r.async=1;r.src='https://'+t+'/license'+c+'/dist/primary-bundle.js';
w=i.getElementsByTagName(g)[0];w.parentNode.insertBefore(r,w);
})(window,document,'script','data-8x8-co-browsing','<Co-browse-server-domain>','<Co-browse-license-id>',{
'data-8x8-co-browsing-multi-domain': true,
'data-8x8-co-browsing-mode':'<Co-browse-mode>'
});
</script>
With sub-domain support:
<script>
(function(e,i,g,h,t,c,o,b,r,w){r=i.createElement(g);r.setAttribute(h,c);
o&&Object.keys(o).map(function(k){r.setAttribute(k,o[k])});
r.async=1;r.src='https://'+t+'/license'+c+'/dist/primary-bundle.js';
w=i.getElementsByTagName(g)[0];w.parentNode.insertBefore(r,w);
})(window,document,'script','data-8x8-co-browsing','<Co-browse-server-domain>','<Co-browse-license-id>',{
'data-domain-name':'<Customer-domain>',
'data-8x8-co-browsing-mode':'<Co-browse-mode>'
});</script>
Without multi-domain or sub-domain support:
<script>
(function(e,i,g,h,t,c,o,b,r,w){r=i.createElement(g);r.setAttribute(h,c);o&&r.setAttribute(o,b);
r.async=1;r.src='https://'+t+'/license'+c+'/dist/primary-bundle.js';
w=i.getElementsByTagName(g)[0];w.parentNode.insertBefore(r,w);
})(window,document,'script','data-8x8-co-browsing','<Co-browse-server-domain>','<Co-browse-license-id>','data-8x8-co-browsing-mode','<Co-browse-mode>');
</script>
- Edit the parameters with the values provided by 8x8:
<Co-browse-server-domain>: Refers to the domain for the Co-browsing server. Replace it withcb.8x8.com<Co-browse-license-id>: Refers to your Co-browsing license ID; for example, 556c8b7beec7f02018b31700.<Customer-domain>: (Sub-domain only) Refers to the customer domain; populate the value so that Co-browsing can work in the required domain.<Co-browse-mode>: (Optional) Refers to the Co-browsing mode. Select one of the three types: full-control, partial-control, or no-control. If you don't select a mode, full-control is the default mode assigned to users.
- Add the code snippet within the <body> tags on the web page.
- Your completed code snippet should look like this. Please note that the value for
<Co-browse-license-id>is a variable.With multi-domain support:
<script>
(function(e,i,g,h,t,c,o,b,r,w){r=i.createElement(g);r.setAttribute(h,c);
o&&Object.keys(o).map(function(k){r.setAttribute(k,o[k])});
r.async=1;r.src='https://'+t+'/license'+c+'/dist/primary-bundle.js';
w=i.getElementsByTagName(g)[0];w.parentNode.insertBefore(r,w);
})(window,document,'script','data-8x8-co-browsing','cb.8x8.com','556c8b7beec7f02018b31700',{
'data-8x8-co-browsing-multi-domain': true,
'data-8x8-co-browsing-mode':'full-control'
});
</script>
With sub-domain support:
<body>
<script>
(function(e,i,g,h,t,c,o,b,r,w){r=i.createElement(g);r.setAttribute(h,c);
o&&Object.keys(o).map(function(k){r.setAttribute(k,o[k])});
r.async=1;r.src='https://'+t+'/license'+c+'/dist/primary-bundle.js';
w=i.getElementsByTagName(g)[0];w.parentNode.insertBefore(r,w);
})(window,document,'script','data-8x8-co-browsing','cb.8x8.com','556c8b7beec7f02018b31700',{
'data-domain-name':'specialtycookies.com',
'data-8x8-co-browsing-mode':'full-control'
});</script>
</body>
Without multi-domain or sub-domain support:
<body>
<script>
(function(e,i,g,h,t,c,o,b,r,w){r=i.createElement(g);r.setAttribute(h,c);o&&r.setAttribute(o,b);
r.async=1;r.src='https://'+t+'/license'+c+'/dist/primary-bundle.js';
w=i.getElementsByTagName(g)[0];w.parentNode.insertBefore(r,w);
})(window,document,'script','data-8x8-co-browsing','cb.8x8.com','556c8b7beec7f02018b31700','data-8x8-co-browsing-mode','full-control');
</script>
</body>
You can add a simple help link or a help button on your website that allows visitors to request assistance. The website visitor clicks on this link to generate a unique Co-browsing session ID that can be shared with the agent. For example:
<a href="#" onclick="window.coBrowsingInstance && coBrowsingInstance.showPopup();return false;">Help </a>
This step is optional for the basic Co-browsing setup. Complete this step only if you need to mask fields with sensitive data in a form. If a customer enters sensitive information (such as a Social Security Number) into a web form during a Co-browsing session, you can prevent agents from viewing or editing that data. Co-browsing provides a built-in way to mask previously configured elements. When masking is enabled, agents only see asterisks instead of the actual data input. Agents cannot enter data in masked fields.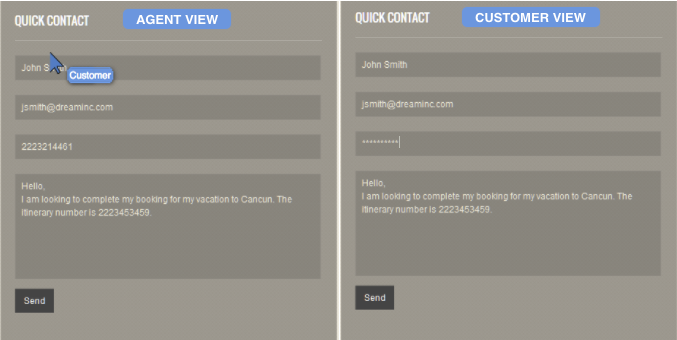
To mask a field, you must add the “maskContent” CSS class to the element that should be marked by “*”.
Note: Password fields are automatically masked. You do not need to add the “maskContent” CSS class to mask them.
For example, the following input element is configured to mask its content. Data entered by customers in the field will be masked with “*” for agents:
<input type="text" name="sensitiveFieldData" class="anotherClass maskContent" placeholder="Sensitive data">
Save these changes to the web page. With this, you have enabled your web page with Co-browsing capability.
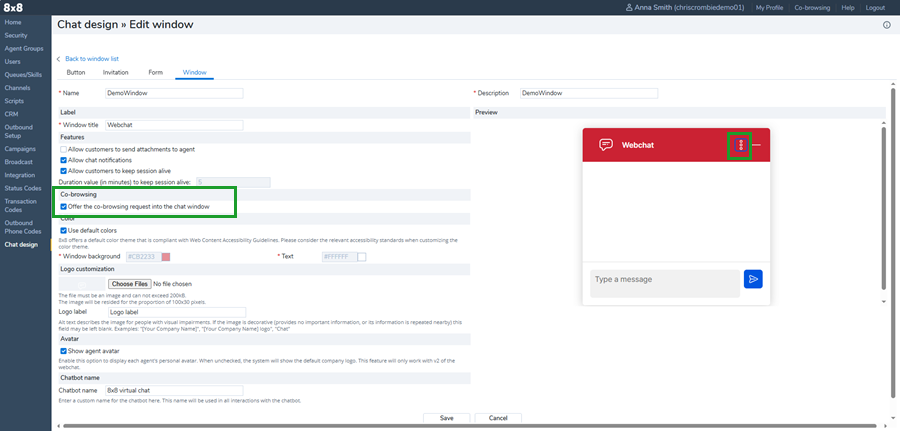
When you enable Co-browsing in an embedded chat window on a website, the Co-browsing ![]() option shows up on the chat window menu. Agents can request aCo-browsing sessions via chat.
option shows up on the chat window menu. Agents can request aCo-browsing sessions via chat.
To enable Co-browsing via chat in 8x8 Configuration Manager:
- Log in to 8x8 Configuration Manager.
- Go to Chat Design.
- Open the Window tab.
- Open an existing chat window.

- Enable the Co-browsing check box to display the Co-browsing
 option in the agent's chat window menu.
 - Save your changes.