Create User Profiles
As an administrator, you can create user profiles one at a time or in bulk. To create an individual user profile:
- Click Accounts in the top navigation bar.
- Under the Accounts menu, click User Profiles.
- Click Create New User Profile.
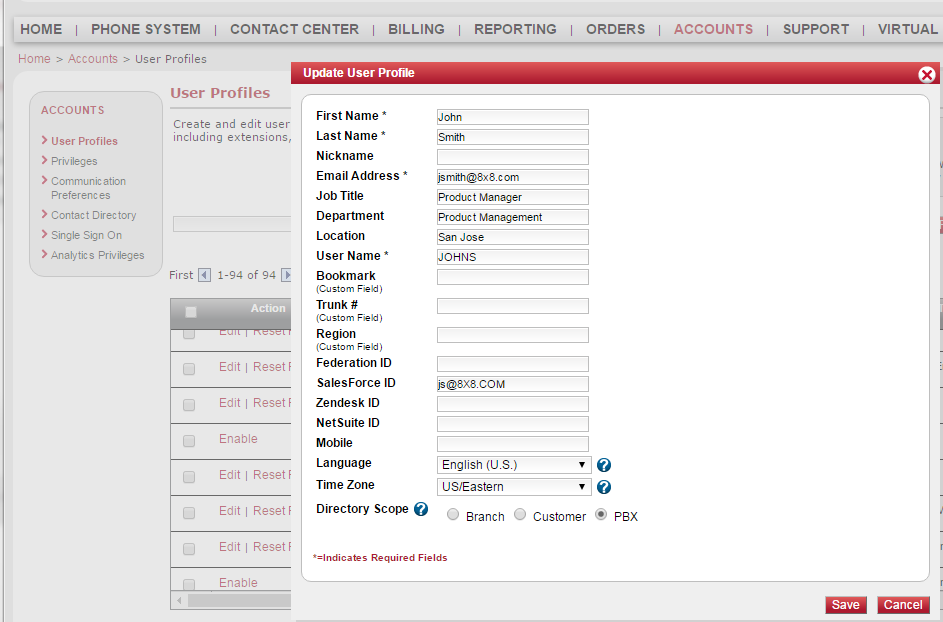
- Enter user information. The mandatory fields are First Name, Last Name, Email Address, and User Name (by default, the user name is the email address).

- Select a Language from the list. The user's email communications are sent in the selected language.
- Select a Directory Scope level from the following options:
- PBX: Allows access to all contacts within the PBX, including the branches.
- Customer: Allows access to all contacts within the account (this may include multiple PBXs and branches within the PBXs).
- Branch: Allows access to only the contacts assigned to that branch.
By default, all users in a PBX are allowed access at the PBX level. If required, you can change access per user.
Note: Directory Scope is only applicable to enterprise customers with multiple PBXs and branches.
- Click Save.
Note: For phone extensions that are not assigned to a specific individual, but instead located in a specific area like the front lobby, conference room, and so on, create a user profile for each area. For example, enter Front as a First Name and Lobby as the Last Name, and enter the email address of the person responsible for maintaining the extension settings (such as the primary system administrator).
Disable User Profiles
To disable a user profile, click Disable in the Action column. Disabling a user profile removes the profile from all extensions and features the user profile has been assigned to.
Note: You can re-enable a disabled user profile. However, you have to manually reassign the user profile to an extension or other feature. To maintain historical reporting, you are unable to delete a user profile completely from your system.
- Click
- Under the Accounts menu, click User Profiles.
- To hide available fields in the User Profile chart, click Edit Viewable/Hidden Fields.
- Clear the check boxes next to the fields to hide.

- Click Save.

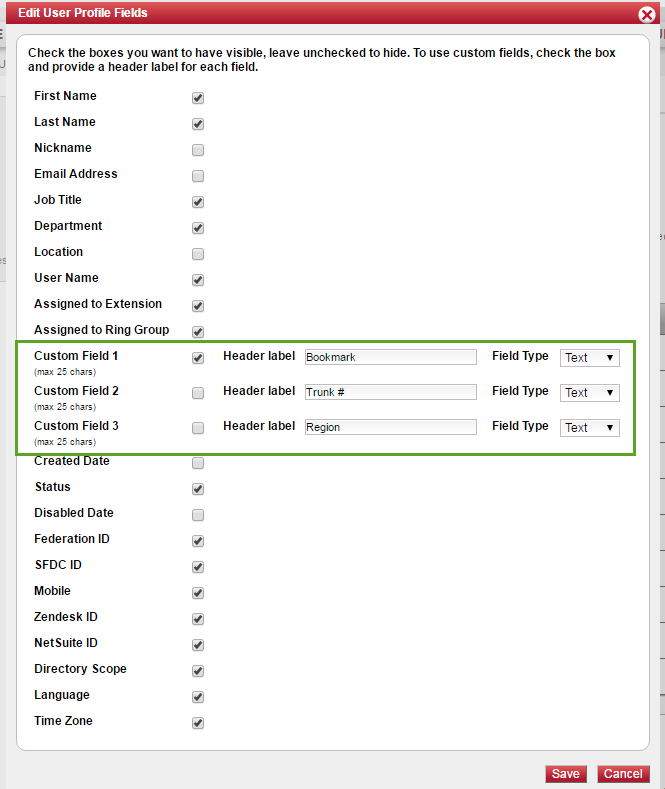
Phone system administrators can create up to three customizable fields.
- Go to Accounts > User Profiles.
- Click Edit Viewable/Hidden Fields.
- Select the check boxes next to the fields to display.
- Name the field by typing in the adjacent Header Label box.
- Click Save.