Manage Reporting
Using Account Manager, you can run and schedule call log reports that reflect activity on individual extensions, selected extensions, or all extensions.
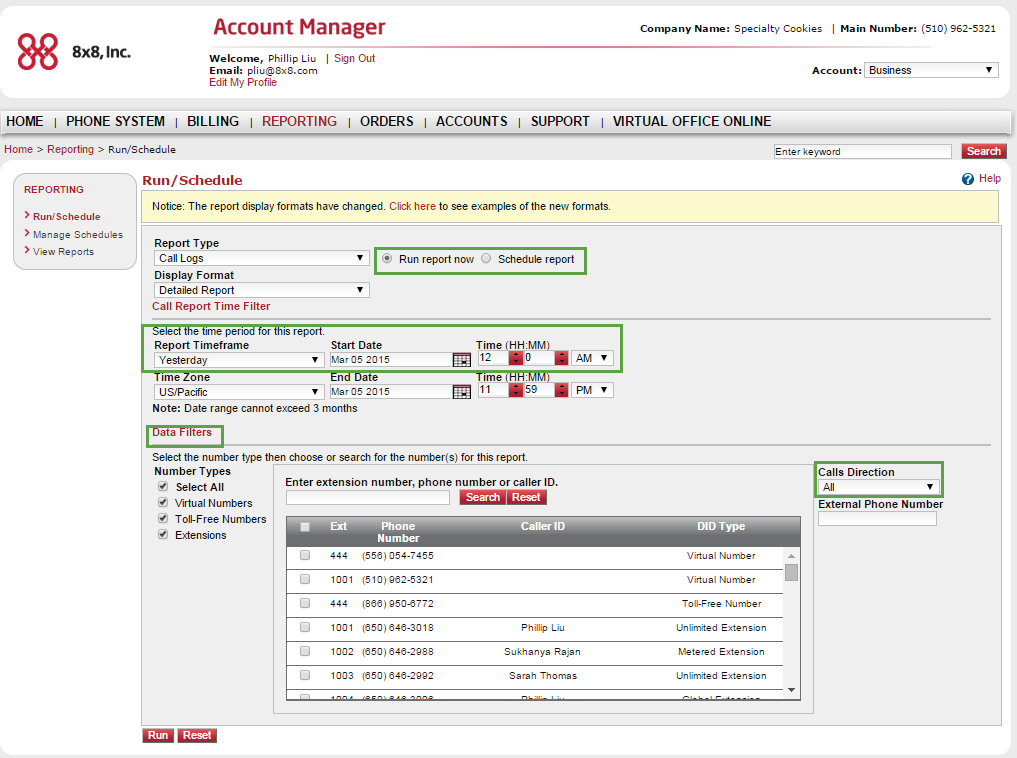
Run or Schedule a Report
- Click Reporting in the top navigation bar.
- Set the Report Type and Display Format to select the type and organization of the activity reflected in the report.
- Set the Report Timeframe. Data can be reported from the previous day, week, month, and more. You can also set a custom timeframe.

Note: The date range cannot exceed 3 months.
If you selected the Custom report timeframe, you can set:- Start Date
- End Date
- The Time for both dates
- If necessary, set the Time Zone.
- Select Data Filters:
- Choose Number Types to display in the extension box:
- Select All
- Extensions
- Virtual Numbers
- Toll-Free Numbers
- Select the extensions you want to include in the report.

- Select the Calls Direction to include in the report:
- All
- Inbound
- Outbound
- To track calls made to or from your contact center that involve a specific external number, enter an optional External Phone Number to include in the report.
- Choose Number Types to display in the extension box:
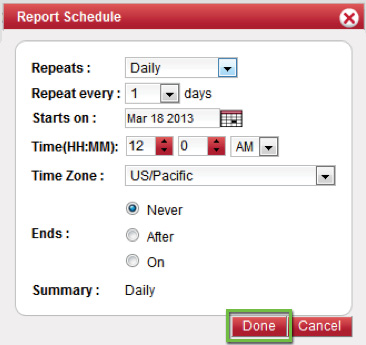
- If you want to schedule a report instead of running one immediately, select Schedule Report.
Under the Report Scheduling Settings section that appears:- Enter the Report Name.
- Set the Report Frequency.

- In the Report Schedule box that pops up, enter the necessary information. Reports can run at a future date, or on a daily, weekly, or monthly repeating schedule. Click Done when finished.

- Under Email Download Notifications To, select the system administrator you would like to send an email notification to once the report is ready.
Note: Email notifications can only be sent to system administrators. To create new administrators for the reporting, go to Accounts > Privileges. Make sure to grant Reporting privileges.
- To make the report available to all your phone system administrators with Reporting capabilities, select the Viewable by all admins check box.
- If you selected Run Report Now, click Run to finish.
OR
If you selected Schedule Report, click:- Save to save a report without running it.
- Save and Run Now to save a report and run it.


Manage Schedules
To edit scheduled reports, click Manage Schedules under the Reporting menu.
Find the report you want to manage, and choose from the following actions:
- Enable/Disable
- Edit
- Delete
- Run Now
View Reports
To view previously-generated reports, click View Reports under the Reporting menu.