Manage queues on desktop/web
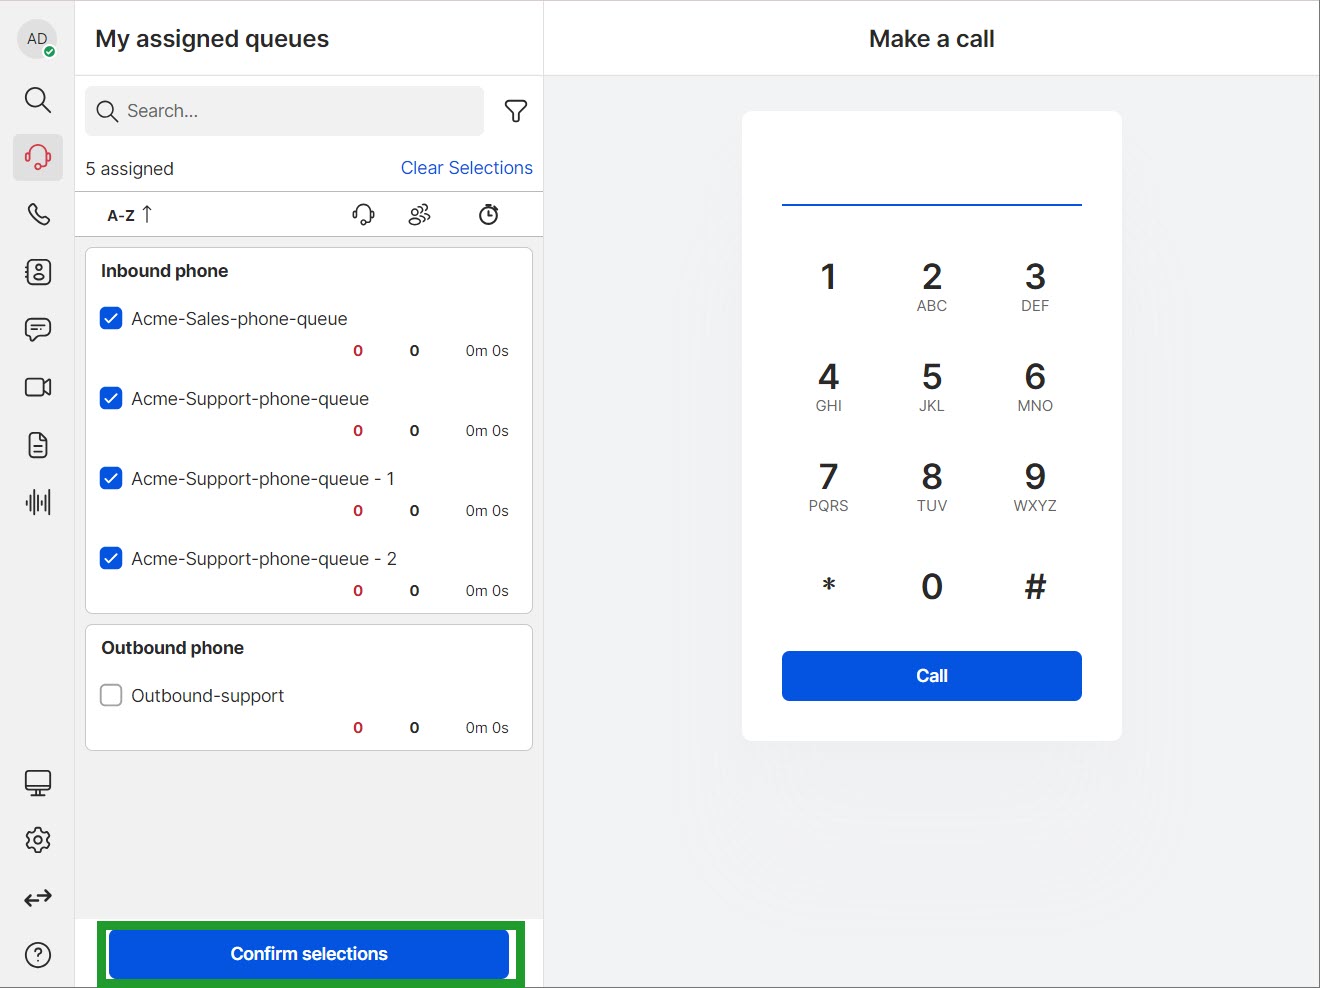
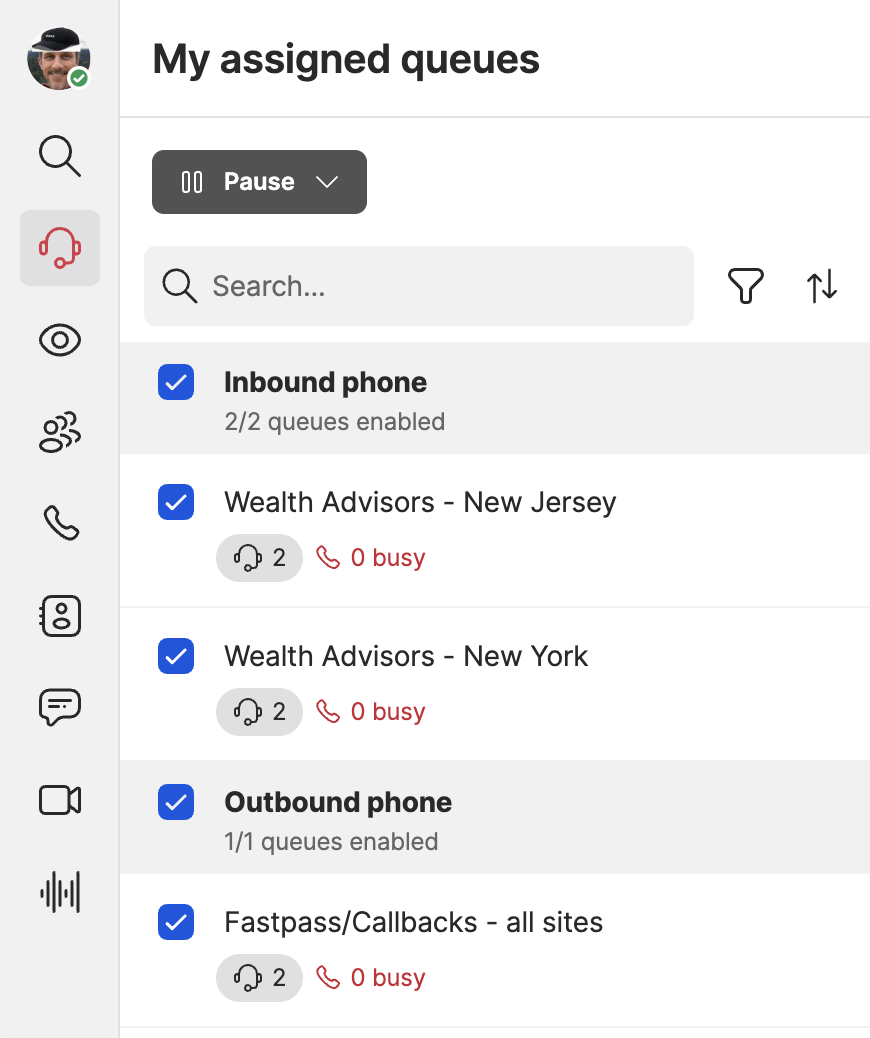
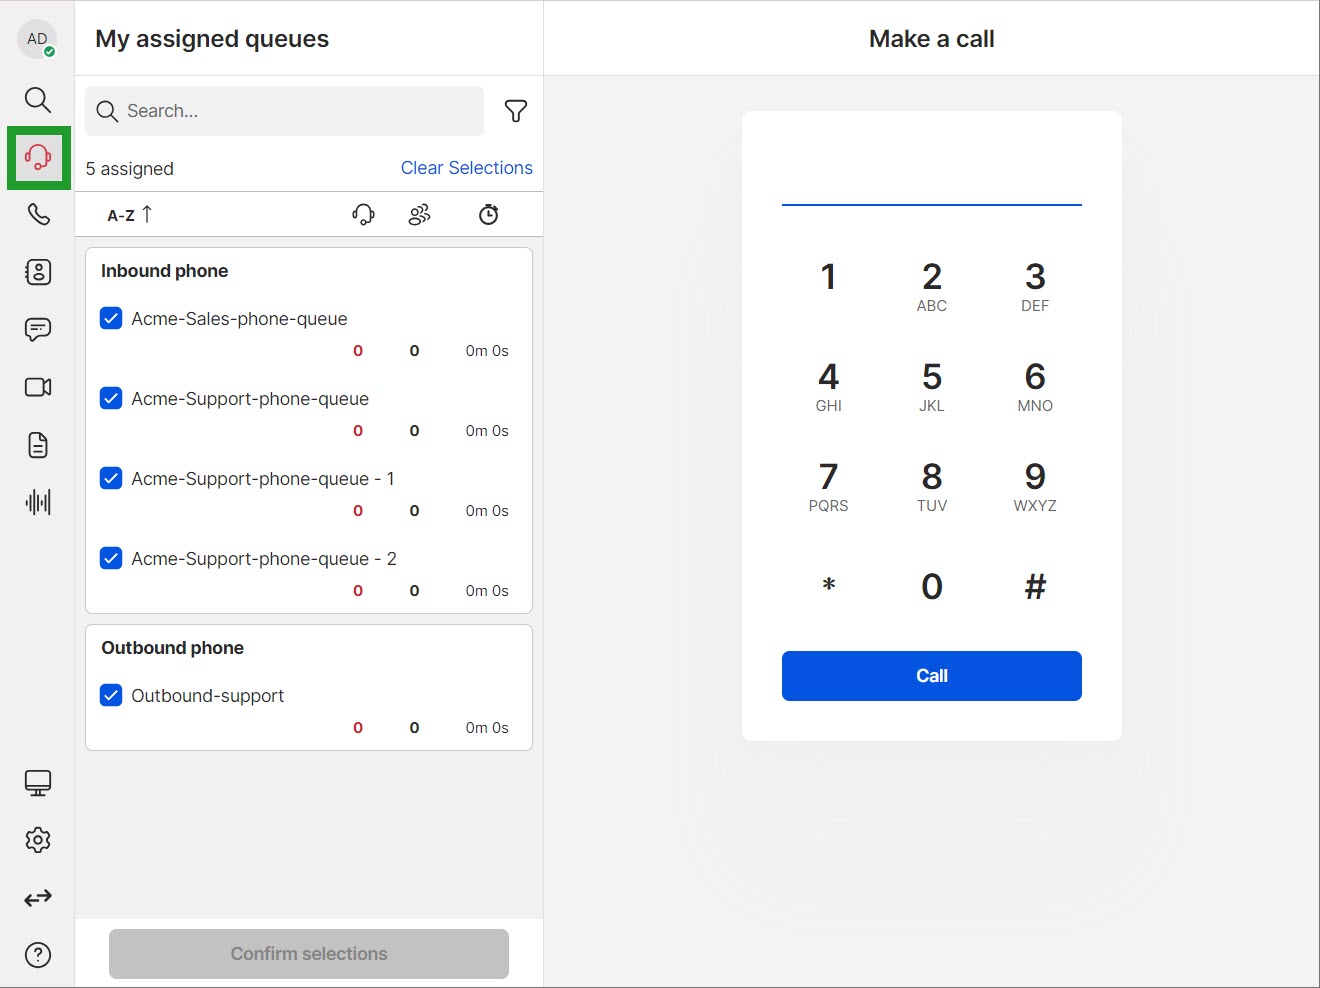
Your 8x8 Engage supervisor has assigned you to one or more queues. The customer calls get routed via these queues to you. As a member of the queue, both the queue status and your status determine if you can receive a queued call or not. For example, If you are on Do not disturb status, you will not be offered a queued call, or if you have disabled queues, similarly you won’t be offered calls from the disabled queues even if your user status is Available. My assigned queues ![]() lists the queues that are assigned to the 8x8 Engage users, grouped by media like inbound and outbound (for IVR callbacks).
lists the queues that are assigned to the 8x8 Engage users, grouped by media like inbound and outbound (for IVR callbacks).
To view queue details:
-
Log in to 8x8 Work for Desktop or 8x8 Work for Web.
-
From the navigation menu click My Assigned Queues
 .
. -
View the assigned queues, or search for the queues that are available to you.
-
Select the desired phone queues to assign them to yourself.
-
Click Confirm selections and continue to work.
Note: If there are no queues displayed, select Filter
 , then check the box to enable the desired media queue and its current status.
As an 8x8 Engage user, you can enable or disable queues in 8x8 Engage depending on the number of queued phone interactions with customers. For example, there are multiple calls waiting on the sales queue and this one is not enabled, you can enable it and start processing calls.
To enable or disable a queue:
- Log in to 8x8 Work for Desktop or 8x8 Work for Web.
- Click My assigned queues .
-
To disable a queue, clear the queue check box under My assigned queues and click Confirm selections. You will block interactions from the queue.
-
To enable the queue, place a checkmark in the queue’s checkbox under My assigned queues and click Confirm selections. You will receive interactions from the queue.

You can filter queues 8x8 Engage by queue status and media type. You can also search for queues assigned to you.
To filter queues:
- Log in to 8x8 Work for Desktop or 8x8 Work for Web.
- Click My assigned queues
 . The icon in the navigation menu changes to
  .
.
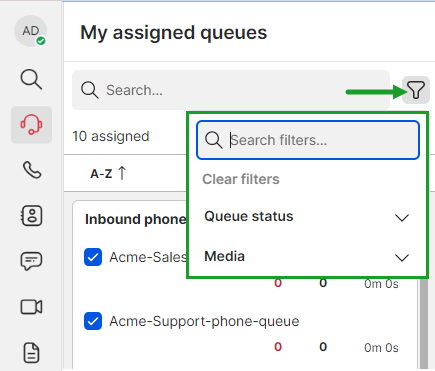
- Search for your desired queue or select
 to open the filters list.
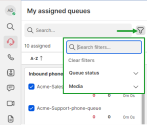
- From the filters list, you can search for a specific filter or select your desired queue status and/or media type.
- Selecting the Queue status
drop-down menu displays these filter options:
- Enabled: Selecting this option displays the queues that are enabled and assigned to you.
- Disabled: Selecting this option displays the queues that are disabled and assigned to you.
- Selecting the Media drop-down menu displays these filter options:
- Inbound phone: Selecting this option displays inbound phone queues assigned to you.
- Outbound phone: Selecting this option displays outbound phone queues assigned to you.
- Selecting the Queue status
drop-down menu displays these filter options:
-
After making your selection, click
 to close the filtering window.
Note: From the filtering window, click Clear filters to discard your filter selection.
-
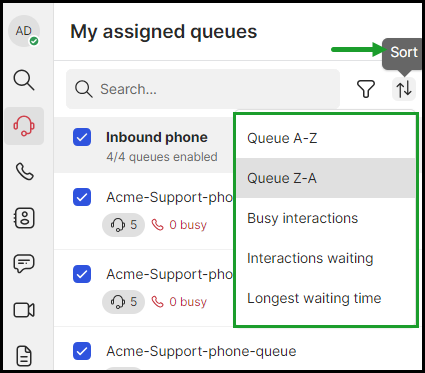
For an easier search, click Sort
 and choose the appropriate sorting criterion to order the queues alphabetically by busy interactions, interactions waiting, or by longest waiting time.

To receive customer phone calls from queues, you must be an 8x8 Engage assigned user of the queue, and you must be in one of the following statuses Available, Busy, Away, or Invisible. You are presented with the interactions that are awaiting service in the phone queue if you are allocated to one.
Notes:
- The channel number is not visible in the active call UI; however, for 8x8 Frontdesk users, the channel name is visible.
- The channel name and number are hidden in 8x8 Engage Mobile, Microsoft Teams, and Deskphones.
- To display both, save the channel as a company contact in 8x8 Admin Console > Contacts. If not saved, only the number will be shown.
To accept and process an inbound phone interaction:
-
If you are offline, select Available
 in the Profile Menu to change your status. If you are working offline, change your status by clicking Do not Disturb
  .
. -
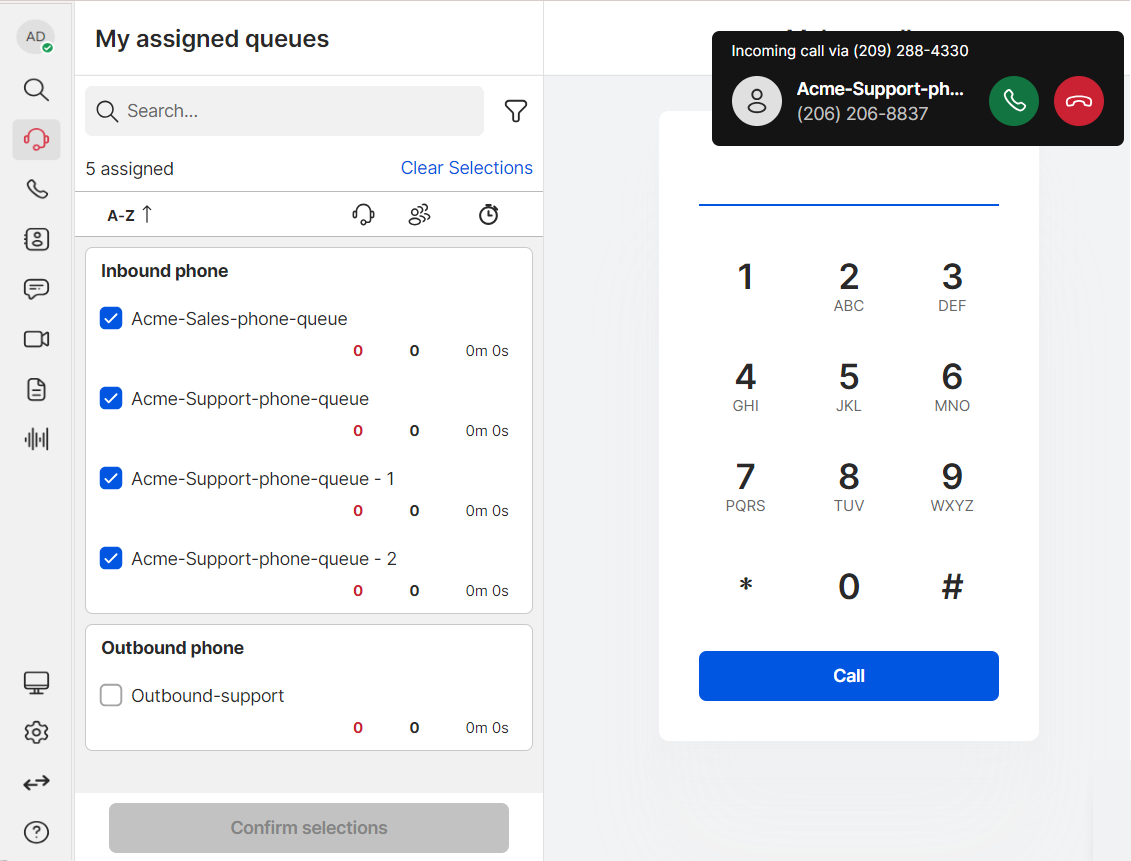
When you receive a call, a notification appears as a banner in the application (or pops up on-screen if enabled while the app is minimized), which displays the caller ID, the name of the call queue, the channel name and number, prompting you to accept or decline the call.


You can:
-
Accept the call and see the caller’s phone number and the name of the call queue.
-
Decline the call and this one goes back to the queue for the next available 8x8 Engage user.
Notes: If you reject or miss the call, this one goes back to the queue, and you are put back to Available status after 10 seconds.
While waiting in the queue, a callback option may be offered to the customer if configured by the admin.
Notes: Within 8x8 Work apps, you can select a different ringtone for your incoming calls by navigating to Notifications > Sound Theme > Modern. Click the Incoming advanced call queue calls drop-down menu to view a list of available ringtones.
Note: This feature is currently only available to Beta customers. To have this feature enabled, contact your 8x8 Account Representative.
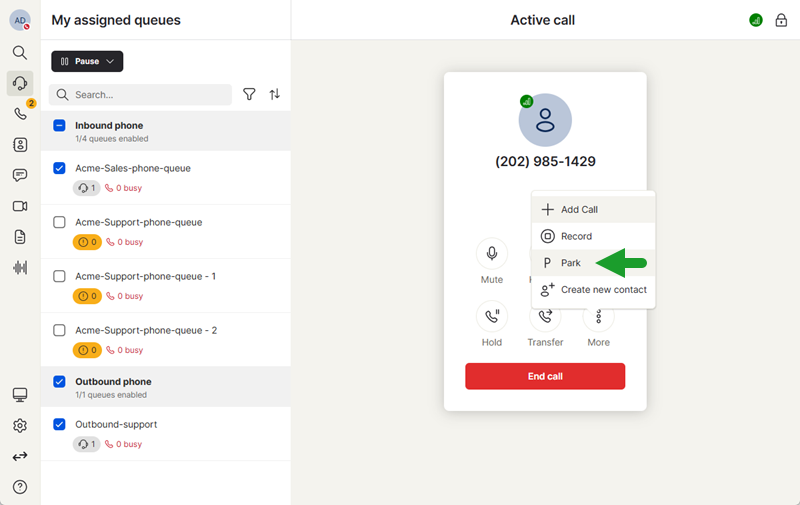
You can now park Contact Center queued calls in 8x8 Engage. This new feature provides more flexibility for users handling multiple calls, streamlining workflows in busy environments where calls need to be shared or deferred temporarily.
Let’s say Pat needs to quickly assist another incoming caller. Pat can now park their current call, handle the new one, and either return later or have a teammate pick up the parked call to continue the conversation without losing context.
Limitations
- Call parking can only be enabled for customers with a post-processing time above one minute.
- Parked calls data is not visible in 8x8 Analytics.
To park a call in 8x8 Engage:
- While on a call, click More
 to open a menu.
 - From the list of options, select Park.

- Confirm the prompt to disconnect the call and park it for later retrieval.
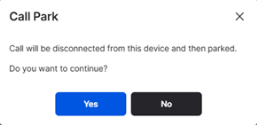
- An announcement plays specifying the extension number the call has been parked on before the call disconnects.

Note: Calls that are not retrieved from the queue before the recall timer is reached are automatically returned to the agent.
How to retrieve a parked call
To retrieve a parked call, call the announced call park extension.
Note: This feature is currently only available to Beta customers. To have this feature enabled, contact your 8x8 Account Representative.
We’ve re-enabled the park calls feature for receptionists using 8x8 Frontdesk in 8x8 Engage, making it easier to manage active calls. You can now accept a call, park it, and let either yourself or another user retrieve it later. While on an active call, click the Park ![]() icon to park the call and select the destination from the list.
icon to park the call and select the destination from the list.
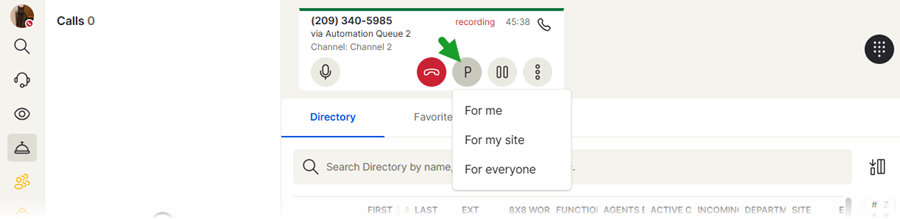
You can park calls as follows:
- For me: Only you can retrieve the parked call.
- For site: Allows only the users located at that site to retrieve the parked call.
- For everyone: Allows anyone in the company to retrieve the call.
Note: Calls that are not retrieved from the queue before the recall timer is reached are automatically returned to the agent. Parked calls that have bounced back display the ![]() icon in front of the customer’s name or number.
icon in front of the customer’s name or number.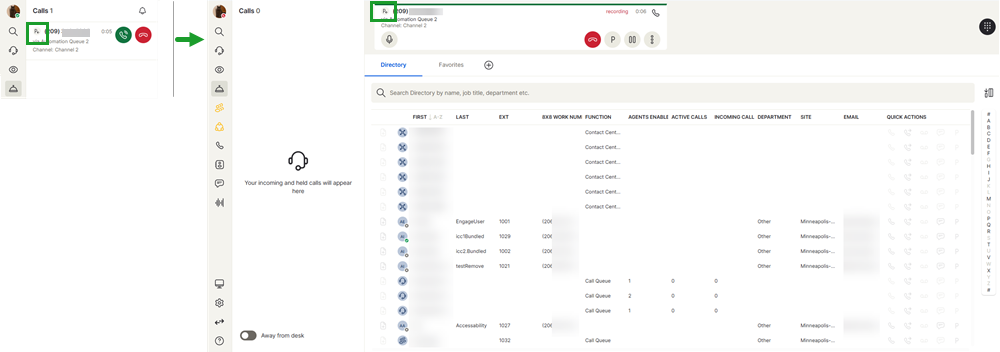
Limitations
- Call parking can only be enabled for customers with a post-processing time above one minute.
- Parked calls data is not visible in 8x8 Analytics.
For additional information on parking calls from 8x8 Frontdesk, see Park calls.
As an
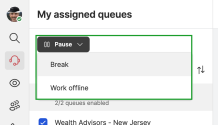
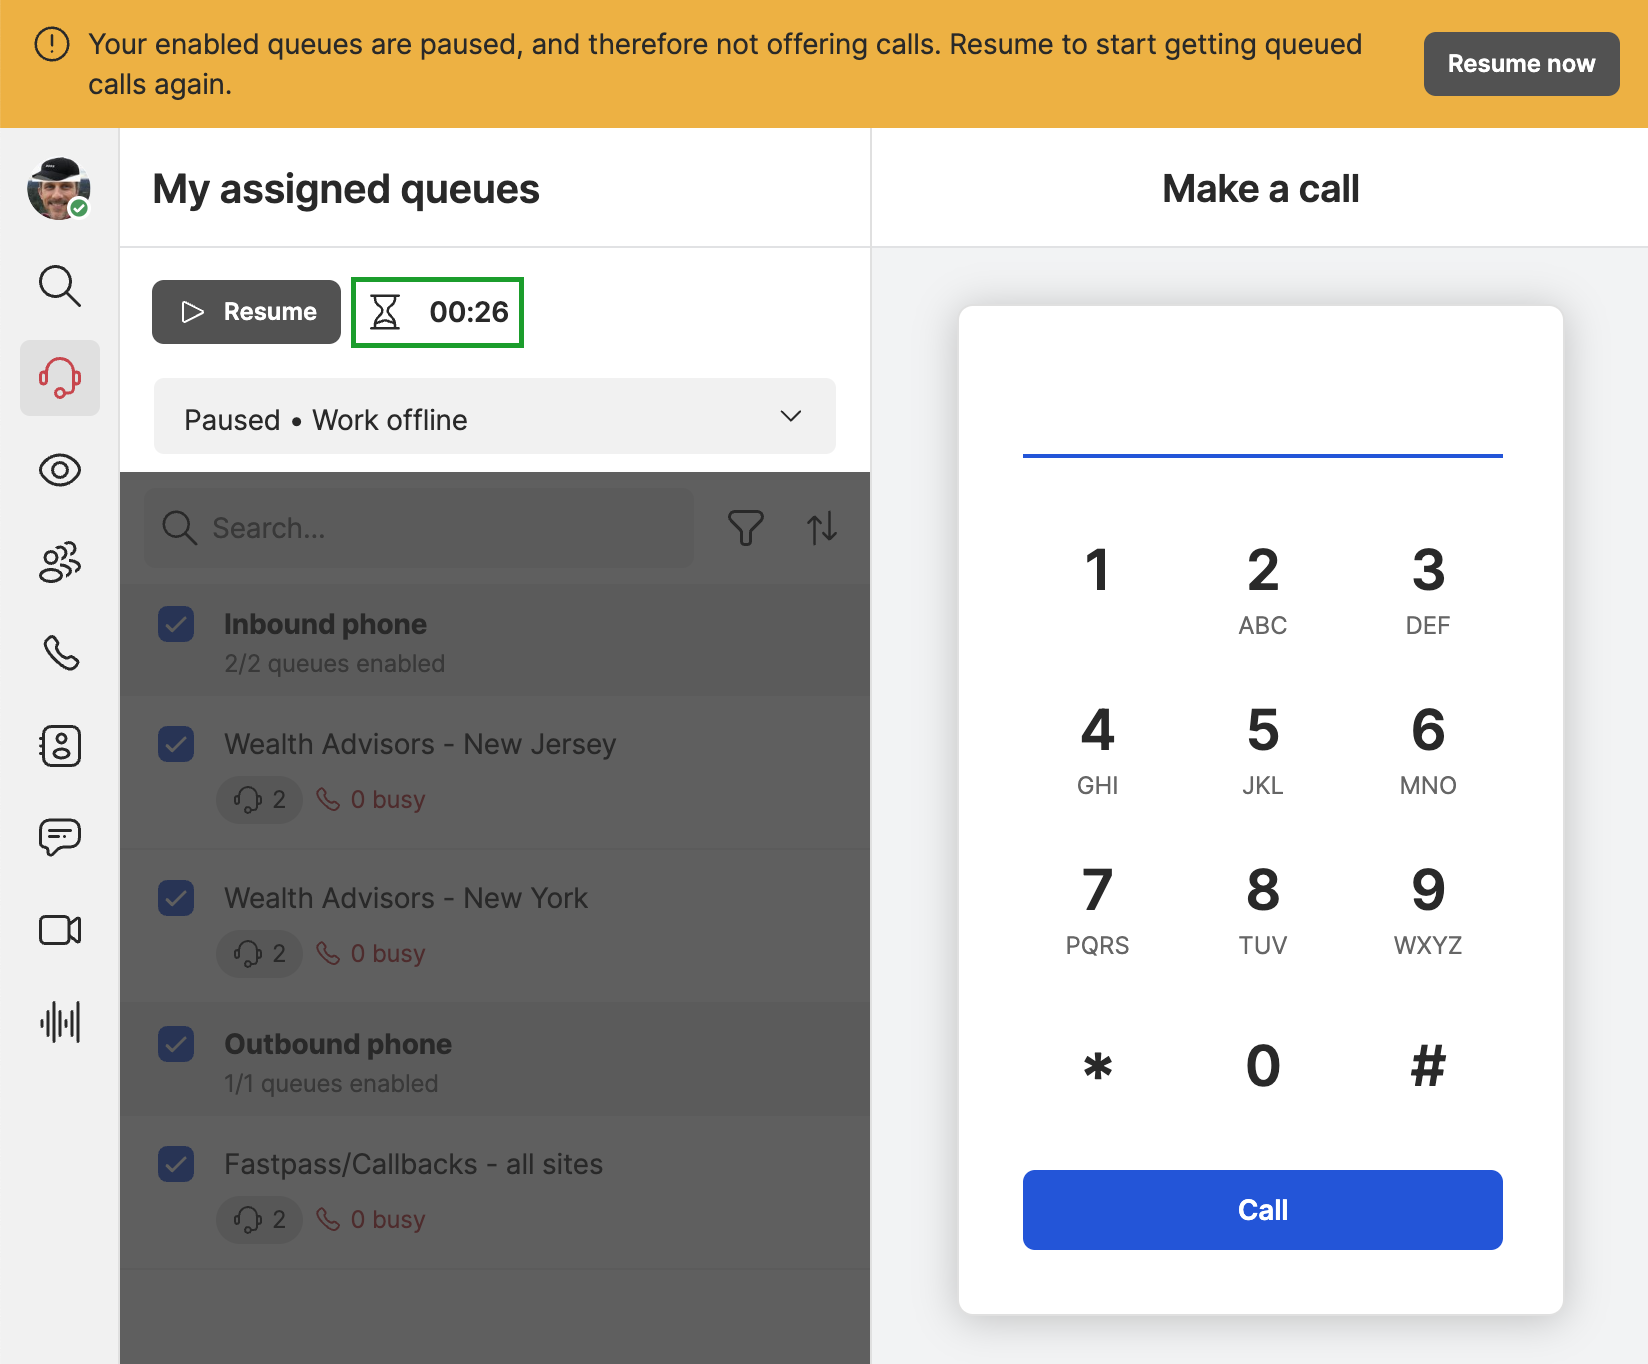
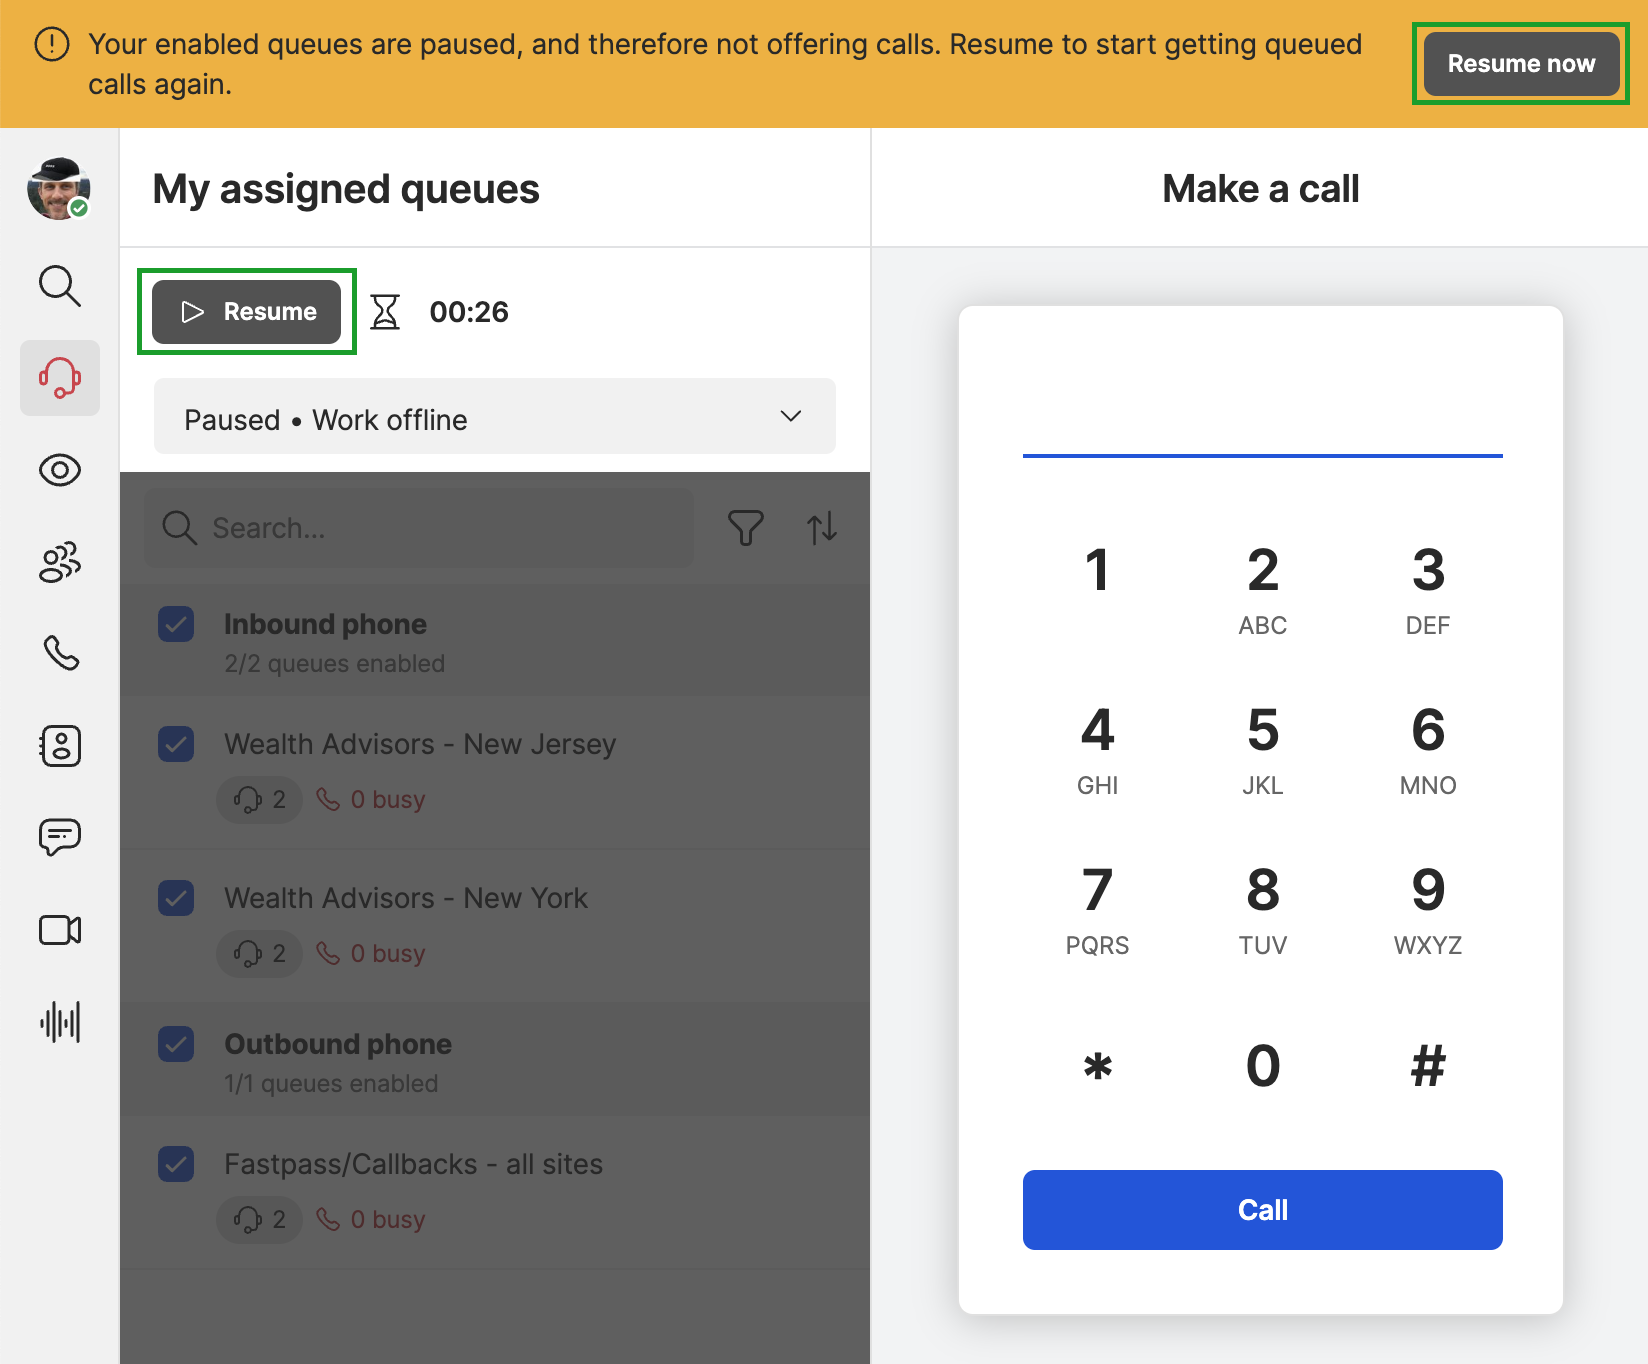
A banner notification appears at the top to let you know that your enabled queues are paused. When you're ready to receive new calls, just resume them.
Notes:
- Pause reasons are not available by default. Prior to the April 2025 release, you could select a reason for pausing queued calls. The ability to pause queued calls is not affected by this update.
To pause calls to your assigned queues:
- Log in to 8x8 Work for Desktop or 8x8 Work for Web.
- From the navigation menu, click My assigned queues
-
Select the phone queue(s) you would like to pause.

-
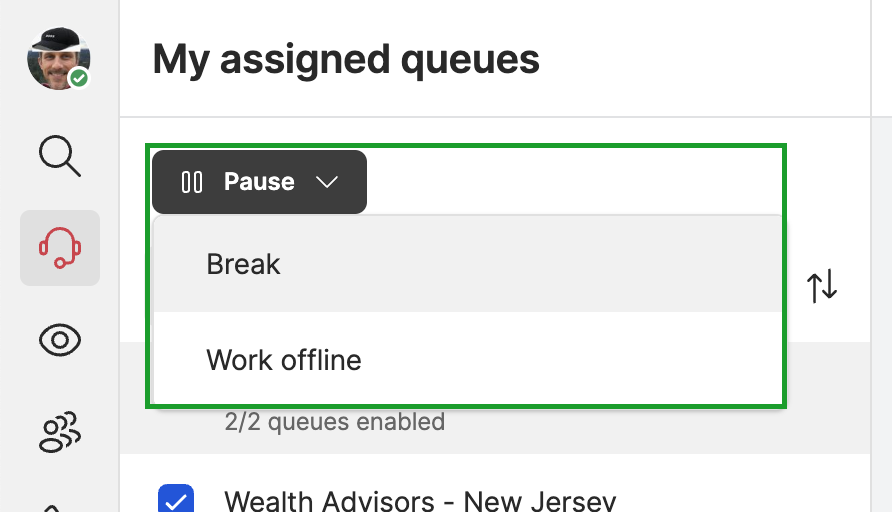
Click Pause. From the drop-down menu, select a reason to pause calls.
Note: As an 8x8 Engage user, you can change the reason for pausing interactions from a queue without having to first resume queue calls.
All inbound calls routed via the selected queues are paused, and a timer is displayed indicating the duration of the pause.
To resume calls to your assigned queues:
- Log in to 8x8 Work for Desktop or 8x8 Work for Web.
- From the navigation menu, click My assigned queues .
- Click Resume now or Resume to start getting calls again.
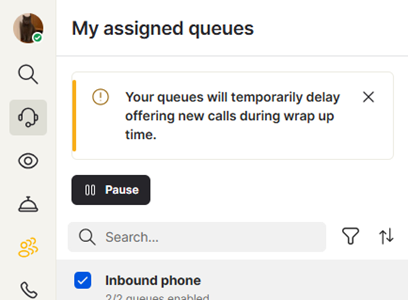
A notification banner is displayed when finishing, missing, or rejecting a call from My assigned queues![]() to inform you that there is a delay in receiving new calls. The banner serves as a real-time reminder so you can stay informed when these system delay conditions are applied. The delay time offered varies depending on the admin settings. By default, the delay is set at 10 seconds for rejected or missed calls.
to inform you that there is a delay in receiving new calls. The banner serves as a real-time reminder so you can stay informed when these system delay conditions are applied. The delay time offered varies depending on the admin settings. By default, the delay is set at 10 seconds for rejected or missed calls.
Let’s say you are wrapping up an important conversation when you receive a call. You reject the call to focus on adding important notes following your conversation. To ensure you can focus on your call, the system temporarily delays offering you a new call, and a notification banner displays on the screen.
8x8 Engage users with Conversational IQ (CIQ) enabled can now view interaction details for their recorded interactions. This feature allows you to access advanced interaction analytics by selecting a recording from the Call Recordings ![]() navigation menu or reviewing call logs from the Calls
navigation menu or reviewing call logs from the Calls ![]() menu.
menu.
Note: Without the CIQ add-on, no data is displayed in the interaction details.
Key capabilities include:
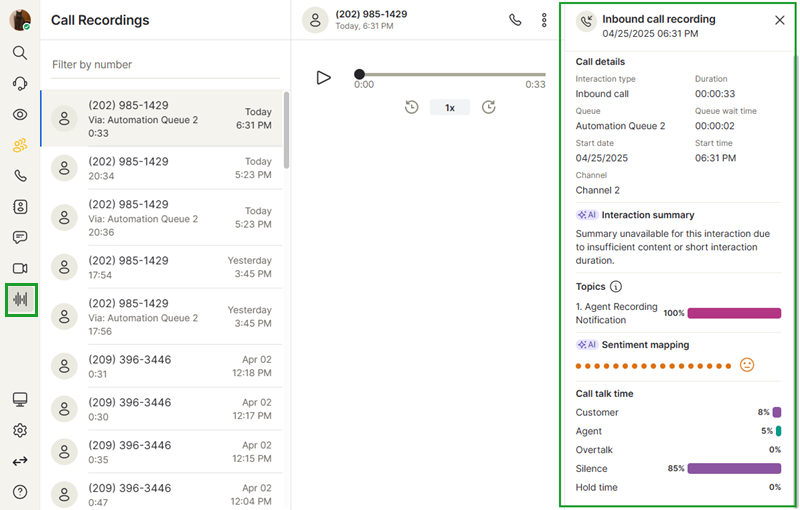
- Call details: Displays data such as interaction type, call duration, and the date and time of the interaction.
- Interaction summary (Beta): Displays an AI summary of the conversation. This feature is currently only available to Beta customers. To have this feature enabled, contact your 8x8 Account Manager.
- Topics: Displays the category of key discussion topics during interactions based on the topics created in 8x8 Contact Center Analytics.
- Sentiment mapping: Displays a visual representation of customer sentiment throughout the call based on AI analysis.
- Call talk time: Displays detailed metrics on agent and customer talk duration, and hold time.
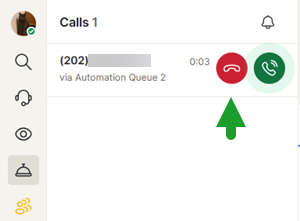
Receptionists using 8x8 Frontdesk ![]() in 8x8 Engage can now decline queued calls from the call card. This enhancement allows you to reject a queued call so the caller can be redirected to the next available receptionist and reduce the time spent waiting in the queue.
in 8x8 Engage can now decline queued calls from the call card. This enhancement allows you to reject a queued call so the caller can be redirected to the next available receptionist and reduce the time spent waiting in the queue.
The reject button is only available for customers using 8x8 Frontdesk ![]() with 8x8 Engage.
with 8x8 Engage.
Video Elevation is an integrated solution that allows 8x8 Engage users to establish a one-way video connection with customers in need of assistance. With this feature, you can switch from a phone interaction to a one-way video interaction with a few clicks. This new feature ensures you can get a clear visual of the customer’s problem by extending a video call invitation to gather all the information necessary for a quick call resolution.
Note: You do not need an SMS configured on your account to use the Video elevation service on
While on a queued call with a customer, click Video invite ![]() to send an SMS with a link to a video call. The customer can simply click the link received via SMS to establish the video connection, without having to install any software.
to send an SMS with a link to a video call. The customer can simply click the link received via SMS to establish the video connection, without having to install any software.
Only the 8x8 Engage user and the customer can view the live video feed shared with them. However, the customer does not see the 8x8 Engage during the video interaction.


Let’s say Pat is a support specialist at AcmeJets and receives a call from customer Blake about shutters that won't close. To clarify, Pat initiates a video call and sends Blake a link. Upon acceptance, Blake shows the shutters, and Pat sees a safety pin blocking them. After guiding Blake to remove the pin, the shutters function correctly, solving the issue without needing expert escalation or technician dispatch.
Features
- Share Video: As an 8x8 Engage user, you can view what your customers are experiencing by sharing their screens.
- Screenshot:As an 8x8 Engage user, you can capture the customer’s issue by clicking Take screenshot remotely
 . The customer can authorize you to take screenshots during the call, although customers you will not be notified when these are taken.
 - Camera View Control: As an 8x8 Engage user, you can ask the customer to change the camera view and recognize their face for identification by clicking Swap camera remotely
 . However, this requires the customer's approval before it can be enacted.
 - Location: As an 8x8 Engage user, you can request the customer’s location details by clicking Ask for location
 . In response, the customer is prompted to provide consent for their information.
 - Recording the video call: As an 8x8 Engage user, you can record the video call by clicking Start recording .
- As an 8x8 Engage user, place a call from the dial pad to an external number.
-
During the call, click Video invite
 to switch your call to a video meeting:
-
In the Video invitation via SMS window, enter the contact number for the video invitation and inform the contact that they will receive a link via SMS, which they should click to join. Once the customer clicks the link, the call upgrades to a one-way video meeting. Customers can easily connect via SMS, and no software installation is required
Important! When you enter the customer’s number, the country code is mandatory.

-
After establishing the video connection, you have the following options:.
- Click Take screenshot remotely to capture the customer’s issue. The customer can authorize the user to take screenshots during the call but will not be notified when they are taken.
- Click Swap camera remotely to change the camera view and recognize the customer's face. However, this requires the customer's approval before it can be enacted.
- Click Ask for location to request the customer’s location details. In response, the customer is prompted to give consent for their information.

Note: To view the list of previous video interactions, navigate to the Meetings menu and look for the desired meetings in the Past meetings panel.

- Click Take screenshot remotely


- After the 8x8 Engage user sends the video invitation, the customer will receive an SMS on their phone that contains the video invitation as a link..
-
Customers can easily establish a video connection by clicking the link in the SMS without installing any software.

-
The Video Elevation Meeting opens in the customer’s browser. Once customers click Allow, they can share the video with the 8x8 Engage user.

-
The customer can access the video meeting in a new browser window. They can allow the 8x8 Engage user to direct them on how to position the camera.

-
Throughout the call, the customer can allow the 8x8 Engage or 8x8 Engageusers to:
- Capture screenshots remotely to identify the customer’s problem. However, the customer will not receive alerts when these screenshots are taken.
- Change the camera view and identify the customer's face. However, this requires the customer's approval before it can be implemented.
- Request the customer’s location details.


-
What do I need to access a video invitation link?
- The customer needs a phone with internet access.
-
Are there any charges for customers receiving the SMS?
- There are no charges; however, if the customer is not on Wi-Fi, they may incur charges for using their mobile data.
-
Can I change the number to which I send the SMS?
- Yes, you can; however, be aware that if you are sending to a different country, there may be different SMS regulations, so you cannot guarantee delivery.
-
Does Video Elevation offer analytics reporting?
- No, Video Elevation does not currently provide analytics reporting.
While in a queued call, you can transfer the call to another extension or an external phone number. You can choose warm transfer or cold transfer. With warm transfer, you announce the call to the person you are transferring the call to. With a cold transfer, you send the call directly to the extension without announcing it.
8x8 Engage users can view the metrics for each available queue (available agents, busy status, and call waiting) during a call transfer to the queues.

To learn more about how to transfer a call in 8x8 Work for Desktop, see 8x8 Work for Desktop—Transfer calls.
To perform a warm transfer from the call screen:
Note: If you try to transfer while managing two calls, the Warm Transfer ![]() does not show up as a transfer option; you can only use cold transfer. The option to use warm transfer is available if you are managing one call.
does not show up as a transfer option; you can only use cold transfer. The option to use warm transfer is available if you are managing one call.
- While on a call, click Transfer to bring up your contact directory.
-
From the contact directory:
- For contacts with one phone number: Hover over the desired contact to transfer to, click Warm Transfer
 to put the original call on hold, and speak with the desired contact.
 - For contacts with multiple phone numbers: Click the desired contact to view their list of phone numbers. Hover over the desired number, click Warm Transfer to put the original call on hold, and speak with the desired contact.
- For contacts with one phone number: Hover over the desired contact to transfer to, click Warm Transfer
- Once the contact is notified, click Cold Transfer
 above the main call screen to transfer. You are disconnected from the call and the contact , and the call is transferred.
To perform a cold transfer from the call screen:
- While on a call, let the caller know you will put them on hold and click Transfer to bring up your contact directory.
- From the Contacts directory:
- For contacts with one phone number: Hover over the desired contact to transfer to, and click Cold Transfer to put the original call on hold and transfer.
- For contacts with multiple phone numbers: Click the desired contact to view their list of phone numbers. Hover over the desired number, and click Cold Transfer to put the original call on hold and transfer.
- For contacts with one phone number: Hover over the desired contact to transfer to, and click Cold Transfer
- The call is disconnected from you, and transferred.
To perform a cold transfer from your call log or contact list:
- While on a call, let the caller know you will put them on hold and click Hold to place the other party on hold.
- Open Contacts
 or My Assigned Queues to view contacts and phone numbers you can transfer the call to.
 - Hover over the contact or call log whose number you want to transfer the call to, and click Cold Transfer to transfer. The call is disconnected from you and transferred.